artwork by Stable Diffusion AI
Stable Diffusion Training for Personal Embedding
We previously described the Neural Style Transfer and Deep Dream, which were among the first popular application of the AI technology on artistic works 5 years ago, but quickly made way for a more powerful and capable model named Textual Inversion. Stable Diffusion is a free tool using textual inversion technique for creating artwork using AI. The tool provides users with access to a large library of art generated by an AI model that was trained the huge set of images from ImageNet and the LAION dataset. The resulting Diffusion Models are able to create stunningly realistic images in a variety of mediums, including digital paintings, photo-based art, comics, and even animations. The tool is incredibly easy to use and can create images in seconds. We can see in Lexica site many example prompts that generating beautiful artworks by Stable Diffusion.
[2024/10/05] We can listen to this article as a Podcast Discussion, which is generated by Google’s Experimental NotebookLM. The AI hosts are both funny and insightful.
images/stable-diffusion-training-for-embeddings/Podcast_Stable_Diffusion_Personal.mp3
After successfully training a personal embedding, Stable Diffusion’s AI creativity is nearly infinite. The algorithms that power Stable Diffusion are two neural networks that work in tandem. They are called an autoencoder and a generative adversarial network, which are a type of neural network that are designed to learn patterns in data. The architecture is fed billions of image and text prompts over thousands of computer hours to teach it how to process language and understand images. After training, it can associate certain words or phrases with certain visual elements. For example, it could learn when you type the word “forest”, it should generate an image containing trees and leaves.
The sample prompt to generate most of the following portraits is
"[realbenny-t2 | panda] happy front portrait as pixar, disney character
 illustration by artgerm, tooth wu, studio ghibli, sharp focus, artstation".
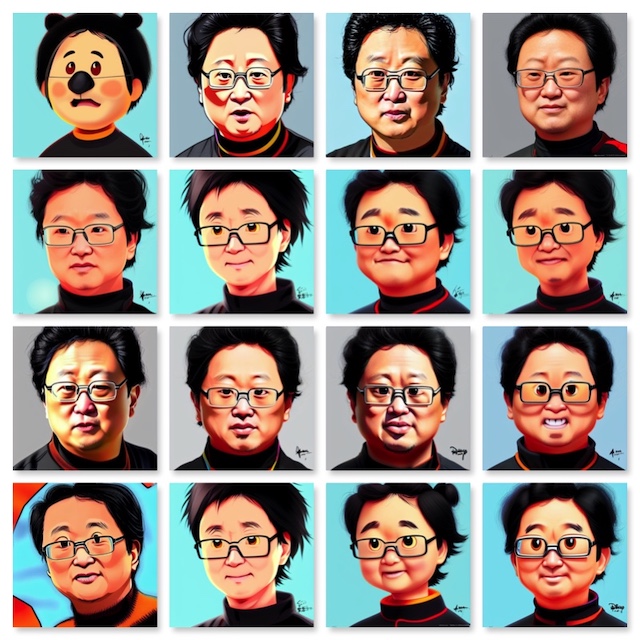
Figure. Examples of Stable Diffusion AI generated portraits using the trained personal embedding with the given input prompt. We have many controls in Stable Diffusion to instruct the direction of the AI creativity.
If you are interested in learning how to use Stable Diffusion to generate personal profile images from text prompts, after reading this article, you will be able to train a personal embeddings model for Stability Diffusion AI!
Installing Stable Diffusion
The official Stable Diffusion repository named AUTOMATIC1111 provides step by step instructions for installing on Linux, Windows, and Mac. We won’t go through those here, but we will leave some tips if you decide to install on a Mac with an M1 Pro chip. If you are not using M1 Pro, you can safely skip this section.
Installation on Mac M1 Pro
If Xcode is not fully installed. Run this to complete the install:
xcodebuild -runFirstLaunch
While the web UI runs fine, there are still certain issues when running this fork on Apple Silicon. All samplers seems to be working now except for “DPM fast” (which returns random noise), and DDIM and PLMS (both of which fail immediately with the following error: “AssertionError: Torch not compiled with CUDA enabled”).
Install HomeBrew
First, you need to install the required dependencies using Homebrew.
xcode-select --install

/usr/bin/ruby -e "$(curl -fsSL https://raw.githubusercontent.com/Homebrew/install/master/install)"
echo 'eval "$(/opt/homebrew/bin/brew shellenv)"' >> /Users/benny.cheung/.bash_profile
eval "$(/opt/homebrew/bin/brew shellenv)"
brew -v
Install Rosetta 2
The magic behind translating intel_64 bits code to arm64 automatically!
sudo softwareupdate --install-rosetta --agree-to-license
Install Stable Diffusion Requirements
The script can be downloaded from here, or follow the instructions below.
brew install cmake protobuf rust python git wget
The script can be downloaded from here, or follow the instructions below.
- Open Terminal.app
- Run the following commands:
$ cd ~/Documents/
$ curl https://raw.githubusercontent.com/dylancl/stable-diffusion-webui-mps/master/setup_mac.sh -o setup_mac.sh
$ chmod +x setup_mac.sh
$ ./setup_mac.sh
After installation, you’ll now find run_webui_mac.sh in the stable-diffusion-webui directory. Run this script to start the web UI using ./run_webui_mac.sh. This script automatically activates the conda environment, pulls the latest changes from the repository, and starts the web UI. On exit, the conda environment is deactivated.
The post brew installation notes:
After the installation, we don’t want PostgreSQL and Redis always start when Mac rebooted, do this to remove the service
brew services stop postgresql@14
brew services stop redis
How Stable Diffusion Works?
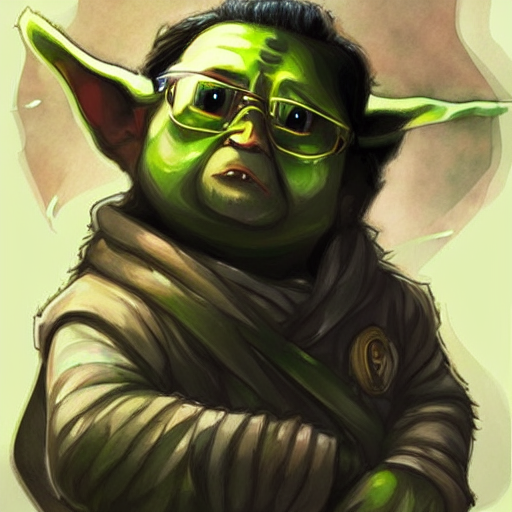
Stable Diffusion is a text to image generation model where you can enter a text prompt like,
half (realbenny-t1 | yoda) person, star war,
art by artgerm and greg rutkowski and alphonse mucha
Steps: 30, Sampler: LMS, CFG scale: 7, Seed: 3711471449, Size: 512x512, Model hash: 7460a6fa, Denoising strength: 0.75, Mask blur: 4
- combination of
realbenny-t1a self-trained embedding andyodafrom the default network, displayed as a person. - background and theme as in
star war - combination of art styles from
artgrem,greg rutkowskiandalphonse mucha
It output an image (512x512) as output like this, who looks like myself and yoda hybrid creature!
High-level view
There are three parts to the system:
- A language model that transforms the text prompt you enter into a representation that can be used by the diffusion model via cross-attention mechanisms. They use a “from the shelf” Bert tokenizer with a transformer for this part.
- The Diffusion Model is a time-conditional U-Net. It takes as input your text prompt representation and a source of Gaussian noise. It removes the noise from the representation, getting closer to your text prompt. This is repeated multiple times, and these changes are known as time steps.
- A Decoder which takes the output of the diffusion model and upsamples it to a full image. The diffusion model operates at 64x64, and the Decoder upscales this to a resolution of 512x512, with a goal of maintaining similar characteristics across the resulting image as seen in the 64x64 input.
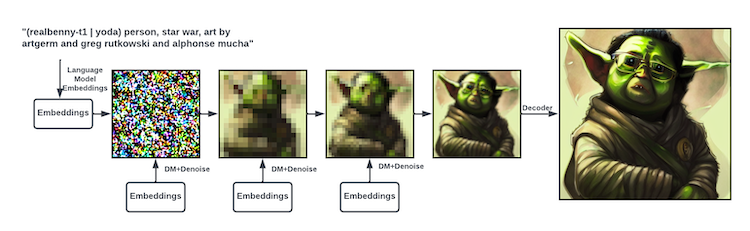
Figure. The language model creates an embedding of the text prompt. It’s fed into the diffusion model together with some random noise. The diffusion model denoises it towards the embedding. This is repeated several times. Then in the end the decoder scales the image up to a larger size.
See Marc Päpper’s post has a great explanation on the technical training concepts, which is not covered in this article.
From Noise to Realistic Image
All the parts of the Stable Diffusion architecture have been trained on a massive amount of images and text to create embedding that cover most of our human semantic space. When concepts are combined together in a new text prompt, the concepts get combined together into a new representation that covers the input concepts. The latent diffusion model is trained to uncover an image out of noise, but guided by the embedding from the autoencoder and text model, the image ends up being a combination of the concepts that were input in the prompt. The decoder then helps to scale up and create a high-resolution image from the image creation process.
The random images are created using “noise”. Noise is a type of data that doesn’t contain any useful information. The model uses a process called “diffusion” to generate the output images. In diffusion, data flows through several layers of noise, which are randomly generated images that contain no information. When the model is initially presented with a text prompt, it has no prior knowledge of what the target image should look like. As a result, it starts by randomly generating an image that contains no visual elements at all.
That means, when the initial image is just “noise”. The algorithm picks up some images that matched the prompt’s keywords. It is trying to fit the images into the “noise”. The algorithm starts by picking up on broad patterns in the input images. For example, it might learn that certain colors are more commonly associated with certain types of images. It then uses these broad patterns to create detailed images that have the appropriate colors. After generating a few images, the algorithm will start to pick up on more specific patterns, and it will continue to refine the images
The magic is that the Stable Diffusion architecture has learned overlapping visual concepts during its training. It is able to combine concepts like the “half man / half yoda,” and create a full image because it learned both individual pieces of that concept during training. The architecture was also able
- to use the specific concepts, like Star Wars or Yoda, by training on a large amount of images of those concepts
- to use a additional trained embedding from
realbenny-t1on top as a new concept
As the data flows through each layer, it picks up on more and more patterns from its surroundings, resulting in a more detailed image. As the models learns more and more patterns from its surroundings, it slowly starts to add in more details. This continues until it reaches the end of the diffusion process, at which point it is able to produce a hyper-realistic image that perfectly matches the user’s input.
When the model reaches the final layer, it can produce highly realistic images that match the text prompt. The process of creating an image from a text prompt is known as “textual inversion”. By combining all these images and concepts, it can create new images that are realistic, using the knowledge gained.
Before we get into the training process for a personal embedding model, let’s discuss the difference between an embedding and a hypernetwork.
Difference between Embedding and Hypernetwork
The Embedding layer in Stable Diffusion is responsible for encoding the inputs (for example, the text prompt and class labels) into low-dimensional vectors. These vectors help guide the diffusion model to produce images that match the user’s input. The Hypernetwork layer is a way for the system to learn and represent its own knowledge. It allows Stable Diffusion to create images based on its previous experience.
Embedding
- Embedding: The result of textual inversion. Textual inversion tries to find a specific prompt for the model, that creates images similar to your training data. Model stays unchanged, and you can only get things that the model already is capable of. So an embedding is basically just a “keyword” which will internally be expanded to a very precise prompt.
An embedding is when the features of the objects are mapped into a vector space. For instance, in a machine learning task, a training set might consist of vectors of features representing the objects it’s trying to learn about. The embedding technique then converts each object’s features into a vector of numbers. The vector can then be used as input to another machine learning algorithm like a neural network.
Hypernetwork
- Hypernetwork: An additional layer that will be processed, after an image has been rendered through the model. The Hypernetwork will skew all results from the model towards your training data, so actually “changing” the model with a small filesize of ~80mb per hypernetwork.
In Stable Diffusion, the hypernetwork is responsible for retaining memory of images the system has previously generated. This means that when the user provides a new input, the system can use its previous knowledge to create a more accurate image. Hypernetworks allow the system to learn faster and improve over time.
Advantages and Disadvantages
Advantage and disadvantage are basically the same: Every image containing something that describes your training data, will look like your training data. If you trained a specific cat, you will have a very hard time trying to get any other cat using the hypernetwork. It however seems to rely on keywords already known to the model.
For our use case is generating self portrait from text prompts. We found that training with personal embedding resulted in faster and better results when compared to hypernetworks. We noticed less errors from the AI when trying to generate realistic images, and our test subjects found that the resulting images were more desirable.
Training Embedding (Textual Inversion) Process
To ensure that your neural network gets trained properly, it is imperative to provide adequate amounts of images that represent you in a variety of looks, poses and backgrounds. If you only give the AI pictures of you making one pose or wearing one outfit it will only be able to generate images matching this input. Giving your AI a diverse set of images to learn from will ensure a more wide range of options and images.
According to Jame Cunliffe’s video, we learned that only 20 images are sufficient.
- 3 full body with different angle
- 5 half body with different angle
- 12 close-up with different angle and facial expressions
- I am a little paranoid - just give it a little more
The training process expects the images you provide are of dimension 512x512. If your images are of a different size, you can use Birme to adjust and resize the images so they match the proper requirements for the neural network to read.
BIRME ‘Resize any image to 512x512 for free; of course you can use Photoshop if you have the license.
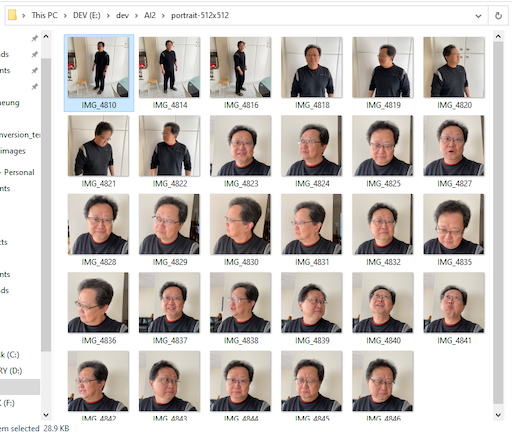
Figure. Just for demonstration of various personal portrait posts of a not so handsome faces.
We recommend to follow the style of Greg Rutkowski
- use the following prompt to prime the hypernetwork training process, to following the style variations
A portrait of a man, trending on artstation, greg rutkowski, 4k
Subsequently, we are using the txt2img’s prompt to take a sample during training. That’s why we are entering a prompt here first, just in case we forget.
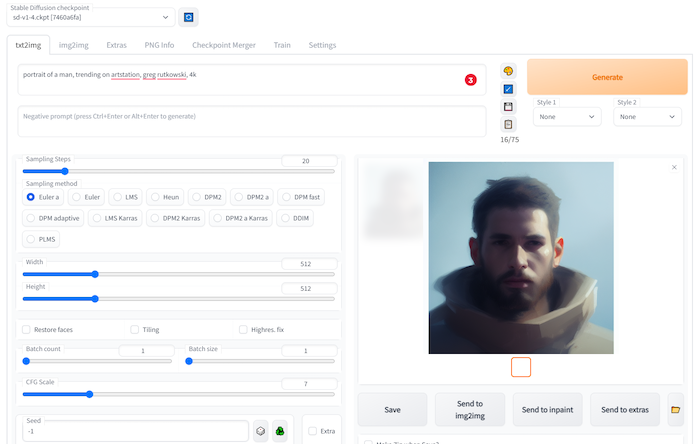
Figure. Enter a test prompt in txt2img page; subsequently, it will be used for training sample results. You can use the training sample to monitor the training progress.
Stable Diffusion Train Embedding
We found that training with embedding is easier than training with a hypernetwork for generating self-portraits. Our training yielded good results which we are satisfied with.
Important Notes on Hardware Requirements
It is important to note that you will require a GPU with at least 8GB of VRAM in order to train a personal embedding model. This is a hardware requirement that is essential for generating quality images, and the lack of a sufficient GPU could result in poor image quality or low performance.
If you don’t have a video card that is compatible, you should consider using cloud infrastructure for training. You can create your own embedding model using Runpod.Io, Google Colab, or another platform that provides cloud access to GPU-enabled hardware required for training.
Step 1 - Create a new Embedding
- Give it a name - this name is also what you will use in your prompts, e.g.
realbenny-t1for 1 token andrealbenny-t2for 2 tokens embeddings. The name must be unique enough so that the textual inversion process will not confuse your personal embedding with something else. - Set some initialization - I like to use “face” or “person” as it gives me a decent variety of results and is simple to remember when writing prompts.
- Set the number of vectors per token (recommend using 1 or 2, as it to be well balanced between edibility and accuracy for faces but it is ultimately up to your preferences).
- More vectors tends to need more images so be prepared to generate more with this many vectors
Step 2 - Process Images
This step basically makes images 512x512 and can rename them
- select a source directory of images (e.g.
/home/data/my_images) - select a destination of images (e.g.
/home/data/my_images/preprocess) - optionally select flip and add caption (using BLIP to automatically generate caption for the image). When we are training a person face, flipping the face is not a good idea.
- click “Preprocess”
Step 3 - Train
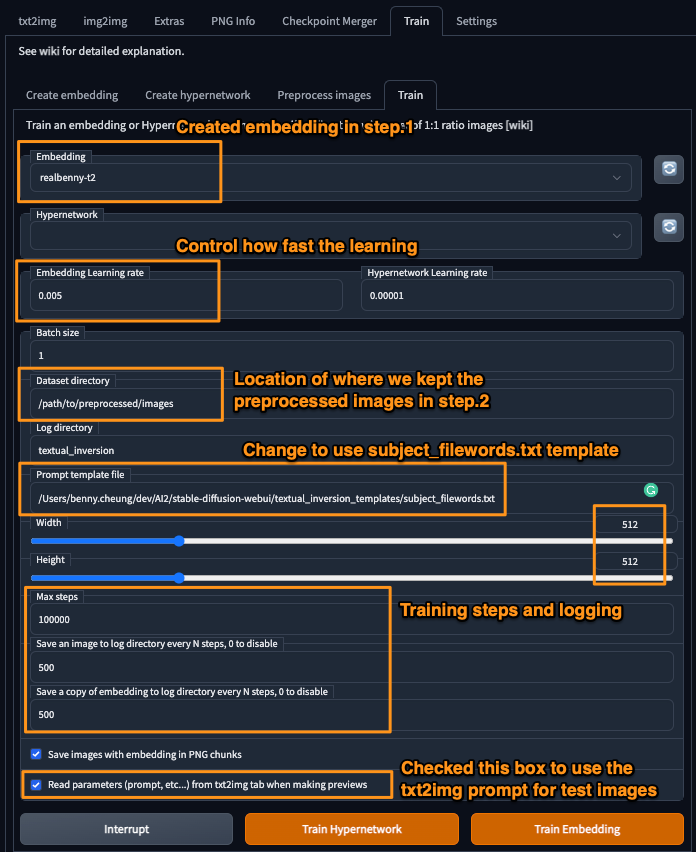
Figure. Showing a example screen of Stable Diffusion settings - training for embedding
- paste the destination directory from step 2. into the “Dataset directory” box (e.g.
/home/data/my_images/preprocess) - set the learning rate is very important, this will affect the neural network training
- higher = “faster” learning, but watch out for NaN! (parameters exploded)
- I’ve gone as low as 0.0005 and as high as 0.005
- with fewer vectors, a slightly higher learning rate may help. I used 0.005 with 1 vector and it seems OK.
- If not using a style, change prompt template file to
subject_filewords.txt- style.txt and subject.txt are the same, but don’t use the filename as (caption)
- I preferred to create a new template file, named
filewords.txt, which only contains the template of[name] [filewords].
- reduce the max steps - because 100000 takes many hours. Above 30000 steps make very little difference. Also, it doesn’t matter if the number of steps is too big, we can interrupt the training at any time.
- press “Train” - check your log directory for images & embeddings.
Step 4 - Put Embedding to Use
After the trained embedding is completed, we found the results in the textual_inversion/<date>/embeddings folder. We can review the sample images and find the one that is the best fit for the type of image that you want to generate. Once you find an embedding file that you are happy with, you will want to create a copy of it and put it in your embeddings model folder.
For example, we observed the best is textual_inversion/<date>/embeddings/realbenny-t2-30000.pt
- copy the best trained
.ptembedding file to the top-level folderembeddingsand rename it torealbenny-t2.pt - restart Stable Diffusion UI. You can see the embeddings are automatically loaded,
...
Loaded a total of 2 textual inversion embeddings.
Embeddings: realbenny-t2, realbenny-t1
...
- The embedding keyword
realbenny-t2is ready to put into use. In our case, we also trained an additional embeddingrealbenny-t1with 1 token so that we can use different embeddings for different generation parameters.
Bonus Notes: Prompt Attention/Emphasis
There is a recent addition to Stable Diffusion. We can use () in the prompt increases the model’s attention to enclosed words, and [] decreases it. You can combine multiple modifiers:
Cheat sheet:
a (word)- increase attention towordby a factor of 1.1a ((word))- increase attention towordby a factor of 1.21 (= 1.1 * 1.1)a [word]- decrease attention towordby a factor of 1.1a (word:1.5)- increase attention towordby a factor of 1.5a (word:0.25)- decrease attention towordby a factor of 4 (= 1 / 0.25)a \(word\)- use literal()characters in prompt
With (), a weight can be specified like this: (text:1.4). If the weight is not specified, it is assumed to be 1.1. Specifying weight only works with () not with [].
If you want to use any of the literal ()[] characters in the prompt, use the backslash to escape them: anime_\(character\).
Concluding Remarks
Hopefully, the information provided about Stable Diffusion in this article will give you enough insight into the architecture to create your own personal embedding model. In addition to its use for profile pictures, you may find other practical use cases for generating images based on text prompts!
Interested reader can continue studying the next article on Dreambooth Training for Personal Embedding, which will describe how to train a Stable Diffusion’s hypernetwork embedding.
This is just the beginning. Go forth, and train your embedding!
References
Formal Publications
- Robin Rombach, et. al., High-Resolution Image Synthesis with Latent Diffusion Models, arXiv:2112.10752v2 cs.CV, 13 Apr 2022
- Nataniel Ruiz, et. al., DreamBooth: Fine Tuning Text-to-Image Diffusion Models for Subject-Driven Generation, arXiv:2208.12242v1 cs.CV, 25 Aug 2022, Google Research
- Online DreamBooth Blog Post
Other Related Blog Post
- Thomas Capelle, Making My Kid a Jedi Master with Stable Diffusion and Dreambooth, Weights & Biases, Oct 2022.
- The latest Stable Diffusion release has the training on embedding. This is equivalent of Dreambooth. Basically, you pass a bunch of different images of someone (or something) to the model and it will learn to depict that person or thing. To make it easier for the model to understand this new “concept” you also give the model the class of this concept.
- Marc Päpper, How and why stable diffusion works for text to image generation, papper.com Blog, Aug 2022.
- This blog post explained the deeper technical details on how the Stable Diffusion image generation works.
Stable Diffusion
- Stable Diffusion 1.4 Features
- Stable Diffusion AUTOMATIC1111 repo
- How to Train Hypernetwork Guide
Video Tutorials
- James Cunliffe, Create Art From Your Face With AI For Free Part 2 - No Google Colab - No Code - Automatic1111 Guide, Youtube video, Oct 2022.
- In Part 1 of this series, I showed you how to create AI art using your own images and the Google Colab version of #dreambooth. This time around we’ll be using #stablediffusion with #automatic1111, while taking advantage of the #hypernetwork feature. As long as you have a GPU powerful enough, you can run this on your own computer for free. Follow the tutorial and use the links below to get yourself up and running!
- He got the full instruction on how to install stable diffusion on Windows
- Nerdy Rodent, Textual Inversion - Make Anything In Stable Diffusion, Youtube video, Oct 2022
- This video is a little bit long but it explains the latest Training with Embedding well. In addition, it use an illustrative example of how to define the number of tokens 1, 2, 4, 16, affecting the generated image edibility. Essentially, more token will generate more accurate image resembling the embedding image; less token will provide higher edibility for the generated image.
Supporting Tools
- Play with Lexica to see many example prompts that generating beautiful Stable Diffusion artworks.
- Use Birme to resize images collection
- The training process expects the images you provide are of dimension 512x512. If your images are of a different size, you can use this site to adjust and resize the images so they match the proper requirements for the neural network to read.