artwork by Style of Kandinsky transfer to Ralph McQuarrie "Robot Dream"
Deep Dream with Caffe on Windows 10
Deep Dream is an algorithm that makes an pattern detection algorithm over-interpret patterns. The Deep Dream algorithm is a modified neural network. Instead of identifying objects in an input image, it changes the image into the direction of its training data set, which produces impressive surrealistic, dream-like images. (read the original Google blog https://research.googleblog.com/2015/06/inceptionism-going-deeper-into-neural.html)
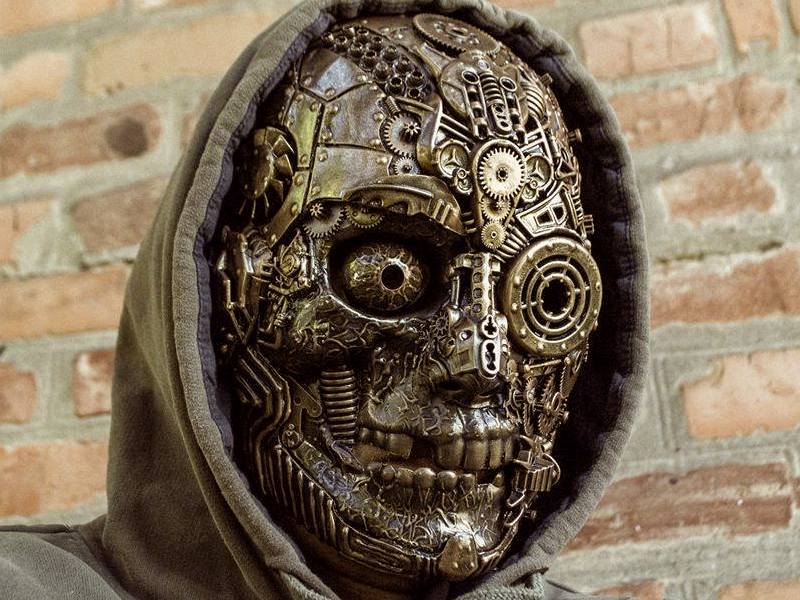
The result are beautiful hallucinations like the one below. The neural network amplified the perceived objects that it is being trained to recognized. I wondered if this is the same effects on our visual cortex subdued by some drugs?
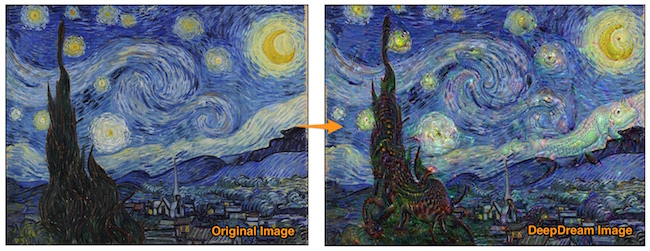
Figure. Vangogh’s “Starry Night” Deep Dream transformation
This article is a continuation of my previous blog on Deep Learning with GPU on Windows 10. You may want to read how to setup NVidia CUDA 8.0 to utilize your GPU for speeding up Deep Dream calcuations.
Caffe
http://caffe.berkeleyvision.org
Caffe is perhaps the first mainstream industry-grade deep learning toolkit, started in late 2013, due to its excellent convolutional neural network implementation (at the time). It is still the most popular toolkit within the computer vision community, with many extensions being actively added. Especially, there are many popular pre-trained neural network (aka. Caffe Model Zoo) can be easily downloaded and used.
The Deep Dream script is using Google’s award winning entry of ILSVRC 2014 GoogLeNet, a 22 layers deep network trained to regconize images. (explained in http://joelouismarino.github.io/blog_posts/blog_googlenet_keras.html) GoogLeNet achieved the classification of the ImageNet dataset (all sorts of animals, household objects, vehicles, etc.), 93.33% of the time the correct object class will be contained in the GoogLeNet ensemble’s top five predictions.
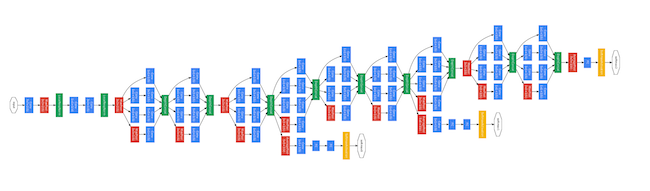
Figure. Showing the GoogLeNet CNN 22 layers deep network
The Caffe’s pre-trained model that we downloaded and used is the iteration 2,400,000 snapshot (60 epochs) using quick_solver.prototxt.
| name | caffemodel | caffemodel_url |
|---|---|---|
| BVLC GoogleNet Model | bvlc_googlenet.caffemodel | http://dl.caffe.berkeleyvision.org/bvlc_googlenet.caffemodel |
Further Caffe info can be found:
Prepare Python Virtual Environment
https://www.continuum.io/downloads
Note: this article assumes you are using bash shell on Windows.
The recommended bash shell comes from Git for Windows https://git-for-windows.github.io installation.
You can install either Anaconda Python 2.7 or Anaconda Python 3.5 on Windows 10. Later, we would create a virtual environment to isolate our Deep Dream tools installation. We shall refer to your Anaconda installation location as {path_to_anaconda_location} later.
Define Anaconda Virtual Environment
By experience, hacking on a new tools suite are usually messy and full of conflicts. Using an isolated Python virtual environment will protect you from headaches and disaster of installations.
In bash shell, enter the following where caffe (or your choice of name) is the name of the virtual environment, and python=2.7 is the Python version you wish to use.
conda create -n caffe python=2.7 anaconda
Press y to proceed. This will install the Python version and all the associated anaconda packaged libraries at {path_to_anaconda_location}/envs/caffe
Install Support Packages on Virtual Environment
Once the caffe virtual environment has been installed, activate the virtualenv by
source activate caffe
Continue to install all the shell script commands,
conda install boost
conda install mingw libpython
Then install Caffe’s dependencies
conda install --yes numpy scipy matplotlib scikit-image pip six
also you will need a Google’s protobuf python package that is compatible with pre-built dependencies. This package can be installed this way:
conda install --yes --channel willyd protobuf==3.1.0
Install Caffe on Windows 10
The lazy way to install Caffe on Windows 10 is downloading the prebuilt binaries from Caffe’s Windows branch on Github: https://github.com/BVLC/caffe/tree/windows
For my Windows 10 setup, I can choose either of these,
- Visual Studio 2015, CUDA 8.0, Python 3.5: Caffe Release (64 bits)
- Visual Studio 2015, CUDA 8.0, Python 2.7: Caffe Release (64 bits)
Since we have created the Anaconda Python 2.7 virtual environment to host our experiment, we choose to install Visual Studio 2015, CUDA 8.0, Python 2.7: Caffe Release package.
After completing the install, ensure to add the following into your Windows’s environment variable, {path_to_caffe} refers to Caffe’s installation.
PYTHONPATH={path_to_caffe}\caffe\python
Deep Dream Python Script
Install Deep Dream Script
You can clone the Deep Dream script from GitHub repository https://github.com/bennycheung/PyDeepDream
git clone https://github.com/bennycheung/PyDeepDream.git
([2017/08/02] make correction to the git repository path to PyDeepDream.git)
Then install of the Deep Dream script’s dependencies from requirements.txt list
cd PyDeepDream
conda install --yes --file requirements.txt
See the commandline options,
python deepdream.py --help
Install the GoogLeNet Caffe pre-trained model
cd PyDeepDream
mkdir bvlc_googlenet
cd bvlc_googlenet
download from http://dl.caffe.berkeleyvision.org/bvlc_googlenet.caffemodel (~54 MB)
and save the model here at bvlc_googlenet/bvlc_googlenet.caffemodel. The deepdream.py assumes it can find the model there.
How to Use
Don’t forget to activate your prepared caffe virtual environment.
source activate caffe
Use -i to specify your input content image. It will deep dream at a random layer.
python deepdream.py -i {your_image}.jpg
If you want to start Deep Dream at a layer depth, type and octave manually:
python deepdream.py -d 1 -t 1 -o 6 -i Style_StarryNight.jpg
Running All Layers Experiment
We are using -d to define which layer that we shall perform the Deep Dream. The level number will be mapped to a GoogLeNet layer name.
# Level 1 - inception_3a_1x1
python deepdream.py -d 1 -t 1 -o 6 -i Style_StarryNight.jpg

# Level 2 - inception_3b_1x1
python deepdream.py -d 2 -t 1 -o 6 -i Style_StarryNight.jpg

# Level 3 - inception_4a_1x1
python deepdream.py -d 3 -t 1 -o 6 -i Style_StarryNight.jpg

# Level 5 - inception_4c_1x1
python deepdream.py -d 5 -t 1 -o 6 -i Style_StarryNight.jpg

# Level 7 - inception_4e_1x1
python deepdream.py -d 7 -t 1 -o 6 -i Style_StarryNight.jpg

# Level 9 - inception_5b_1x1
python deepdream.py -d 9 -t 1 -o 6 -i Style_StarryNight.jpg
The output dream images are stored with the original photo and tagged with a inception layer name. For example, Style_StarryNight.jpg with -d 1 will produce the Deep Dream result Style_StrarryNight_inception_3a_1x1_dream.jpg.
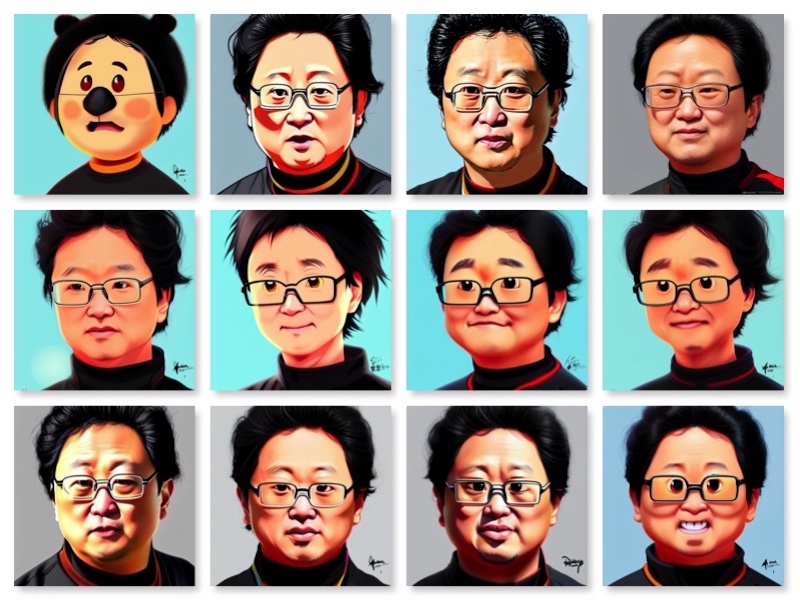
Here are the images of the Deep Dreaming,
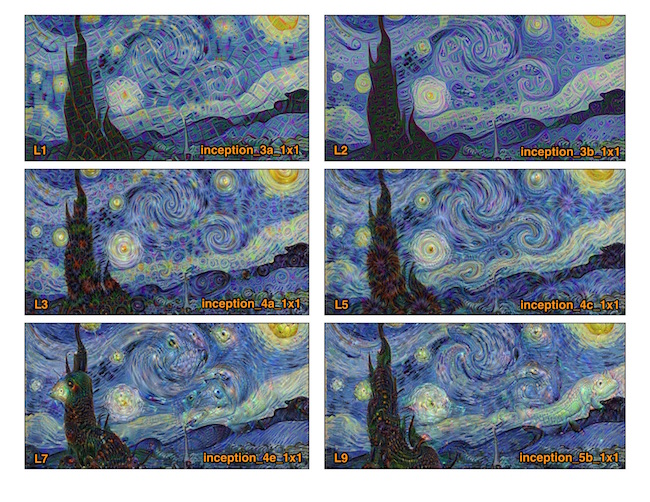
Figure. Deep Dream results from the inception into different levels of the neural network. Lower levels amplify the NN patterns. Higher levels amplify the NN objects
Deep Dream on the Raspberry Pi 3
Deep Dream can actually be run on the Raspberry Pi 3 and Raspbian Jessie; find out how from this excellent tutorial:
http://www.knight-of-pi.org/deepdream-on-the-raspberry-pi-3-with-raspbian-jessie/
Notes: Running on Raspberry Pi 3 is not fast (as expected due to a weaker CPU and no GPU acceleration). Each snapshot will take 5 to 20 minutes. Also due to the memory limitation, it can not Deep Dream beyond layer level 6 (i.e. inception_4d_1x1 is the limit).