artwork by Vincent van Gogh "Starry Night"
Deep Learning with GPU on Windows 10
You just got your latest NVidia GPU on your Windows 10 machine. Other than playing the latest games with ultra-high settings to enjoy your new investment, we should pause to realize that we are actually having a supercomputer able to do some serious computation. A Deep Learning algorithm is one of the hungry beast which can eat up those GPU computing power.
Unfortunately, the Deep Learning tools are usually friendly to Unix-like environment. When you are trying to start consolidating your tools chain on Windows, you will encounter many difficulties. I spent days to settle with a Deep Learning tools chain that can run successfully on Windows 10. Here is the summary of my selection and installation procedure. If you have the endurance to complete, towards the end of this article, you can run neural style transfer to create “deep” and impressive image (The original paper “A Neural Algorithm of Artistic Style” can be found at https://arxiv.org/abs/1508.06576)
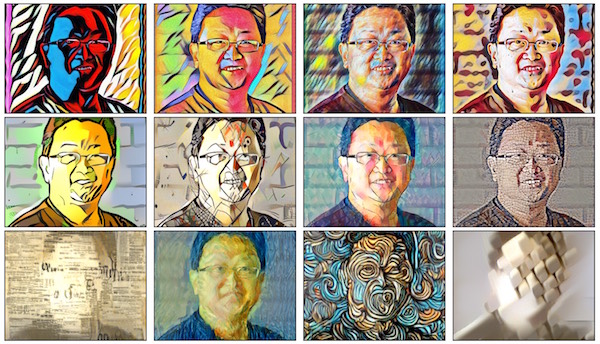
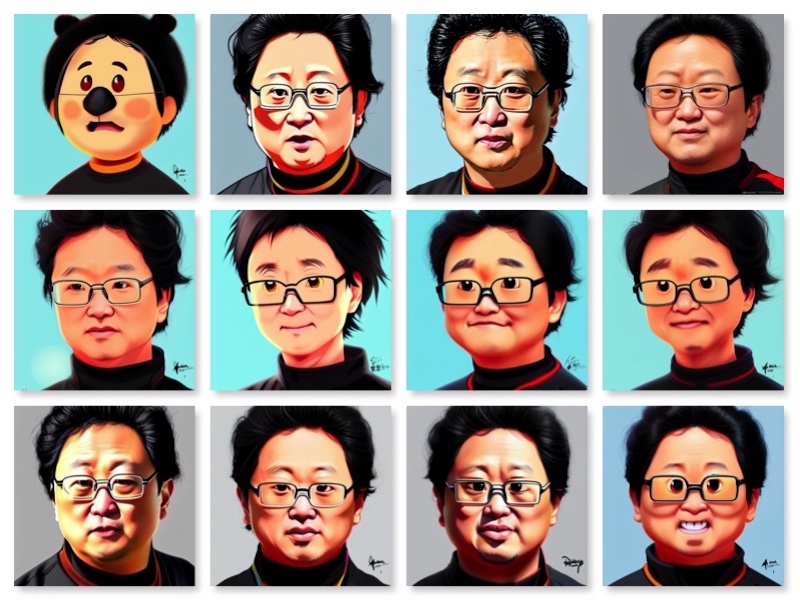
Figure. Grid of sample results after running neural style transfer algorithm on a self-portrait
Just a quick overview, the pre-requisite dependencies that we shall install,
- Scipy + PIL (install via Anaconda Python)
- Numpy (install via Anaconda Python)
- CUDA (GPU) (install via NVidia package)
- CUDNN (GPU) (optional, install via NVidia package)
- PyCUDA (install via prebuilt binaries)
- Theano (install via pip)
- Keras (install via pip)
Install Theano under Anaconda Python (Windows 10)
http://deeplearning.net/software/theano/
Theano is one of the popular Deep Learning framework, which has a Python library that allows you to define, optimize, and evaluate mathematical expressions involving multi-dimensional arrays efficiently.
Note: this article assumes you are using bash shell on Windows.
The recommended bash shell comes from Git for Windows https://git-for-windows.github.io installation.
You will need git to checkout interesting projects, source codes in your “mind hacking” career.
So, this is the right time to hit yourselves with the right power tool.
Anaconda Python
https://www.continuum.io/downloads
Anaconda is an easy-to-install free package manager, environment manager, Python distribution, and collection of over 720 open source packages offering free community support.
You can install either Anaconda Python 2.7 or Anaconda Python 3.5 on Windows 10. Later, we would create a virtual environment to isolate our Deep Learning tools installation. We shall refer to your Anaconda installation location as {path_to_anaconda_location} later.
Define Anaconda Virtual Environment
By experience, hacking on a new tools suite are usually messy and full of conflicts. Using an isolated Python virtual environment will protect you from headaches and disaster of installations.
In bash shell, enter the following where theano (or your choice of name) is the name of the virtual environment, and python=2.7 is the Python version you wish to use.
conda create -n theano python=2.7 anaconda
Press y to proceed. This will install the Python version and all the associated anaconda packaged libraries at {path_to_anaconda_location}/envs/theano
Install Theano on Virtual Environment
Once the theano virtual environment has been installed, activate the virtualenv by
source activate theano
Continue to install all the shell script commands,
conda install boost
conda install mingw libpython
Then, install theano
pip install theano
Add the following lines to $HOME/.theanorc file
[global]
floatX = float32
device = gpu

[nvcc]
flags=-L{path_to_anaconda_location}\envs\theano\libs
compiler_bindir=C:\Program Files (x86)\Microsoft Visual Studio 12.0\VC\bin
Since I have created the virtual environment for Theano, you can see that flags is pointing to that virtual environment libs.
I read that we have to use VS 12.0 in order to compile CUDA. The setting seems to be working with my CUDA 8.0 and Visual Studio 2015 community installation, and I did not bother to investigate if it works for the other Visual Studio versions.
Install PyCUDA
CUDA is a parallel computing platform and programming model invented by NVidia. It enables dramatic increases in computing performance by harnessing the power of the graphics processing unit (GPU). You will need to download and install CUDA development toolkit from NVidia https://developer.nvidia.com/cuda-downloads.
PyCUDA is the Python wrapper of the CUDA API to allow writing CUDA code in Python. In our case, the painless way to install PyCUDA is using the prebuilt Windows 10 binaries. Follow this link to download:
For my version of CUDA 8.0, Python 2.7 for Windows 10 64 bits, the package will be:
pycuda‑2016.1.2+cuda8044‑cp27‑cp27m‑win_amd64.whl
Then, using pip to install this package
pip install pycuda‑2016.1.2+cuda8044‑cp27‑cp27m‑win_amd64.whl
Testing Install
Fire up Python with interactive shell -i.
python -i

>>> import theano
Using gpu device 0: GeForce GTX 1070 (CNMeM is disabled, cuDNN not available)
>>>
If all GPU CUDA libraries are all cooperating with Theano, you should see your GPU device is reported.
Install Keras
Keras is a high-level neural networks library, written in Python and capable of running on top of either TensorFlow or Theano. It was developed with a focus on enabling fast experimentation. This will make your Deep Learning programming even faster.
Install keras by pip,
pip install keras
After installing keras, we can change the keras backend to use theano.
Go to ~/.keras/keras.json
Simply change the field backend to either theano or tensorflow, and Keras will use the new configuration next time you run any Keras code.
In my case, I want theano as my backend.
{
    "image_dim_ordering": "th",
    "epsilon": 1e-07,
    "floatx": "float32",
    "backend": "theano"
}
Running Neural-Style-Transfer Windows
https://github.com/bennycheung/PyDeepStyle
Up to this point, we have installed a full Deep Learning tools chain, which is capable of performing interesting things. We shall try to run an algorithm for combining the content of one image with the style of another image using pre-trained convolutional neural networks. Here’s an example that maps the artistic style of Vangogh’s “The Starry Night” onto a self portrait to create an unique artistic image. Obviously, that hair style is destined to harmonize with Vangogh’s curvy strokes.

Ensure starting the theano virtual environment with all the setups
source activate theano
The script has been updated to work with latest Keras 2.1.6 [2018/05/08]
The python script is deepstyle.py is the Keras implementation of the neural style transfer algorithm, using a pre-trained convolutional neural network (VGG19).
The run.sh bash script takes your input {content_image}, {style_image} and {output_directory} for generating the results.
# Shell scrhipt to drive deepstyle.py
# Usage: ./run.sh <content_image> <style_image> <output_dir>
#

if [ "$#" -ne 3 ]; then
  echo "need to specify <content_image> <style_image> <output_dir>"
  exit
fi

mkdir -p $3

python deepstyle.py "$1" "$2" "$3/$3" \
  --image_size 600 \
  --tv_weight 8.5E-05 \
  --iter 25 \
  --content_layer "block5_conv2" \
  --min_improvement 0
for example, to run the script run.sh
sh run.sh self_portrait.jpg starry_night.jpg result_image
For each epoch, an iteration image will be saved in the result_image directory with an image result_image_at_iteration_{N}.png file (where {N} is the iteration number). This is interesting to trace through how the neural network perceived and built the image.

Figure. Iteration epoch of the self-portrait and starry night style transfer
On a GTX 1070 GPU (has 1,920 cores), the time required for each epoch depends on the image size (gram matrix size):
- For 400x400 gram matrix, each epoch takes approximately 13 seconds.
- For 512x512 gram matrix, each epoch takes approximately 20 seconds.
Most of the style seems to be converged after 25 epoch. You can try a higher number of iterations for higher quality style transfer’s convergence.
For reader’s convenience, the script input parameters are repeated here:
- –image_size : Allows to set the Gram Matrix size. Default is 400 (width), since it produces good results fast.
- –iter : Number of iterations. Default is 10. Test the output with 10 iterations, and increase to improve results.
- –content_weight: The weight given to the content loss (Default is 0.025)
- –style_weight: The weight given to the style loss (Default is 1.0)
- –tv_weight : Regularization factor. Smaller values tend to produce crisp images, but 0 is not useful. Default = 1E-5
- –content_layer : Selects the content layer. Paper suggests block4_conv2, but better results can be obtained from block5_conv2. Default is block5_conv2.
- –min_improvement : Defines minimum improvement required to continue script. Default is 0.0
To replicate the results in the video, try to use the following input parameters (tested on the NVidia GTX TitanX):
...
python deepstyle.py "$1" "$2" "$3/$3" \
  --image_size 600 \
  --content_weight 1E-05 \
  --style_weight 1.0 \
  --tv_weight 8.5E-05 \
  --iter 300 \
  --content_layer "block5_conv1" \
  --min_improvement 0
Neural Style Transfer from Abstract Art
You can watch Neural Style Transfer from Abstract Art. This video captured the deep neural style transfer process from a picture to the matching artist’s abstract style. This is fascinating to watch how the machine think - the artificial art process!
We are ready to dive deeper into Deep Learning for another blog post!