artwork by FLUX.1
Personal Embedding and Fine-Tuning with the FLUX Model on Replicate
Image generation has made tremendous strides in the past six months. As someone deeply invested in exploring the creative potential of models like “Stable Diffusion” and “Dreambooth”, I’ve been thrilled to discover the capabilities of the cutting-edge FLUX model. This breakthrough innovation, combined with Replicate’s user-friendly cloud-based platform, has transformed the process of creating personalized embeddings.
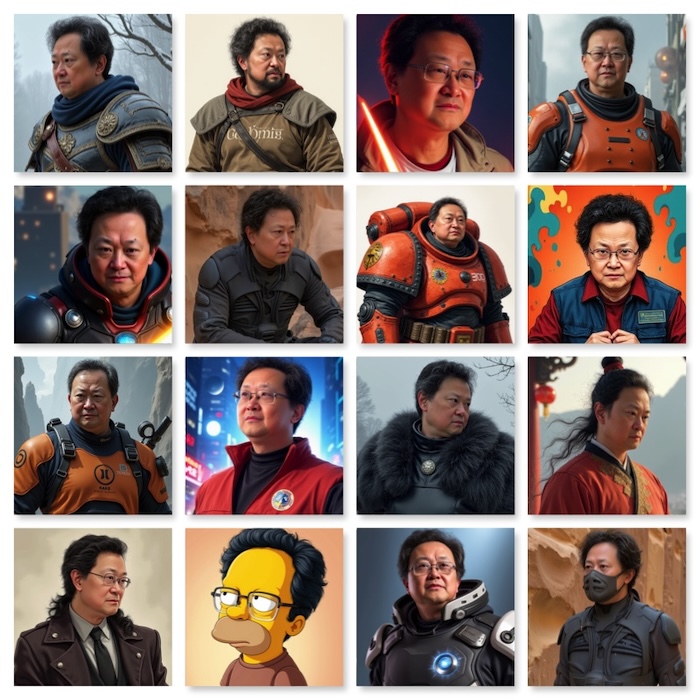
Figure. All of the creative imaginations of personal embedding into the multiverses using FLUX.1 model. The possibilities are limitless.
No longer confined to cumbersome local installations, this updated methodology unlocks a new level of simplicity and accessibility. Whether you’re a creative professional, an AI enthusiast, or just curious about bringing imaginative multiverse versions of yourself to life, this guide will walk you through every step of the journey.
Towards the end, we cover advanced topics like multi-LoRA generation—combining multiple fine-tuned models for unparalleled creativity—and building a microservice for streamlined image generation. These sections will empower you to scale your creative workflows and integrate cutting-edge tools into your own applications. Dive in and discover how the FLUX model, paired with the power of Replicate, can redefine the way we generate and fine-tune personal embeddings.
We can listen to this article as a Podcast Discussion, which is generated by Google’s Experimental NotebookLM. The AI hosts are both funny and insightful.
images/personal-fine-tuning-with-flux/Podcast_Personal_Embedding_with_Flux.mp3
Why Choose the FLUX Model?
FLUX.1 is a family of text-to-image models released by Black Forest Labs this summer. The FLUX.1 models set a new standard for open-source image models: they can generate realistic hands, legible text, and even the strangely hard task of funny memes.
Variants of FLUX.1
The FLUX.1 series includes three main versions, each tailored to specific use cases:
-
FLUX.1 pro: A premium, closed-source model designed for commercial use. It offers superior performance and supports enterprise-level customization via the official API.
-
FLUX.1 dev: An open-source, non-commercial version derived from FLUX.1 pro, providing high-quality images and robust prompt adherence while being more efficient. (this article will concentrate on utilizing FLUX.1 dev for the purpose of personal embedding and fine-tuning.)
-
FLUX.1 schnell: An open-source, lightweight model optimized for speed and minimal memory usage, ideal for local development and personal projects.
Getting Started: Fine-Tuning the FLUX Model with Replicate
To ensure that your neural network gets trained properly, it is imperative to provide adequate amounts of images that represent you in a variety of looks, poses and backgrounds. If you only give the AI pictures of you making one pose or wearing one outfit it will only be able to generate images matching this input. Giving your AI a diverse set of images to learn from will ensure a more wide range of options and images.
Prepare your training data
To start fine-tuning, you’ll need a collection of images that represent the concept you want to teach the model. These images should be diverse enough to cover different aspects of the concept. For example, if you’re fine-tuning on a specific character, include images in various settings, poses, and lighting.
Here are some guidelines:
- Use 12-20 images for best results
- Use large images if possible
- Use JPEG or PNG formats
- Optionally, create a corresponding .txt file for each image with the same name, containing the caption
Once you have your images (and optional captions), zip them up into a single file.
Example - Preparing Personal Images for Fine-tuning
Based on Jame Cunliffe’s video tutorial, here’s a recommended breakdown that I found successful:
- 3 full-body shots from different angles
- 5 half-body shots from various perspectives
- 12 close-ups showcasing a range of facial expressions
Resize your images to 512x512 pixels using tools like BIRME or Photoshop. Once resized, compress the files into a zip archive.
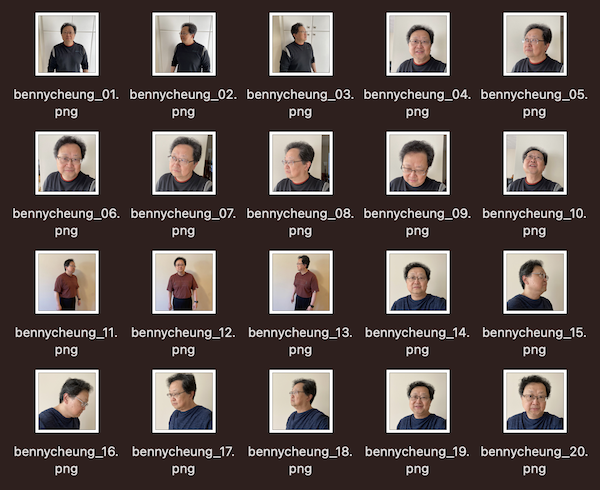
Once you have your images (and optional captions), zip them up into a single file, e.g. we used bennycheung-portrait.zip in the following example.
Fine-Tuning with Replicate
Replicate.ai is a powerful platform that streamlines the deployment, execution, and fine-tuning of machine learning models in the cloud. It offers access to a wide array of pre-trained models developed by various researchers and developers, enabling users to tackle tasks such as image generation, natural language processing, and other specialized AI applications.
Setting Up the Environment
While Replicate provides a user-friendly interface, developers may prefer a programmatic approach to interact with the platform. This method offers the significant advantage of automating the generation process, eliminating the need to rely on a potentially cumbersome user interface.
That said, if you prefer a hands-on, interactive experience, the Replicate’s web UI is always an option for performing your generation tasks manually.
Installation
pip install replicate
Set the REPLICATE_API_TOKEN environment variable
export REPLICATE_API_TOKEN=<paste-your-token-here>
We can also specify the token parameter during the API call.
Creating Your Model
Create a new model that will serve as the destination for your fine-tuned weights. This is where your trained model will live once the process is complete.
import replicate

model = replicate.models.create(
    owner="bennycheung", # change to your owner name
    name="flux-dev-bennycheung-lora", # change to your LoRA model name
    visibility="private", # or "public" if you prefer
    hardware="gpu-t4", # Replicate will override this for fine-tuned models
    description="A fine-tuned FLUX.1 bennycheung model"
)

print(f"Model created: {model.name}")
print(f"Model URL: https://replicate.com/{model.owner}/{model.name}")
Fine-Tuning with LoRA Training
Use Ostris’s AI Toolkit to fine-tune FLUX.1 [dev] via LoRA (Low-Rank Adaptation). A typical training run of 1,000 steps takes 15-20 minutes and costs under $2.
Don’t forget to change
bennycheung-portrait.zipto your own zip filename. The destination should be your model name{owner}/{model}.
import replicate

training = replicate.trainings.create(
    version="ostris/flux-dev-lora-trainer:4ffd32160efd92e956d39c5338a9b8fbafca58e03f791f6d8011f3e20e8ea6fa",
    input={
        "input_images": open("bennycheung-portrait.zip", "rb"),
        "steps": 1000,
        "trigger_word": "bennycheung",
    },
    destination=f"bennycheung/flux-dev-bennycheung-lora"
)

print(f"Training started: {training.status}")
print(f"Training URL: https://replicate.com/p/{training.id}")
Note that it doesn’t matter which hardware you pick for your model at this time, because Replicate will route to H100s for all our FLUX.1 fine-tunes.
Best Practices for Fine-Tuning
- Dataset Quality: Use 12-18 high-resolution images (preferably 1024x1024).
- Style Consistency: Avoid variations like different ages or haircuts for subjects.
- Trigger Words: Select clear, unique identifiers (e.g., “CustomSubject”).
- Parameter Tuning: Adjust LoRA rank and inference steps to refine the model’s performance.
Generating Images with Replicate
After fine-tuning, you can generate images programmatically:
import replicate

name = "bennycheung_SciFi"
prompt = """
bennycheung as Gordon Freeman in Half Life, wearing the hev suit,
ultra realistic, intricate, elegant, highly detailed, digital painting,
artstation, smooth, sharp focus, illustration, in the style of greg rutkowski
"""

# change the following to generate multiple images
# batch_size control how many images are generated per call, range from 1 to 4
# n control how many iterations
# Total number of generated images = n * batch_size
#
start_idx = 1
batch_size = 1
n = 1

for k in range(0, n):
    print(f"Generating {batch_size} images for {name} {k}...")

    output = replicate.run(
        "bennycheung/flux-dev-bennycheung-lora",
        input={
            "model": "dev",
            "prompt": prompt,
            "prompt_strength": 1.0,
            "lora_scale": 0.9,
            "num_outputs": batch_size,
            "aspect_ratio": "2:3",
            "output_format": "png",
            "guidance_scale": 3.5,
            "output_quality": 80,
            "num_inference_steps": 28,
            "disable_safety_checker": True,
        }
    )

    # If the model returns multiple outputs
    for idx, file_output in enumerate(output):
        idx = idx + start_idx
        with open(f'{name}_{idx:03d}.png', 'wb') as f:
            f.write(file_output.read())

    start_idx += batch_size
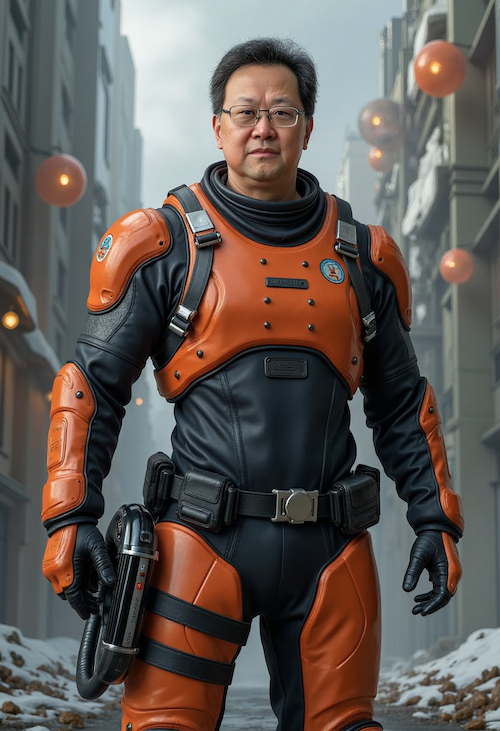
The FLUX model generated super realistic image, definitely looks like myself as Gordon Freeman (Half-Life game’s main character).
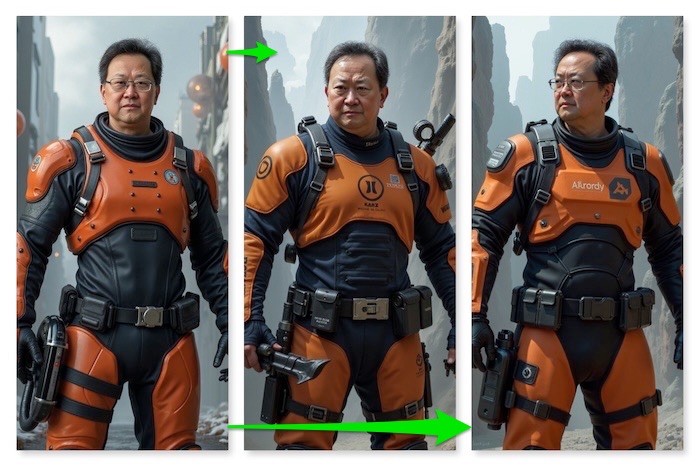
Tweak the image generation according a given image (i.e. img2img)
The
imageparameter specified a local file, e.g.bennycheung_HalfLife_protrait_04.pngas illustrated in the code.
output = replicate.run(
    "bennycheung/flux-dev-bennycheung-lora",
    input={
        "image": open("bennycheung_HalfLife_protrait_04.png", "rb"),
        "model": "dev",
        "prompt": "bennycheung as Gordon Freeman in Half Life, wearing the hev suit , ultra realistic, intricate, elegant, highly detailed, digital painting, artstation, smooth, sharp focus, illustration, in the style of greg rutkowski",
        "go_fast": False,
        "lora_scale": 1,
        "megapixels": "1",
        "num_outputs": 1,
        "aspect_ratio": "2:3",
        "output_format": "png",
        "guidance_scale": 3,
        "output_quality": 80,
        "prompt_strength": 0.8,
        "extra_lora_scale": 1,
        "num_inference_steps": 28
    }
)
Here are the sample generated image with img2img. The variation is according to the first image.
Using Multiple LoRA Fine-tuned Models
Another example of combining fine-tuned models with FLUX is by using Freeman’s Stillsuit (roadmaus/stillsuit model) alongside my private appearance (bennycheung/flux-dev-bennycheung-lora model). Our goal? To make a fashion statement on the planet Arrakis!
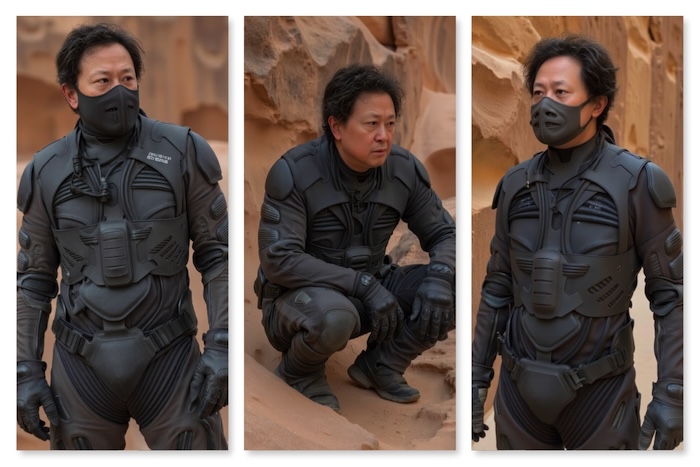
The following code illustrated the Replicate call to use the models together in the generation, by setting the extra_lora and extra_lora_scale parameters.
# Need REPLICATE_API_TOKEN environment variable.
#
import replicate

name = "bennycheung_Dune"
prompt = """
The image portrays "bennycheung" as a character in the 2021 film "Dune,"
wearing the iconic ST1LLSU1T and nose piece designed for survival in the harsh
desert environment of the planet Arrakis. This photograph captures the
character in a position amidst a rocky setting. The ST1LLSU1T is a marvel of
practical design and functionality, engineered to conserve and filter the
wearer's bodily moisture. The suit is comprised of numerous intricate
components, such as hydration tubes running along the body, filters
strategically placed at crucial collection points, and a snug, form-fitting
material that appears both robust and flexible to allow for mobility and
endurance in the brutal desert climate.

The character's suit is primarily dark in color, varying shades of grey
and black which helps it blend seamlessly into
the desert rock background. The materials of the ST1LLSU1T likely combine
advanced synthetic fabrics and possibly some organic elements, designed to
maximize both efficiency in moisture recovery and comfort. The texture of the
suit exhibits a rugged and utilitarian aesthetic, evident in the reinforced
patches and ribbed sections on the arms and legs, which suggest areas requiring
extra protection and durability. There is noticeable wear, indicative of the
character's extensive use and adaptation to the extreme conditions of Arrakis.

Wrapped around the character's neck and shoulders is a light, sand-colored
scarf, adding layers to the attire that offer protection from the sun and sand.
The scarf’s soft, woven texture contrasts with the more structured and
technical design of the ST1LLSU1T. The lighting in the scene is muted, natural
daylight filtering into what seems to be a sheltered segment of the desert,
casting subtle shadows and highlights on the suit. This lighting accentuates
the detailed construction of the ST1LLSU1T, highlighting its rugged surface and
the practical placement of its components. The character’s facial expression
and body language convey a sense of alertness and determination, reflected in
the intense gaze of their striking blue eyes. This eye color is heavily
pronounced against the neutral tones of the surrounding environment and the
suit, suggesting a significant narrative element in the movie “Dune” related to
the use of the spice known as Melange, which turns the eyes blue. Anatomically,
the character appears to be young, with a lean and athletic build, emphasizing
the suitability and necessity of the ST1LLSU1T’s design for such a physique.

The gloves worn by the character are integrated into the suit, with flexible
joints and padded areas, likely aids for handling tools and weapons in the
harsh terrain. As a medium, the photograph is highly detailed, with a sharp
focus on the character and the ST1LLSU1T, allowing viewers to appreciate the
intricacies of the suit’s design. The composition places the character slightly
off-center, with the surrounding rock formations framing them, underscoring the
isolation and the challenging environment of Arrakis. The image encapsulates
the essence of survival and resilience central to the film’s theme, with the
ST1LLSU1T standing out as a critical element in this depiction. The person
depicted in the image remains unidentified.
"""

# change the following to generate multiple images
# batch_size control how many images are generated per call, range from 1 to 4
# n control how many iterations
# Total number of generated images = n * batch_size
#
start_idx = 1
batch_size = 1
n = 4

for k in range(0, n):
    print(f"Generating {batch_size} images for {name} {k}...")

    output = replicate.run(
        "bennycheung/flux-dev-bennycheung-lora",
        input={
            "model": "dev",
            "extra_lora": "roadmaus/stillsuit",
            "extra_lora_scale": 0.8,
            "prompt": prompt,
            "prompt_strength": 0.8,
            "lora_scale": 0.95,
            "num_outputs": batch_size,
            "aspect_ratio": "2:3",
            "output_format": "png",
            "guidance_scale": 3.5,
            "output_quality": 80,
            "num_inference_steps": 50,
            "disable_safety_checker": True,
        }
    )

    # If the model returns multiple outputs
    for idx, file_output in enumerate(output):
        idx = idx + start_idx
        with open(f'{name}_{idx:03d}.png', 'wb') as f:
            f.write(file_output.read())

    start_idx += batch_size
Replicate Image Generator Service
If you’re exploring ways to utilize Replicate to bring your business ideas to life, the possibilities are vast. Whether you’re building applications that rely on AI-driven image generation, custom embeddings, or personalized content creation, Replicate provides a robust foundation.
For businesses aiming to deliver real-world applications, you can adopt a microservice-based approach that integrates seamlessly with the Replicate API service. This system enhances functionality by incorporating features such as data management, image generation tracking, and guardrails for added reliability and control.

Figure. Cloud-based architecture leveraging a Kubernetes cluster to manage API requests, data management, and image storage while offloading GPU-intensive image generation to the Replicate API Service.
This implementation is a cloud-based system hosted on any platform, built around a Kubernetes cluster to manage microservices for data management, image storage, and guardrails enforcement. The system includes an API Gateway for client interaction and a REST API that processes requests and communicates with an Image Generator Server. The Image Generator Server validates inputs, applies guardrails, and sends requests to the external Replicate API Service, which handles GPU-intensive image generation. Generated images and metadata are stored in cloud storage and a Postgres database, enabling efficient image retrieval and campaign tracking. By offloading compute-heavy tasks to the Replicate API, the system is lightweight, cost-efficient, and easy to maintain.
Microservice with FastAPI
We can integrate the generation pipeline into a FastAPI REST API:
Key Considerations:
- Optional Parameters: The ModelInput class includes optional parameters with default values matching those specified in the API documentation.
- Dynamic Input Dictionary: The input_dict is dynamically created to include only parameters that are not None, ensuring that only provided parameters are sent to the Replicate API.
- Media Type Handling: The media_type is dynamically set based on the output_format specified in the request, allowing the endpoint to return images in the desired format.
from fastapi import APIRouter, HTTPException
from fastapi.responses import StreamingResponse, FileResponse, Response
from pydantic import BaseModel
from typing import Optional

from dotenv import load_dotenv
from io import BytesIO

import os
import requests
import replicate

load_dotenv(dotenv_path=".env")

router = APIRouter()

model_name_lookup = {
    "default": "black-forest-labs/flux-schnell",
    "bennycheung": "bennycheung/flux-dev-bennycheung-lora"
}

class ModelInput(BaseModel):
    prompt: str
    image: Optional[str] = None
    mask: Optional[str] = None
    aspect_ratio: Optional[str] = "1:1"
    height: Optional[int] = None
    width: Optional[int] = None
    prompt_strength: Optional[float] = 0.8
    model: Optional[str] = "dev"
    num_outputs: Optional[int] = 1
    num_inference_steps: Optional[int] = 28
    guidance_scale: Optional[float] = 3.0
    seed: Optional[int] = None
    output_format: Optional[str] = "webp"
    output_quality: Optional[int] = 80
    disable_safety_checker: Optional[bool] = False
    go_fast: Optional[bool] = False
    megapixels: Optional[str] = "1"
    lora_scale: Optional[float] = 1.0
    extra_lora: Optional[str] = None
    extra_lora_scale: Optional[float] = 1.0


@router.post("/image/{model_name}")
async def generate_image(input_data: ModelInput, model_name: str):
    try:
        # Use the provided model_name or default to a specific model version
        model_name = model_name_lookup.get(model_name, model_name_lookup["default"])

        input_dict = input_data.dict()
        input_dict = {k: v for k, v in input_dict.items() if v is not None}

        output = replicate.run(
            model_name,
            input=input_dict,
        )

        # Fetch the generated image
        image_url = output[0]
        image_response = requests.get(image_url)
        image_response.raise_for_status()

        # Create an in-memory buffer
        image_buffer = BytesIO(image_response.content)
        image_buffer.seek(0)

        # Determine the appropriate media type
        media_type = f"image/{input_data.output_format}"

        # Stream the image back to the client
        return StreamingResponse(image_buffer, media_type=media_type)

    except Exception as e:
        raise HTTPException(status_code=500, detail=str(e))
The code imports necessary FastAPI and third-party libraries, such as pydantic for defining input models, requests for making HTTP requests, and replicate for running the machine learning model. It also loads environment variables from a .env file using dotenv. The ModelInput class is a Pydantic model that defines the expected input parameters for the image generation process.
The @router.post("/image/{model_name}") decorator defines the endpoint for generating images. The generate_image function takes an instance of ModelInput as input and performs the following steps:
- Defines the generative model
model_nameto be used for image generation. - Converts the input model instance to a dictionary and filters out any optional parameters with a value of None.
- Calls the
replicate.runfunction to execute the machine learning model with the provided input parameters. - Fetches the generated image URL from the model output.
- Makes an HTTP GET request to the image URL to retrieve the image content.
- Creates an in-memory buffer (
BytesIO) to store the image content. - Determines the appropriate media type for the image based on the output_format parameter.
- Returns a
StreamingResponsewith the image content and the appropriate media type.
If any exception occurs during the image generation process, an HTTPException with a status code of 500 (Internal Server Error) is raised, and the exception message is included in the response details.
Concluding Remarks
The FLUX model, when combined with the advanced capabilities of Replicate’s cloud platform, represents a transformative tool in the realm of AI-powered image generation. This pairing streamlines the process of creating personalized embeddings and fine-tuning models, offering both efficiency and accessibility for a wide range of applications.
For instance, marketing professionals can utilize these tools to design captivating visuals tailored to their campaigns, enabling brands to stand out in a crowded marketplace with minimal effort. Similarly, artists and designers can unlock new realms of creativity, producing unique and intricate artwork that pushes the boundaries of traditional media. Developers, on the other hand, can integrate these advanced models into their AI-driven applications, enhancing user experiences through the incorporation of highly customized and visually compelling assets.
Moreover, the FLUX model’s adaptability makes it an invaluable asset for exploring novel use cases. Its ability to generate high-quality, detailed images with user-specific characteristics ensures that it can cater to personalized requirements across diverse industries. The potential applications extend beyond the traditional; from architectural visualizations and educational content to creating immersive environments for gaming or virtual reality, the possibilities are boundless.
This article has outlined the essential steps to harness these tools effectively, providing a robust foundation for users seeking to leverage cutting-edge advancements in image generation. By following the best practices detailed here, users can unlock the full potential of the FLUX model, tailoring its capabilities to meet their specific needs and drive innovation in their respective fields. The future of AI-driven visual creativity is here, and the FLUX model is your gateway to a world of unparalleled possibilities.
References
- Yjg, What is the Replicate & How to use it?, Medium, 25 Aug 2024.
- Replicate.ai is a platform that simplifies the process of deploying, running, and fine-tuning machine learning models in the cloud. It provides a variety of pre-trained models created by different developers and researchers, which can be used to solve tasks like image generation, natural language processing, or even specialized AI tasks.
-
deepfates, Fine-tune FLUX.1 with your own images, Replicate Blog, 14 Aug 2024.
- Dark_infinity, Understanding Prompting and Captioning for LoRAs, civitai Blog, 30 Oct 2024.
- LoRAs are great for fine-tuning Stable Diffusion models by adding specialized knowledge without retraining from scratch. However, to truly leverage their potential, it’s crucial to understand how and when LoRAs influence image generation. This guide explores key aspects of LoRA behavior, including their interaction with the latent noise space, why they may appear inactive in certain scenarios, and how training with captions affects their responsiveness to prompts.
- Replicate HTTP API documentation
- Basic Replicate has all API management tools available.
- Download the schema at api.replicate.com/openapi.json
- Replicate Documentation, black-forest-labs / flux-schnell API Schema
