artwork by Dmitriy Bragin
X.509 Identity for Attribute-based Encryption
Blockchain Healthcare
Part 3 of 3In the physical world, we trust the identity cards issued by a well known organization, including the government. The verification process is a visual inspection of the card authenticity. Advancing into the digital realm, we are relying on the Public Key Infrastructure (PKI) to securely identify the participants. This is the key cryptographic technology that enables our internet commerce today! Coupling with the advanced attribute-based encryption, we shall see how to use PKI identity to support a flexible access control to the protected records.
[2024/10/05] We can listen to this article as a Podcast Discussion, which is generated by Google’s Experimental NotebookLM. The AI hosts are both funny and insightful.
images/identity-for-attribute-based-encryption/Podcast_Personal_Identity_ABE.mp3

Figure. Artistic style of Kandinsky transfer to a many faces image
In our previous article on “Attribute-based Encryption for Healthcare Blockchain” explained how to apply attributed-based encryption (ABE) to electronic health records (EHR), helps to layout the roadmap for a secured system implementation. However, due to the focus on ABE, we just wrote a short paragraph touching on the participant identities and attributes. We assumed the knowledge on public key infrastructure (PKI), X.509 certificates and certificate authority (CA). In addition, the application-level attributes is magically registered into the X.509 certificate. The participant’s identity and attributes are fully secured and authenticated, i.e. no one can fake their identity and attributes. This is time for us to explain this cryptographic component in greater details.
To continue our explorations, we shall take the practical approach to demonstrate how to use Python cryptography to generate X.509 certificate with custom atributes; subsequently, we use charm-crypto framework’s hybrid adapter to perform CP-ABE (ciphertext-policy) with the X.509 custom attributes.
Python Installation
Virtual Environment
Using an isolated Python virtual environment will protect you from headaches and disaster of installations.
crypto (or your choice of name) is the name of the virtual environment, and python=3.5 is the Python version.
conda create -n crypto python=3.5
Press y to proceed. This will install the Python version and all the associated anaconda packaged libraries at `{path_to_anaconda_location}/envs/crypto
Then activate the virtual environment by,
source activate crypto
cryptography Module
Our experiment starts with cryptography module,
cryptography includes both high level recipes and low level interfaces to common cryptographic algorithms such as symmetric ciphers, message digests, and key derivation functions. We rely on many features from cryptography to illustrate the X509 certificate processing.
Make sure the cryptography installation is inside the virtualenv.
pip install cryptography
Charm Framework
Our experiment is using the Python implementation of Attribute-based Encrpytion based on the charm-crypto framework [AGM13]. Charm is designed for rapidly prototyping advanced cryptosystems. It was a well engineered framework that uses a hybrid design: performance intensive mathematical operations are implemented in native C modules, while cryptosystems themselves are written in a readable, high-level language. Charm additionally provides a number of new components to facilitate the rapid development of new schemes and protocols. That’s how we did the CP-ABE experiment.
Installing Charm from source is straightforward. First, verify that you have installed the following dependencies:
Make sure the Charm installation is from the virtualenv.
Note: --enable-darwin is for MacOS installation
./configure.sh --enable-darwin
make install
To validate the installation is working,
make test
Public Key Infrastructure
Understanding the Public Key Infrastructure (PKI) standard will help us to design a secure communication between various network participants. The PKI enable us to provide identity to the participants and to ensure that messages on the system are properly authenticated.
There are four key elements to PKI:
- Public and Private Keys
- Certificate Authorities
- Digital Certificates
- Certificate Revocation Lists (not discussion here)
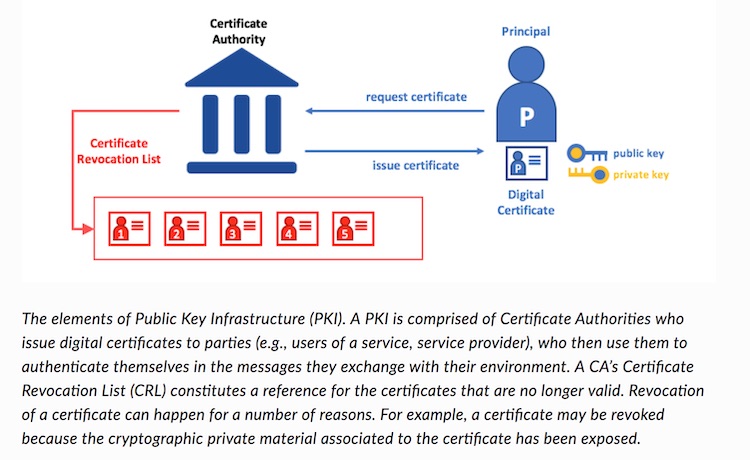 credit: picture from Hyperledger Fabric documentation
When obtaining a certificate from a Certificate Authority (CA), the usual flow is:
- Generate a private/public key pair.
- Create a request for a certificate (CSR), which is signed by your key (to prove that you own that key).
- You give your CSR to a CA (but not the private key).
- The CA validates that you own the resource (e.g. domain and/or attributes) you want a certificate for.
- The CA gives you a certificate, signed by them, which identifies your public key, and the resource you are authenticated for.
We shall try to understand each mentioned components with experimental Python code in the following sections.
Authentication, Public keys, and Private Keys
Authentication and message integrity are important concepts in secure communications. Authentication requires that parties who exchange messages are assured of the identity that created a specific message. For a message to have “integrity” means that cannot have been modified during its transmission.
The PKI authentication mechanisms rely on digital signatures allow a participant to digitally sign its messages. Digital signatures guarantees on the integrity of the signed message is coming from the specific participant instead of anyone else. In public key cryptography, digital signature mechanisms require each party to hold two cryptographically connected keys: a public key that is made widely available and acts as authentication anchor, and a private key that is used to produce digital signatures on messages. Recipients of digitally signed messages can verify the origin and integrity of a received message by checking that the attached signature is valid under the public key of the expected sender.
The unique relationship between a private key and the respective public key is the cryptographic magic that makes secure communications possible. The unique mathematical relationship between the keys is such that the private key can be used to produce a signature on a message that only the corresponding public key can match and only on the same message.
If we want to obtain a certificate from a typical CA, we’ll need to generate a private key, an RSA key (these are the most common types of keys on the web right now):
from cryptography.hazmat.backends import default_backend
from cryptography.hazmat.primitives import serialization
from cryptography.hazmat.primitives.asymmetric import rsa

# Generate our key
key = rsa.generate_private_key(
  public_exponent=65537,
  key_size=2048,
  backend=default_backend()
  )

# Write our key to disk for safe keeping
# Alternative, encryption_algorithm=serialization.BestAvailableEncryption(b"passphrase")
# but this required password when the private key is used, not ideal for automation.
with open("key.pem", "wb") as f:
  f.write(key.private_bytes(
    encoding=serialization.Encoding.PEM,
    format=serialization.PrivateFormat.TraditionalOpenSSL,
    encryption_algorithm=serialization.NoEncryption(),
  ))
The private key is saved into key.pem in PEM file format. We should keep this file safe and protected. This file should not be transmitted anywhere else. The next step is creating a request for a certificate (CSR), which is signed by private key.
Certificate Authorities
As we’ve discussed, a participant is able to participate in the secured system, via the means of a digital identity issued by an authority trusted by the system. In the most common case, digital identities (or simply identities) have the form of cryptographically validated digital certificates that comply with X.509 standard and are issued by a Certificate Authority (CA).
A Certificate Authority dispenses certificates to different participants. These certificates are digitally signed by the CA and bind together the participant’s public key (and optionally with a list of attributes, we shall come back this later). As a result, if one trusts the CA (by knowing its public key), it can trust that the specific participant is bound to the public key included in the certificate, and owns the included attributes, by validating the CA’s signature on the participant’s certificate.
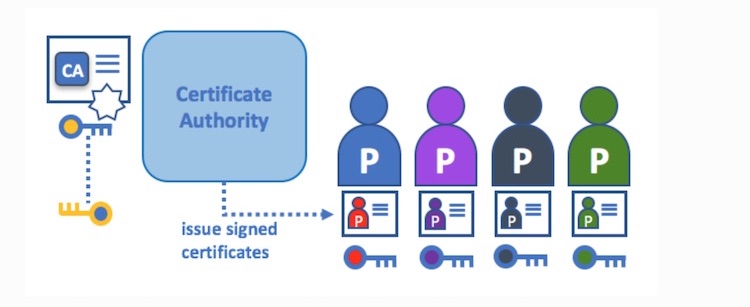 credit: picture from Hyperledger Fabric documentation
If you’ve already generated a private key (in the previous step), we can load it with load_pem_private_key().
Next we need to generate a certificate signing request. A typical CSR contains a few details:
- Information about our public key (including a signature of the entire body).
- Information about who we are.
- Information about what domains this certificate is for.
from cryptography import x509
from cryptography.x509.oid import NameOID
from cryptography.hazmat.backends import default_backend
from cryptography.hazmat.primitives import hashes
from cryptography.hazmat.primitives import serialization

# load the saved private key
pem_key = open('key.pem', 'rb').read()
key = serialization.load_pem_private_key(pem_key, password=None, backend=default_backend())

# Generate a CSR
csr = x509.CertificateSigningRequestBuilder().subject_name(x509.Name([
# Provide various details about who we are.
  x509.NameAttribute(NameOID.COUNTRY_NAME, u"CA"),
  x509.NameAttribute(NameOID.STATE_OR_PROVINCE_NAME, u"Ontario"),
  x509.NameAttribute(NameOID.LOCALITY_NAME, u"Toronto"),
  x509.NameAttribute(NameOID.ORGANIZATION_NAME, u"Medical Record Company"),
  x509.NameAttribute(NameOID.COMMON_NAME, u"medicalrecord.com"),
  ])).add_extension(
    x509.SubjectAlternativeName([
      # Describe what sites we want this certificate for.
      x509.DNSName(u"www.medicalrecord.com"),
    ]),
  critical=False,
  # Sign the CSR with our private key.
  ).sign(key, hashes.SHA256(), default_backend())

# Write our CSR out to disk.
with open("csr.pem", "wb") as f:
  f.write(csr.public_bytes(serialization.Encoding.PEM))
The CSR is saved into csr.pem in PEM file format. The next step is sending the CSR to a CA (but not the private key).
The CA validates that the resource ownerhsip (e.g. domain and/or attributes) and signed and issued the request certificate.
Digital Certificate - X.509
In a EHR setting, every participant who wishes to interact with the system needs an identity. One or more CAs can be used to define the participants from a digital perspective. It’s the CA that provides the basis for participant to have a verifiable digital certificate. A digital certificate is a document which contains a set of attributes relating to the participant. The most common type of certificate is the one compliant with the X.509 standard, which allows the encoding of a participant’s identity details in its structure.
Certificates can be widely disseminated, as they do not include any private keys. As such they can be used as anchor of trusts for authenticating messages coming from different participants. CAs also have a certificate, which they make widely available. This allows the other verifier CA to verify a participant’s certificate. The certificate alongs with all the attributes is digitally signed by CA so that tampering will invalidate the certificate. Think of X.509 certificate as a digital identity card that is impossible to change.
Move the previous generated CSR csr.pem to CA side, the CA needs to verify and then sign it to generate the proper certificate.
from cryptography import x509
from cryptography.hazmat.backends import default_backend
from cryptography.hazmat.primitives import hashes, serialization
import datetime
import uuid

pem_csr = open('csr.pem', 'rb').read()
csr = x509.load_pem_x509_csr(pem_csr, default_backend())

# using internal CA certificate and private key
pem_cert = open('ca.crt', 'rb').read()
ca = x509.load_pem_x509_certificate(pem_cert, default_backend())
pem_key = open('ca.key', 'rb').read()
ca_key = serialization.load_pem_private_key(pem_key, password=None, backend=default_backend())

# should perform CSR validation
builder = x509.CertificateBuilder()
builder = builder.subject_name(csr.subject)
builder = builder.issuer_name(ca.subject)
builder = builder.not_valid_before(datetime.datetime.now())
builder = builder.not_valid_after(datetime.datetime.now() + datetime.timedelta(30)) # 30 days
builder = builder.public_key(csr.public_key())
builder = builder.serial_number(int(uuid.uuid4()))
for ext in csr.extensions:
    builder = builder.add_extension(ext.value, ext.critical)

certificate = builder.sign(
    private_key=ca_key,
    algorithm=hashes.SHA256(),
    backend=default_backend()
)

with open('my.crt', 'wb') as f:
    f.write(certificate.public_bytes(serialization.Encoding.PEM))
Using openssl to print out a text version of the my.crt - X.509 certificate file,
openssl x509 -text -noout -in my.crt
The text output of the given X.509 certificate should look like, see the Subject section that defines the standard attributes for the certificate holder.
Certificate:
    Data:
        Version: 3 (0x2)
        Serial Number:
            e1:99:7e:e7:1d:6d:48:b9:90:a4:f0:9f:8e:60:cc:e1
    Signature Algorithm: sha256WithRSAEncryption
        Issuer: C=CA, ST=Ontario, O=Jonah Group Ltd., OU=Consulting, CN=Jonah Group CA/emailAddress=bcheung@jonahgroup.com
        Validity
            Not Before: Aug 18 09:35:58 2020 GMT
            Not After : Sep 17 09:35:58 2020 GMT
        Subject: C=CA, ST=Ontario, L=Toronto, O=Medical Record Company, CN=medicalrecord.com
        Subject Public Key Info:
            Public Key Algorithm: rsaEncryption
                Public-Key: (2048 bit)
                Modulus:
                    00:b6:a3:22:fb:20:4c:70:e3:94:4a:bd:ae:0f:b8:
                    fe:61:2f:37:b8:a7:22:f5:6c:1e:bd:84:0a:0d:bf:
                    b8:0e:92:a5:6e:69:bc:99:14:c7:3d:77:8d:a3:ea:
                    b7:be:f9:e4:86:e2:2d:c0:3f:27:38:92:e0:45:98:
                    61:7f:0e:65:b2:02:11:db:d8:00:6d:cc:fa:57:43:
                    09:d0:27:af:12:a4:f6:0d:de:74:a6:c3:20:00:6b:
                    cd:d8:f6:5c:2c:3a:d1:e0:7d:cf:f5:40:80:33:e6:
                    ad:cb:3d:26:f9:87:41:d8:e2:cb:80:52:c1:27:80:
                    ca:98:68:93:b8:7e:4e:04:b7:4e:fc:fb:e5:63:8c:
                    c1:62:b8:76:62:d2:5d:33:7e:1c:35:12:cd:ba:17:
                    e6:9e:1e:f9:3c:54:8c:96:bc:18:e9:a1:27:ae:b2:
                    70:6e:be:c3:41:5b:8f:0d:f7:7d:25:42:6d:c3:5c:
                    9a:2e:4b:4a:2c:ff:77:ec:d3:e6:06:03:dc:0d:f4:
                    26:51:b3:16:2a:93:ba:b2:88:9a:71:d1:0f:6c:d1:
                    ff:87:4c:8c:50:eb:1e:29:69:e0:48:14:e5:89:df:
                    5e:ee:40:2a:ad:83:b1:7d:06:90:3e:1d:54:60:4c:
                    ea:83:cc:bc:71:d7:bd:92:c6:67:71:ac:16:d0:7d:
                    7d:2b
                Exponent: 65537 (0x10001)
        X509v3 extensions:
            X509v3 Subject Alternative Name:
                DNS:www.medicalrecord.com
    Signature Algorithm: sha256WithRSAEncryption
         7a:cc:9e:75:74:aa:fb:8f:4c:16:70:bf:f2:61:1c:40:6c:9f:
         44:82:33:be:76:b0:eb:b2:74:61:04:36:ed:ce:a1:c8:d0:e6:
         51:cb:14:4a:50:a2:f7:f7:3f:97:ef:25:8c:39:e9:1e:7a:8a:
         10:06:49:05:6c:70:e6:cb:61:cd:f4:91:5b:7b:cb:4a:71:f9:
         11:49:e2:da:55:c7:17:89:65:29:9e:d0:2a:79:34:e7:79:02:
         9e:c4:70:88:5a:f4:d8:53:aa:d5:67:47:45:32:2e:0b:c7:45:
         d1:b3:08:f7:0d:2c:33:94:65:5a:91:43:e9:b1:4a:6a:8e:b7:
         6d:b4:8b:b8:53:c9:fb:e1:fd:88:1c:85:00:3b:db:eb:5a:96:
         06:a0:fa:89:70:ff:c6:27:29:1b:5d:e0:8e:93:05:47:9e:3e:
         c6:2a:51:f9:d0:10:a4:26:d4:84:96:1a:6a:bd:9f:f7:a5:f2:
         3f:17:5d:58:4c:79:87:b4:0c:9a:a5:43:72:cb:9a:e1:40:07:
         4d:f7:42:c0:36:e9:b4:e9:2f:6e:f2:6b:52:93:54:28:7e:0f:
         67:bc:f0:98:30:c1:44:32:9f:1f:d2:81:43:41:30:9c:4e:57:
         48:8a:e2:8a:0b:c9:7a:95:55:7d:a1:fc:15:39:33:c2:a1:8a:
         c7:91:3c:77
Self-Signed Certificate with Custom Attributes
While most of the time we want a certificate that has been signed by CA, so that trust is established, sometimes we want to create a self-signed certificate. Self-signed certificates are not issued by a CA, but instead they are signed by the private key corresponding to the public key they embed, aka. self-signed.
This means that other people don’t trust these certificates, but it also means they can be issued very easily. In general the only use case for a self-signed certificate is for testing, where we don’t need anyone else to trust our certificates. This is how to proceed with the custom attributes and CP-ABE experiments.
In the following example code, we have included a X.509 non-standard extension 1.2.3.4.5.6.7.8.1 in the certificate, which has the JSON value of {"Role":"PATIENT", "ID":"123456"} to encode the custom attributes. Then we generate the certificate itself:
from cryptography import x509
from cryptography.x509.oid import NameOID
from cryptography.hazmat.backends import default_backend
from cryptography.hazmat.primitives import hashes
from cryptography.hazmat.primitives import serialization
import datetime

# load the saved private key
pem_key = open('key.pem', 'rb').read()
key = serialization.load_pem_private_key(pem_key, password=None, backend=default_backend())

# Various details about who we are. For a self-signed certificate the
# subject and issuer are always the same.
subject = issuer = x509.Name([
  x509.NameAttribute(NameOID.COUNTRY_NAME, u"CA"),
  x509.NameAttribute(NameOID.STATE_OR_PROVINCE_NAME, u"Ontario"),
  x509.NameAttribute(NameOID.LOCALITY_NAME, u"Toronto"),
  x509.NameAttribute(NameOID.ORGANIZATION_NAME, u"Medical Record"),
  x509.NameAttribute(NameOID.COMMON_NAME, u"Amy Grant"),
  ])

cert = x509.CertificateBuilder().subject_name(
  subject
).issuer_name(
  issuer
).public_key(
  key.public_key()
).serial_number(
  x509.random_serial_number()
).not_valid_before(
  datetime.datetime.utcnow()
).not_valid_after(
  # Our certificate will be valid for 10 days
  datetime.datetime.utcnow() + datetime.timedelta(days=10)
).add_extension(
  x509.SubjectAlternativeName([x509.DNSName(u"localhost")]),
    critical=False,
).add_extension(
  x509.BasicConstraints(ca=False, path_length=None), critical=True,
).add_extension(
  x509.UnrecognizedExtension(
    x509.ObjectIdentifier('1.2.3.4.5.6.7.8.1'),
    b'{"Role":"PATIENT", "ID":"123456"}'
  ),
  critical=True,
  # Sign our certificate with our private key
  # don't sign with SHA1() anymore, it is deplicated
).sign(key, hashes.SHA256(), default_backend())

# Write our certificate out to disk.
with open("my_self.crt", "wb") as f:
  f.write(cert.public_bytes(serialization.Encoding.PEM))
Using openssl to print out text version of the my_self.crt - a self-signed X.509 certificate file,
see the Issuer and Subject are the same entity.
openssl x509 -text -noout -in my_self.crt
Certificate:
    Data:
        Version: 3 (0x2)
        Serial Number:
            13:ee:bf:1e:ae:0c:a5:b2:c8:22:25:6a:0f:39:62:dc:b0:fd:2e:4a
    Signature Algorithm: sha256WithRSAEncryption
        Issuer: C=CA, ST=Ontario, L=Toronto, O=Medical Record, CN=Amy Grant
        Validity
            Not Before: Aug 18 01:25:31 2020 GMT
            Not After : Aug 28 01:25:31 2020 GMT
        Subject: C=CA, ST=Ontario, L=Toronto, O=Medical Record, CN=Amy Grant
        Subject Public Key Info:
            Public Key Algorithm: rsaEncryption
                Public-Key: (2048 bit)
                Modulus:
                    00:b6:a3:22:fb:20:4c:70:e3:94:4a:bd:ae:0f:b8:
                    fe:61:2f:37:b8:a7:22:f5:6c:1e:bd:84:0a:0d:bf:
                    b8:0e:92:a5:6e:69:bc:99:14:c7:3d:77:8d:a3:ea:
                    b7:be:f9:e4:86:e2:2d:c0:3f:27:38:92:e0:45:98:
                    61:7f:0e:65:b2:02:11:db:d8:00:6d:cc:fa:57:43:
                    09:d0:27:af:12:a4:f6:0d:de:74:a6:c3:20:00:6b:
                    cd:d8:f6:5c:2c:3a:d1:e0:7d:cf:f5:40:80:33:e6:
                    ad:cb:3d:26:f9:87:41:d8:e2:cb:80:52:c1:27:80:
                    ca:98:68:93:b8:7e:4e:04:b7:4e:fc:fb:e5:63:8c:
                    c1:62:b8:76:62:d2:5d:33:7e:1c:35:12:cd:ba:17:
                    e6:9e:1e:f9:3c:54:8c:96:bc:18:e9:a1:27:ae:b2:
                    70:6e:be:c3:41:5b:8f:0d:f7:7d:25:42:6d:c3:5c:
                    9a:2e:4b:4a:2c:ff:77:ec:d3:e6:06:03:dc:0d:f4:
                    26:51:b3:16:2a:93:ba:b2:88:9a:71:d1:0f:6c:d1:
                    ff:87:4c:8c:50:eb:1e:29:69:e0:48:14:e5:89:df:
                    5e:ee:40:2a:ad:83:b1:7d:06:90:3e:1d:54:60:4c:
                    ea:83:cc:bc:71:d7:bd:92:c6:67:71:ac:16:d0:7d:
                    7d:2b
                Exponent: 65537 (0x10001)
        X509v3 extensions:
            X509v3 Subject Alternative Name:
                DNS:localhost
            X509v3 Basic Constraints: critical
                CA:FALSE
            1.2.3.4.5.6.7.8.1: critical
                {"Role":"PATIENT", "ID":"123456"}
    Signature Algorithm: sha256WithRSAEncryption
         a0:20:f3:6a:aa:45:a4:00:0c:ba:ce:7f:e1:a3:15:c7:43:19:
         02:ae:71:10:ee:5b:d1:17:a6:ee:fc:ff:0c:b0:25:19:f0:dd:
         da:1b:7c:77:c5:9c:fc:44:0d:84:5d:eb:8d:ef:8d:26:95:2a:
         fc:33:a8:78:89:38:4c:08:0e:c3:f5:8e:46:06:51:1b:d3:0e:
         16:fd:00:99:88:04:f6:67:cf:f8:b8:cd:18:63:59:95:04:00:
         74:49:e5:2d:f7:f2:95:9a:69:ca:64:13:ea:94:c7:7d:0a:ff:
         e1:29:74:71:14:42:49:ec:f7:65:b1:f8:0b:dc:92:c7:e1:37:
         a9:65:44:1b:d0:73:71:f7:b5:4f:cf:56:d3:20:2d:d4:5c:db:
         6b:ce:dc:55:ba:ac:61:ff:0d:53:5b:a2:df:4f:80:6f:78:73:
         93:7d:c7:22:8d:e7:51:8a:ef:15:d9:d3:1c:01:8e:65:c8:77:
         41:95:d4:8d:e0:1f:b3:84:27:c2:03:65:0e:e2:06:ab:5e:3a:
         ae:5c:3e:be:7f:44:fd:20:45:1d:38:d0:0b:0d:8c:d1:62:58:
         a7:fe:77:2e:38:b9:80:da:f2:24:75:a1:c2:04:18:4f:e5:7a:
         63:27:a4:62:06:d7:bf:f4:fe:e0:9f:bc:61:dc:59:e4:d2:03:
         0e:40:8e:ce
We can test by decoding the certificate extensions,
import json

for ext in cert.extensions:
    print('-'*8)
    print('oid:', ext.oid)
    print('critical:', ext.critical)
    if (ext.oid.dotted_string == '1.2.3.4.5.6.7.8.1'):
        obj = json.loads(ext.value.value.decode('utf-8'))
        print('Custom ABAC (attribute-based access control)')
        print('Role:', obj['Role'])
        print('ID:', obj['ID'])
    else:
        print('value:', ext.value)
--------
oid: <ObjectIdentifier(oid=2.5.29.17, name=subjectAltName)>
critical: False
value: <SubjectAlternativeName(<GeneralNames([<DNSName(value='localhost')>])>)>
--------
oid: <ObjectIdentifier(oid=2.5.29.19, name=basicConstraints)>
critical: True
value: <BasicConstraints(ca=False, path_length=None)>
--------
oid: <ObjectIdentifier(oid=1.2.3.4.5.6.7.8.1, name=Unknown OID)>
critical: True
Custom ABAC (attribute-based access control)
Role: PATIENT
ID: 123456
CP-ABE using Charm’s Hybrid Adapter
There are a number of questions in our previous CP-ABE example from “Attribute-based Encryption for Healthcare Blockchain”, which is concerning about the random \(GT\) message. The reader expected to encrypt any plain text message with CP-ABE. We shall provide an extended example to illustrate how to encrypt any plain text message and to decrypt with the certificate attributes (reference to the answer from crypto exchange).
In real world application, Attribute-based Encryption (ABE) is used in conjunction with a symmetric cipher, because we can only encrypt group elements with ABE. In this case it is the multiplicative group \(GT\). The number of bits is limited when we try to represent text messages (bit strings) with a group element, because the size of the group is derived from a prime. In Charm, it is most likely 512 bit prime. We cannot represent messages that are bigger than any group element, if we would have a mapping function to map bit strings to group elements and back again.
Charm provided the hybrid adapter in the context of ABE. The text message is encrypted using AES is derived from the random \(GT\) element.
The following code illustrated how to use Charm hybrid adapter (HybridABEnc) for CP-ABE scheme [BSW07].
Assume that we are using the access policy as ((PATIENT and 123456) or (PRACTITIONER and 9876543)).
- The patient’s certificate is read and decoded with the extensions containing the custom attributes.
- The patient’s certificate custom attributes are having
['PATIENT', '123456']so that the patient’s key has sufficient attributes to satisfy the policy. The cipher-text is permitted to be decrypted.
from cryptography import x509
from cryptography.hazmat.backends import default_backend
from charm.toolbox.pairinggroup import PairingGroup
from charm.adapters.abenc_adapt_hybrid import HybridABEnc
from charm.schemes.abenc.abenc_bsw07 import CPabe_BSW07
import json

# preparing the hybrid adapter for CP-ABE
groupObj = PairingGroup('SS512')
cpabe = CPabe_BSW07(groupObj)
hyb_abe = HybridABEnc(cpabe, groupObj)
(pk, mk) = hyb_abe.setup()

access_policy = '((PATIENT and 123456) or (PRACTITIONER and 9876543))'
message = "Personal Secret: high blood pressure and diabetic"
# ct is the encrypted message with the access policy
ct = hyb_abe.encrypt(pk, message, access_policy)

# pretend that we are in the secured server, reading the participant's certificate
pem_cert = open('my_self.crt', 'rb').read()
cert = x509.load_pem_x509_certificate(pem_cert, default_backend())

# fetching the custom attributes stored in the extension 1.2.3.4.5.6.7.8.1
for ext in cert.extensions:
    if (ext.oid.dotted_string == '1.2.3.4.5.6.7.8.1'):
        obj = json.loads(ext.value.value.decode('utf-8'))
        attr = [value for key, value in obj.items()]
        break

# using the patient attributes to generate the secret key
print('patient attributes:', attr)
sk = hyb_abe.keygen(pk, mk, attr)

# using the secret key
# CP-ABE will check if the attributes are sufficient to decrypt the message
hyb_abe.decrypt(pk, sk, ct)
If everything goes as planned, you should see the message.
patient attributes: ['PATIENT', '123456']
b'Personal Secret: high blood pressure and diabetic'
Amy has successfully decrypted her own medical record using her X.509 identity! Amy medical condition is secured that only herself and potentially a practitioner who has {"Role":"PRACTITIONER", "ID":"9876543"} attributes in the certificate can decrypt.
References
- [CRYPTO] Cryptography online documentation - X.509 module
- [BSW07] John Bethencourt, Amit Sahai, and Brent Waters. “Ciphertext-policy attribute-based encryption.” In Security and Privacy, 2007. SP’07. IEEE Symposium on, pp. 321-334. IEEE, 2007.
- [AGM13] Akinyele, J.A., Garman, C., Miers, I. et al. Charm: a framework for rapidly prototyping cryptosystems. J Cryptogr Eng 3, 111–128 (2013).
- [MD16] Marlon Dutra, Empowering X.509 Certificate Management with Python, PyCon Austrialia 2016.