artwork by Benny Cheung
Journey of Building Scale Model Dioramas
Building Scale Model
Part 1 of 2Diving into the immersive world of modelling and miniatures, one finds the ability to freeze history in time, captured within a meticulously crafted diorama. A fascinating blend of history and craftsmanship await us in the creation of a scale model diorama. Though it may seem like a challenging task, a systematic approach can turn our imagined WWII scene into a tangible reality.
Let us embark on this journey to create an evocative diorama of a Flakvierling 20mm anti-aircraft gun system mounted on an Opel Blitz. This scene, set against the backdrop of an Eastern Front stone barn house during WWII, tells a riveting tale of its own. The figures, a mixture from D-Day Miniatures and Evolution at 1/35 scale, are carefully painted in acrylic to breathe life into this historic moment. Follow this guide, step-by-step, to learn the way of building this piece of history.
[2024/10/05] We can listen to this article as a Podcast Discussion, which is generated by Google’s Experimental NotebookLM. The AI hosts are both funny and insightful.
images/journey-of-building-scale-model-dioramas/Podcast_Scale_Model_Diorama.mp3
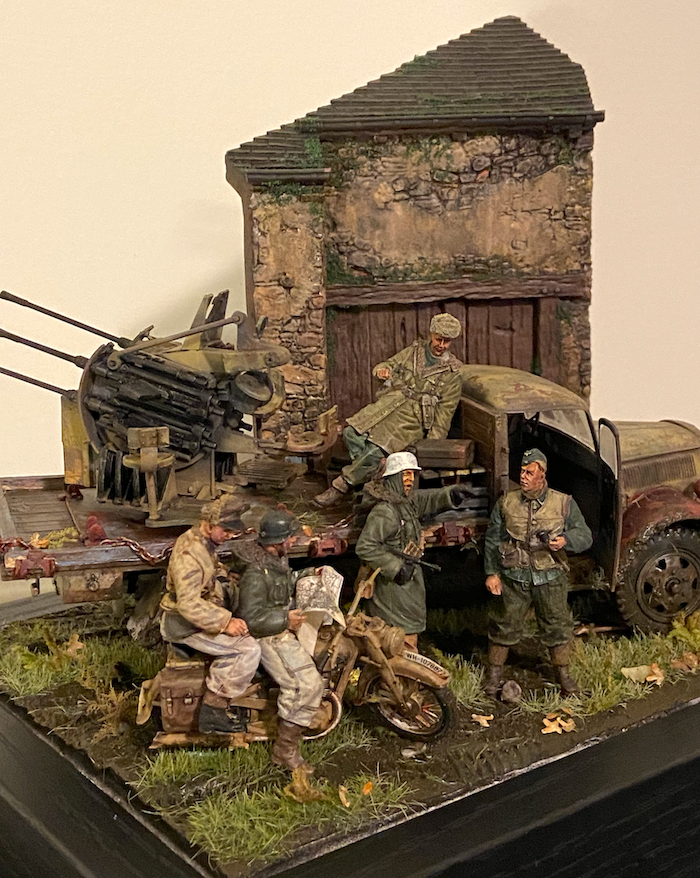
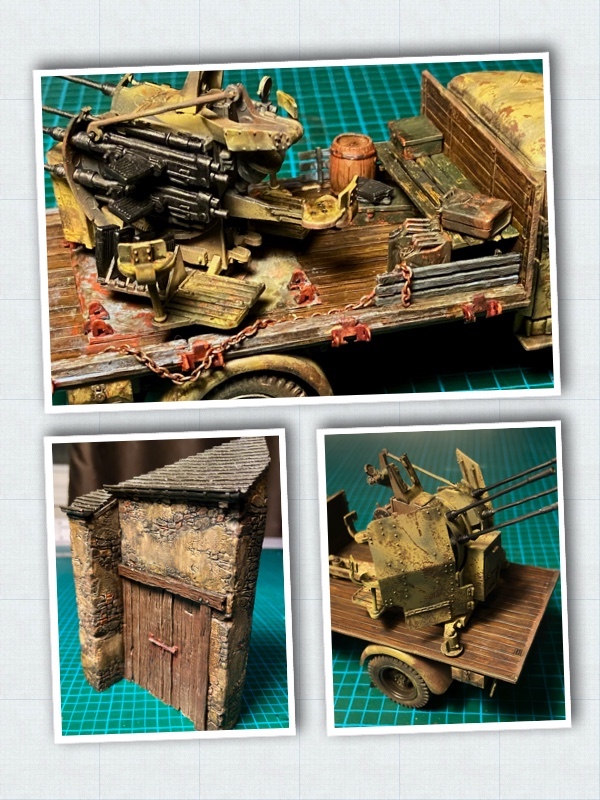
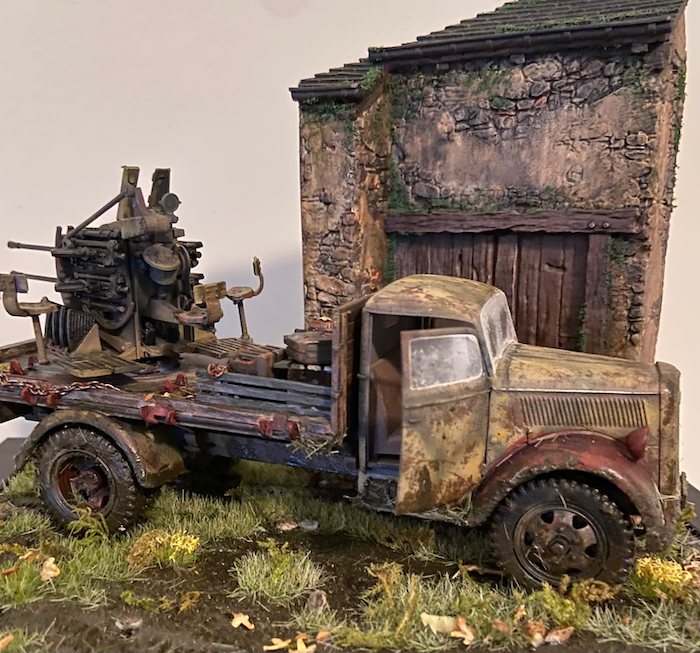
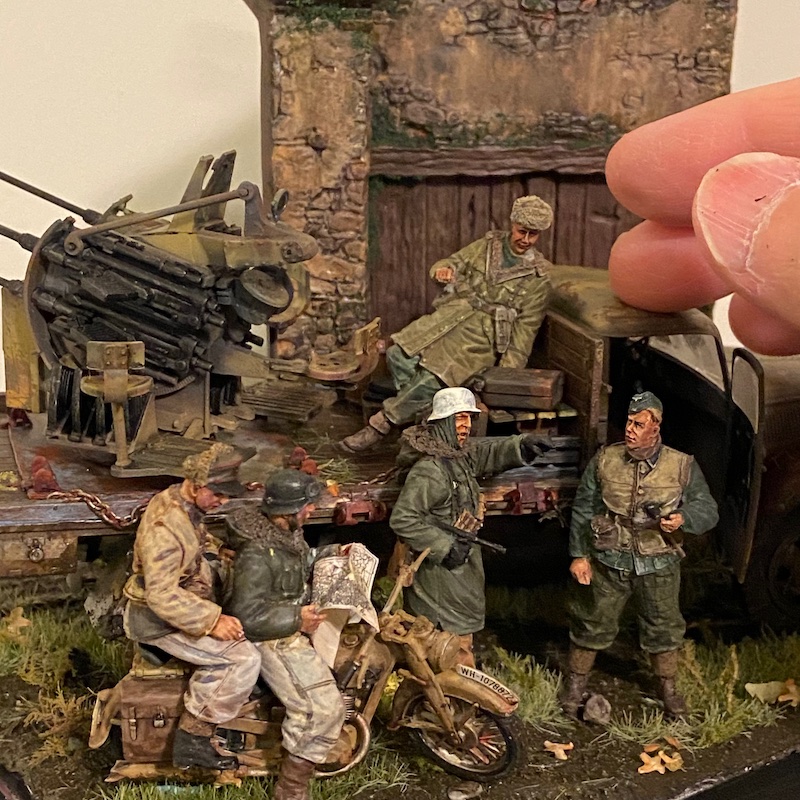
Figure. Here is the final presentation of our meticulous work - a scene set on the Eastern Front during World War II. The centrepiece is the rugged Opel Blitz truck equipped with the formidable Flakvierling 38 anti-aircraft guns. Completing the scene is a motorcyclist pausing in his journey, asking for directions. The details in the setting and the figures bring to life the struggles and the mundane moments experienced even amidst the chaos of war.
The Process
Creating a scale model diorama begins with planning our scene, deciding on its scale and size, and selecting appropriate model kits, figures, and components. After conducting necessary research, we build the components and test their fit with a dry fitting. we then paint all elements according to our chosen theme before fitting them onto the base again. Following this, we design and paint the base itself. The final steps involve arranging all the components on the base, blending them into the environment, and fixing them into place.
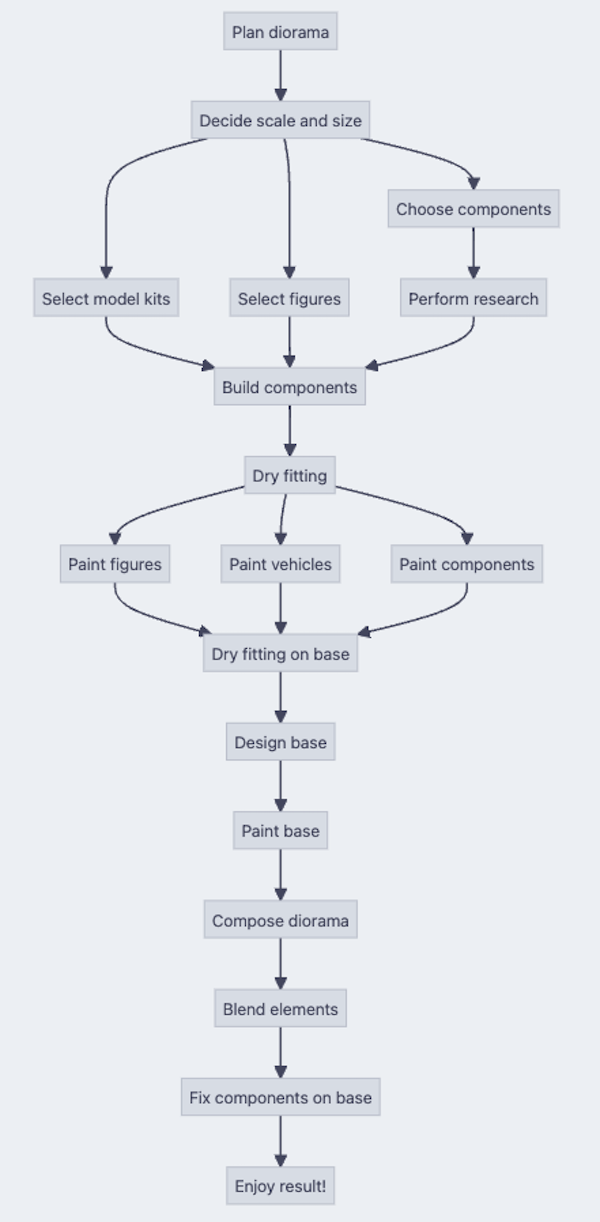
Figure. The presented diagram is a comprehensive visualization of our diorama building journey. From the initial sparks of imagination through to the tangible reality, this chart guides us through each stage of the creative process.
As depicted in the diagram, the diorama building process, much like software architecture, operates as a systematic and methodical workflow. Each step in the procedure is repeatable, allowing for consistent results while fostering creativity and innovation. The workflow, from the first spark of imagination to the final, tangible model, guides us on a journey of transformation, mirroring the systematic yet creative process integral to software architecture.
Preparations
Preparation is key when starting a new project. A diorama starts as an idea, a scene that we’d like to capture. This can come from our imagination, historical photos, or even a favourite movie scene.
Historical Background
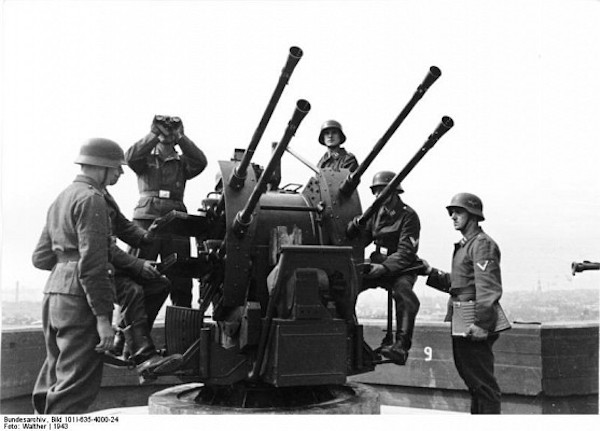
The Flak 30 (Flugzeugabwehrkanone 30) and improved Flak 38 were 20 mm anti-aircraft guns used by various German forces throughout World War II. It was not only the primary German light anti-aircraft gun but by far the most numerously produced German artillery piece throughout the war. It was produced in a variety of models, notably the Flakvierling 38 which combined four Flak 38 autocannons onto a single carriage.
The term Vierling literally translates to “quadruplet” and refers to the four 20 mm autocannon constituting the design.
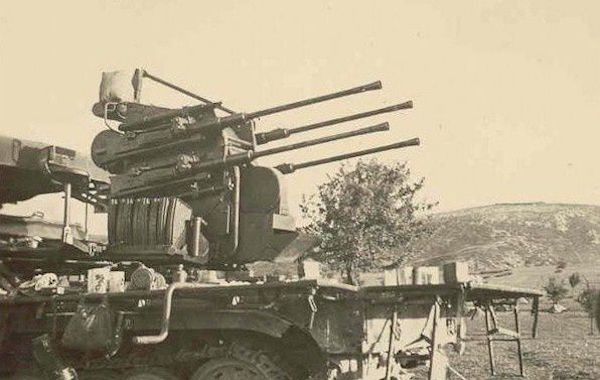
The Flakvierling four-autocannon anti-aircraft ordnance system, when not mounted into any self-propelled mount, was normally transported Sd. Ah. 52 trailer, and could be towed behind a variety of half-tracks or trucks, such as the Opel Blitz and the armoured Sd.Kfz. 251 and unarmored Sd.Kfz. 7/1 and Sd.Kfz. 11 artillery-towing half-track vehicles.
Scale, Vehicles and Equipments
Next, determine the scale, size, and base of our diorama. The scale should be proportionate to the figures we plan to include and the size depends on the area we have available for the diorama.
Now comes an exciting phase - the selection of model kits and figures. For this project, we’re specifically looking at 1/35 scale models to maintain a consistent level of detail and realism across the diorama. The world of model kits offers numerous choices that can cater to our specific requirements.
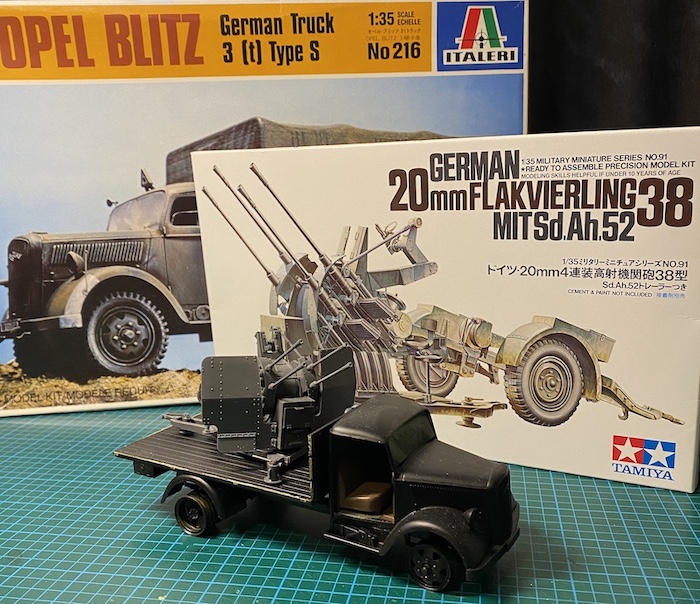
For the centerpiece of our diorama, we’re selecting the Opel Blitz German Truck Type S model kit made by Italeri. This will serve as the mobile platform for our anti-aircraft system.
Next, we choose the German 20mm Flakvierling 38 anti-aircraft guns, a kit made by Tamiya. This model will add a potent defensive presence to our scene, and it’s the perfect fit for our Opel Blitz truck.
Keep in mind that we’ll be modifying the Opel Blitz vehicle model to accommodate the Flak 38 guns, ensuring the setup is as historically accurate as possible. The modifications are part of the fun, bringing a unique touch to our diorama.
Figures
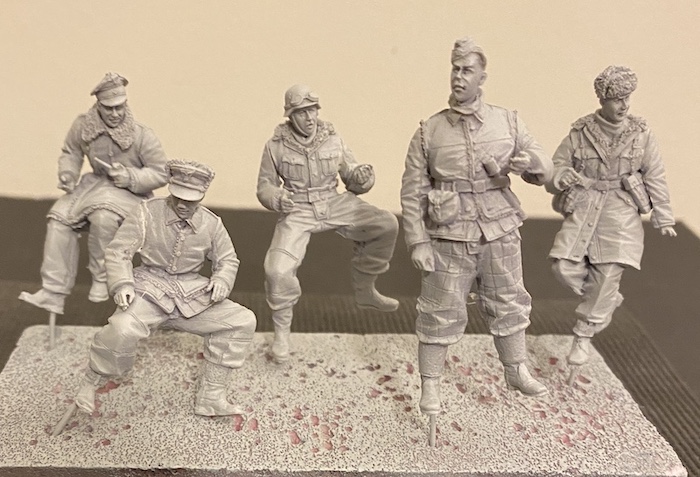
To populate our diorama and add human elements to the scene, we’ll be incorporating model figures at 1/35 scale from D-Day Miniatures and Evolution. These figures will interact with our vehicles and breathe life into our WWII Eastern Front setting.
Once we’ve chosen the vehicles and figures, it’s time to consider the backdrop and surrounding elements. Think about the elements that will fill out the scene, like the background structures (in our case, the stone barn house), vegetation, and the general landscape. These components provide context and enhance the overall believability of our diorama.
Lastly, it’s essential to dive into some historical research. This crucial step ensures our diorama not only portrays what we want to depict but does so with accuracy, enhancing its believability. In our case, the research might involve understanding the typical environment of the WWII Eastern Front and how our Flakvierling anti-aircraft system and Opel Blitz would have been operated and deployed. Through this attention to detail, our diorama becomes a realistic slice of history.
Building
With preparations complete, it’s time to immerse ourselves in the construction phase of our diorama. This entails the assembly of the figures, the Opel Blitz, the Flakvierling anti-aircraft guns, and other significant components of the diorama following the guidance provided in the respective model kits.
Once we’ve built our models, proceed with a dry fitting of the primary elements. This is an essential step to visualize how the assembled pieces integrate within the diorama, comparing it with our original vision. This fitting gives we the opportunity to make any necessary alterations to ensure that everything fits together perfectly.
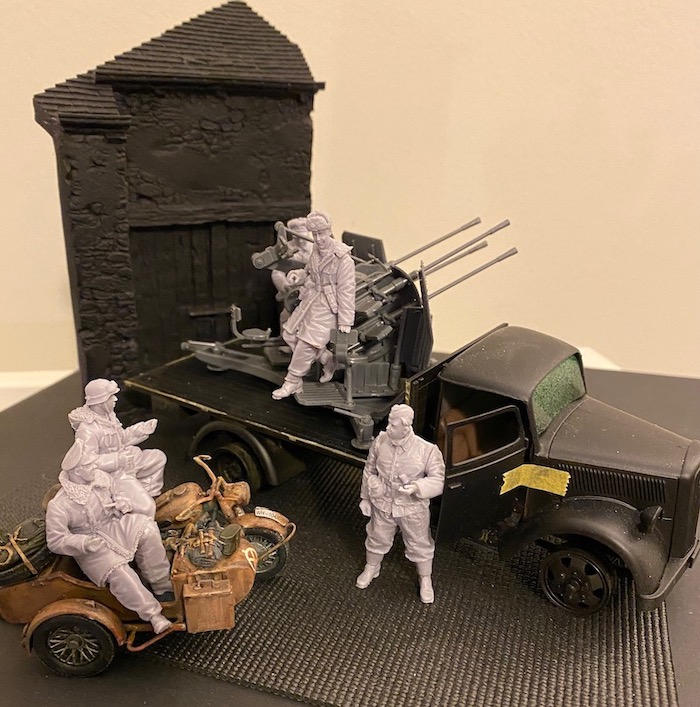
During this process, we may find that certain elements could be tweaked to better tell the story. In our case, we decided to replace one of the initial figures with an Evolution figure, depicted as pointing towards a specific direction, adding a dynamic aspect to the scene. Similarly, we modified a motorcycle to remove its sidecar, further tailoring our diorama to align with our narrative. Such changes highlight the flexibility and creativity involved in building a diorama.
Painting, Brushing, Weathering
Figures
With our diorama components assembled and properly fitted, we now introduce the vibrant element of color. Begin by painting the figures, taking into consideration the historical context, weather, and conditions we’ve researched and decided upon. This step brings a layer of realism to our diorama, as the colors should reflect the time and place being depicted.
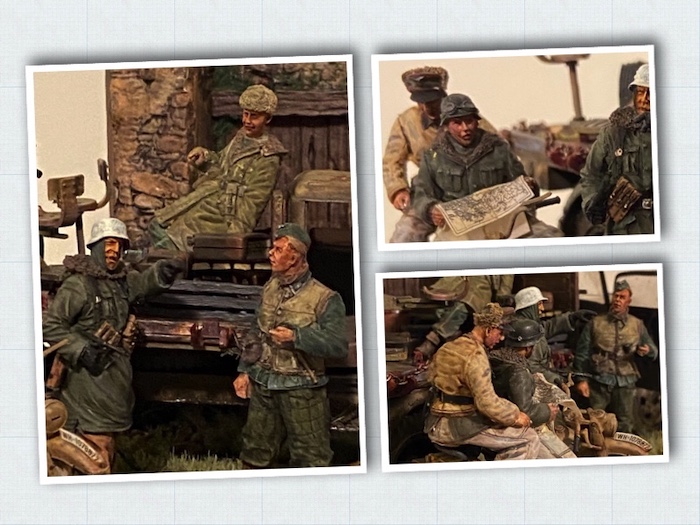
For instance, one of our figures is designed as the driver of the Opel Blitz, standing next to his vehicle. He’s participating in an interaction with a motorcyclist, providing him directions. This scene is carefully painted to capture the subtlety of his facial expression, as he’s trying to verbally convey directions while another figure is visually pointing towards the destination. These details, brought out through thoughtful painting, add depth to our diorama, turning static figures into characters with a story to tell.

Vehicles
While a comprehensive guide on various painting techniques and vehicle modelling is beyond the scope of this article, we’ll proceed with the basics. Following the painting of figures, it’s time to bring color and texture to the vehicles in our diorama. Utilize the correct color scheme along with weathering effects to enhance the authenticity of our scene.
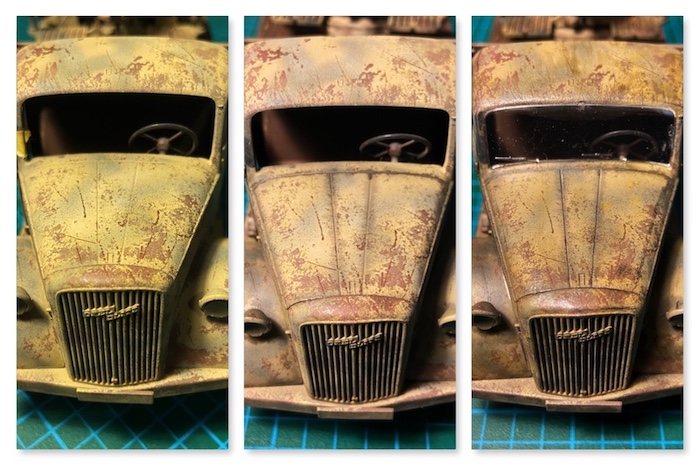
In our scenario, we envision the Opel Blitz as a vehicle that’s seen extensive use. This vision will be represented through visible scratches, signs of rust, and the faded original green camouflage on the vehicle’s body. To create this effect, we’ll employ chipping techniques, allowing the worn-out appearance to naturally reveal itself. Such attention to detail underscores the historical context and gives our diorama an authentic, lived-in look.
Building and Accessories
Don’t forget to paint the major diorama components like houses, accessories, and other elements that make up the scene. Painting not only brings the diorama to life, but it also adds a touch of realism.
Diorama Base
Moving forward, our attention shifts to the base of the diorama. At this stage, conduct another round of dry fitting, this time focusing on the base. This ensures all our carefully constructed and painted components will perfectly sit on the base, harmoniously creating the scene we’ve envisioned.
In our case, we’re picturing a soggy, mud-slicked terrain, interspersed with clumps of grass and weeds. This terrain has been further detailed by tire tracks imprinted by the passage of heavy vehicles, highlighting the wet, malleable nature of the ground. These meticulous details lend an additional layer of realism to our WWII Eastern Front scene, and emphasize the conditions under which the events are unfolding.
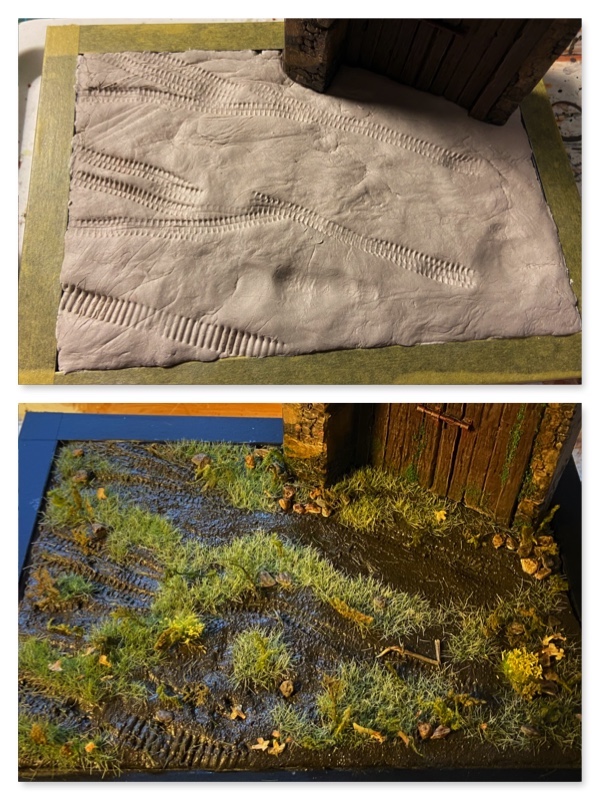
Following the dry fitting, it’s time to bring our base to life with design and paint. This step involves more than just applying color; it’s about considering the color scheme of our diorama, the prevailing weather conditions, and the type of ground cover and special effects that can add depth and realism to our scene.
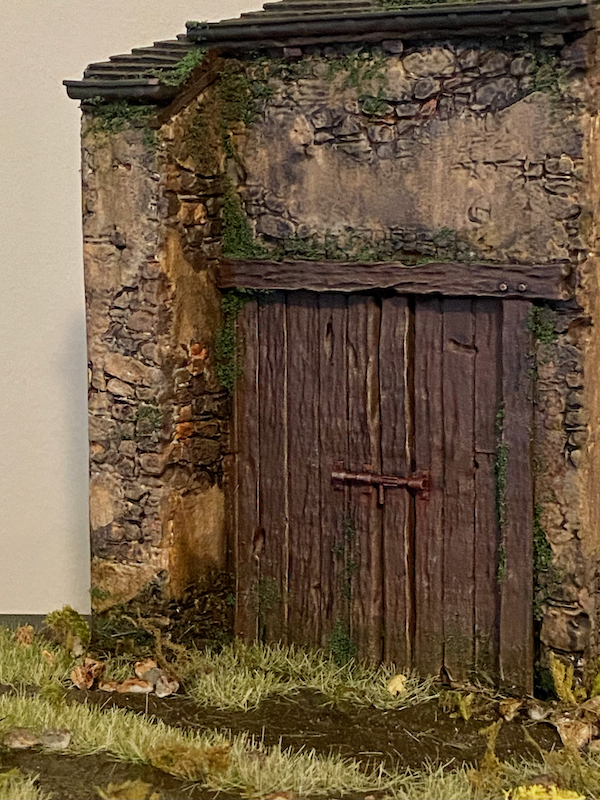
For our diorama, we picture the old stone barn bearing the marks of time and weather. It has a crumbling, aged feel, the signs of dampness and the passage of time represented by patches of moss growing around the door rims and on the roof. These weathering details, skillfully applied through paint and design, which enrich the scene atmosphere.
Composition
Blending with Environment
With all the components skillfully built and vibrantly painted, the stage is set to assemble everything. Begin the composition by carefully arranging all the elements on the diorama base. The aim is to integrate the vehicles and figures into the environment seamlessly, thereby creating a cohesive and realistic scene.
In our diorama, for instance, we consider the impact of the environment on the vehicles. The Opel Blitz, having navigated the muddy terrain, will naturally have bits of grass and splashes of mud on its body. Such minor details might seem insignificant, but they add a touch of realism and continuity that connects all the elements in the diorama.
Fixing Components in Place
Once our diorama composition is arranged to our satisfaction, the next step is to secure everything onto the base. Depending on the materials used in our models, we might need to use different types of adhesive. Ensure that we choose the right type of glue that best suits each material to achieve a firm and lasting bond.
For instance, if we’re affixing natural materials such as moss or small bits of wood, Mod Podge might be our adhesive of choice due to its flexible and clear-drying properties. However, for heavier materials, especially metal components, a stronger bond is required. In such cases, super glue could be our go-to option. Each element’s secure placement contributes to the diorama’s durability, ensuring our creative masterpiece stands the test of time.
Concluding Remarks
In conclusion, once everything is securely placed and our diorama is complete, take a moment to step back and admire our work. we’ve journeyed from a simple concept to a tangible, three-dimensional miniature scene, capturing a specific moment in time. This diorama is a concrete representation of our creativity, diligence, and dedication.
And with that, we’ve explored the entire scale model diorama process. Witnessing its evolution from inception to completion has been an exceptionally fulfilling journey. Remember, it’s a journey that demands patience and appreciation of each step spanning a full year. The most important part is not just the final product, but also the enjoyment derived from the creative process itself. So, continue to embrace our artistic side and happy modelling!
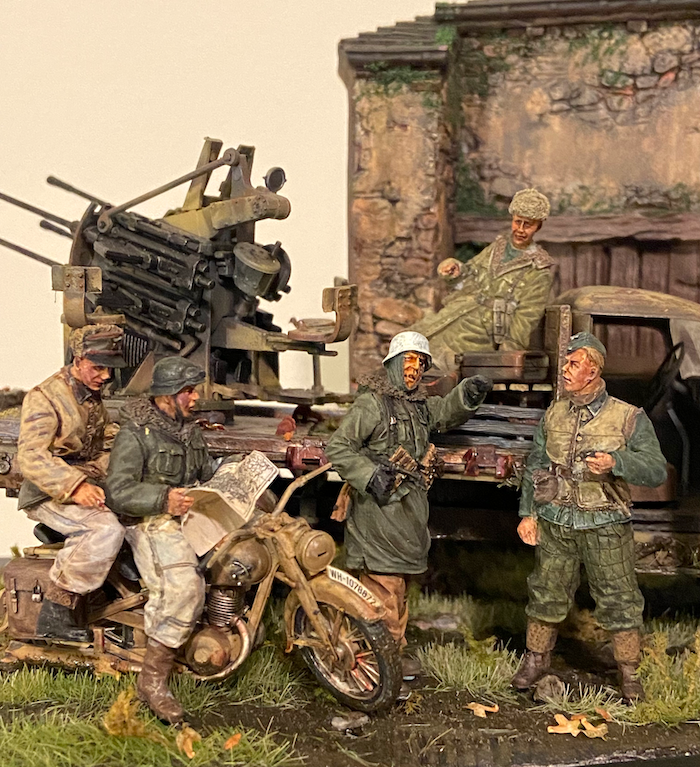
Figure. Presenting the completed diorama featuring the Flakvierling 20mm anti-aircraft guns mounted on an Opel Blitz, showcased within the historic setting of a WW2 stone barn house. The figures, combined from D-Day Miniatures and Evolution 1/35 scale, bring life and realism to the scene. Each painted with acrylic, capturing the anti-aircraft crews friendly directing the motorists route.
References
History
- Wikipedia, 2 cm Flak 30, Flak 38 and Flakvierling 38
Movies
- Johny Johnson, 2 cm Flak 30/38 - In The Movies, video, 29 May 2022.
- A brief overview of the 2cm Flak as seen in movies and video games.
Books
- Kirill Kanaev, Figure Painting Techniques F. A. Q. - The Complete Guide for Figure Scale Modellers, AK-Interactive, Nov 2021. ASIN: B092GQWF7L
- Mig Jiménez, F.A.Q. 2 Limited Edition, AK-Interactive, May 2015. ISBN: 978-8461548149
- Adóba, László, Let’s Build Diorama, Vol.1 Urban Scenes, Sep 2014.
- Adóba, László, Let’s Build Diorama II. Terrain and Vegetation, 2010. ISBN: 978-9630805148

