artwork by Benny Cheung
Building StuG III Model in Winter Camouflage
Building Scale Model
Part 2 of 2As we set forth on another exhilarating modeling journey, this time exploring into the realm of the World War 2 German StuG III anti-tank vehicle. This endeavor not only guarantees a captivating building experience but also offers an exploration of a pivotal fragment of history. I am looking forward to the delight and fulfillment that accompanies the creation of this scale model piece, eager to adopt the techniques showcased by fellow enthusiasts. As we reach the culmination of this project, I apply the power of Generative AI techniques to enhance the final photographic outcomes, adding a modern twist to this historical recreation.
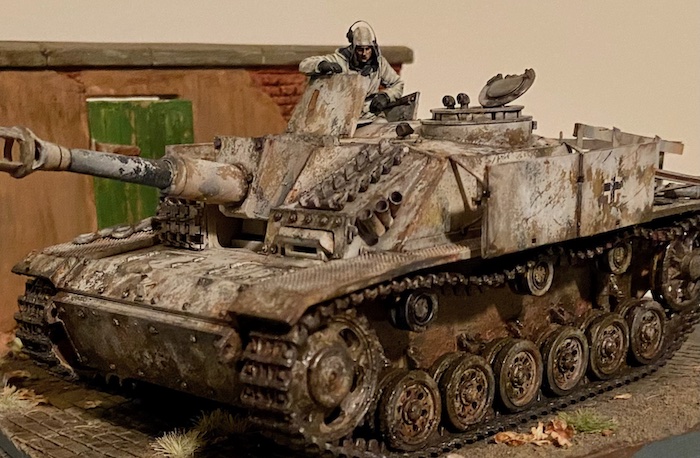
Figure. The completed World War 2 German StuG III tank (from Tamiya 1/35 StuG III Ausf.G model kit) adorned with a winter camouflage, complemented by various weathering elements, showcasing its final appearance.
Building and Painting
Putty Surfacing
In the reference tutorial, I stumbled upon a remarkable technique that has significantly elevated the realism and texture of my creations. This method involves utilizing putty (Tamiya Putty), a versatile material, to add a rich, tactile dimension to the otherwise smooth plastic surface of the model.
By skillfully manipulating the putty, I was able to mimic the rugged and coarse texture of metal, a transformation that not only enhances the visual appeal but also imparts a sense of weight and depth to the tank. This nuanced approach creates an illusion of a battle-hardened vehicle, adding layers of history and stories to its facade.
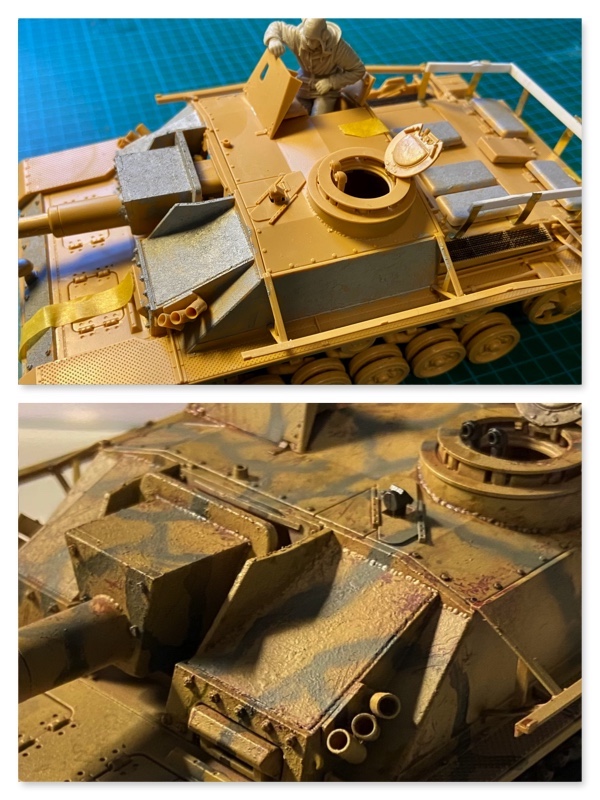
Figure: Displayed in the top image is the added putty texture and the custom-built rack situated at the back, while the bottom image showcases the painted outcome, highlighting the rough putty texture that bestows the model with an illusion of greater depth and heft.
Furthermore, I took a restrained approach to the weathering process, focusing on mastering the delicate art of chipping. This technique, when combined with the following sections, adds a level of authenticity that truly brings the model to life. It creates a narrative of a machine that has witnessed the ravages of war, bearing marks that speak of its journey and experiences.
Painting and Weathering
I find myself thoroughly enjoying the vibrant process of painting this StuG III Ausf.G, equipped with the formidable 105mm assault gun. This phase has been a playground of exploration, where I’ve been able to apply a range of new techniques gleaned from the expertise of various seasoned modellers. It’s a journey of continuous learning and experimentation, adding layers of depth and realism to the model.
Layering the Base Coats
The process of building up the base layers is both methodical and artistic, involving a series of steps that each add a new dimension to the painted layers. Here’s a glimpse into the layers that form the canvas for the detailed artwork that follows:
- Hull Red: This initial layer sets the tone, providing a deep and rich base that hints at the underlying metal structure of the tank.
- Dark Sand: Following the red, a layer of dark sand is applied, adding a contrast and depth that starts to bring the texture and contours of the tank to life.
- Chipping: At this stage, strategic chipping is introduced to create a worn, battle-hardened appearance, adding a realistic touch of age and wear.
- Basic Shading: This layer involves the subtle art of shading, enhancing the three-dimensional aspect of the model and highlighting the intricate details of its design.
- Camouflage Pattern: Next, a camouflage pattern is carefully applied, adding a tactical and aesthetic element that blends artistry with historical accuracy.
- Chipping (Again): To finish off, a final round of chipping is applied, further accentuating the rugged and battle-worn persona of the tank, ready to tell its story through the ensuing layers of weathering and detailing.
As I progress through each layer, the model transforms, adopting a personality and a narrative that delight the viewers.
Oil Dots Surfacing
Adopting a technique that involves the strategic application of diverse oil color dots, I have managed to infuse the tank’s surface with a rich tapestry of tones. By skillfully blending and blurring these hues, the surface transcends its initial state, morphing into a canvas that portrays metal’s weathering complexity, thereby enhancing depth and intriguing visual narrative.
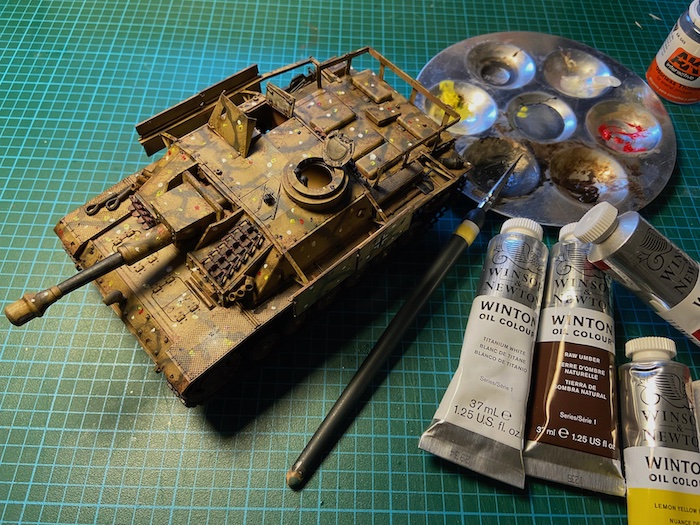
Figure: Showcasing the utilization of varied oil color dots applied to the tank’s surface, which, after blending and natural brush strokes, culminates in a finish that amplifies the realism of the tank’s surface hues.
The following photographs showcasing the completed base coat, a vital step that lays the groundwork for the subsequent painting and weathering phases.
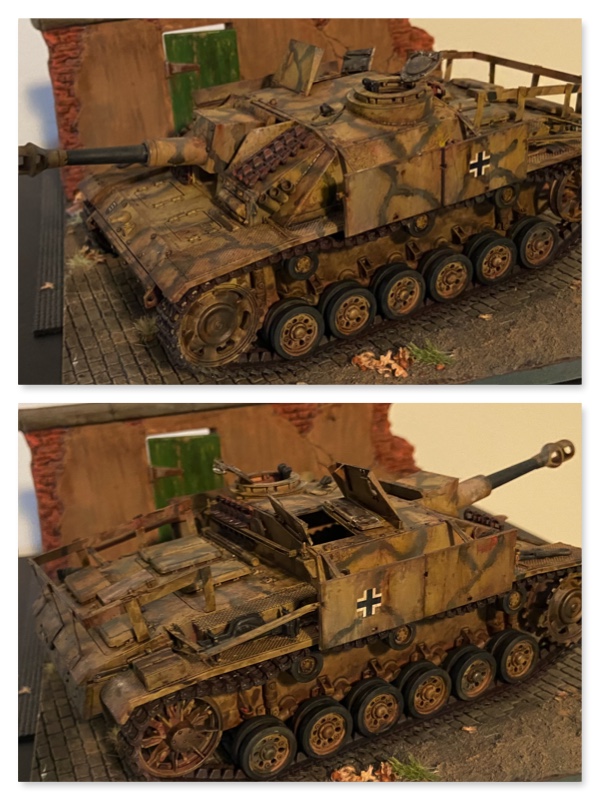
Figure. Illustrating the initial base coating of the tank, a layer that will largely be concealed by the subsequent application of the winter white wash.
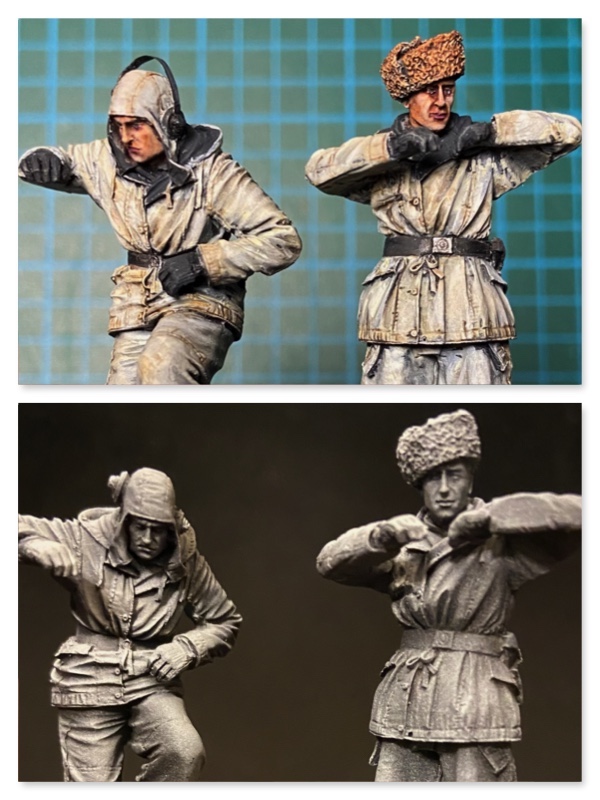
Bringing the Tank Crews to Life
The journey of recreating the StuG III experience advances another step with the painting of the tank crews, a process I’ve documented through photographs to mark this significant milestone. These figures, crafted in 1/35 scale by Evolution, bring a human touch to the model, adding layers of realism and narrative depth. Did your eyes catch the detail of the Captain with headphones? This is a nod to the advanced communication systems German tanks were equipped with since the 1940s, facilitating seamless coordination between tank crews and other vehicles on the battlefield.
To further immerse oneself in the era, I’d like to share a few lines from the “Panzerlied,” a song that reverberates with the spirit and camaraderie of the tank crews, famously featured in the movie “The Battle of the Bulge”:
...
And when fickle luck will desert us at last
Then comforts of home are but memories past,
And when the fatal bullet strikes us
Then no one can save (no one can save)
Our panzer will be our glorious grave.
Continue with painting, painting, painting.
Crafting the Winter White Wash Camouflage
After finished the StuG III Ausf.G base coat, now continue painting with a striking winter camouflage. Venturing into new territories, I opted to employ the hairspray chipping technique for the first time, eschewing the use of pre-made products. I must say, the outcome has surpassed my expectations, presenting an authentic and scale-appropriate chipping effect that adds a layer of realism to the model. Utilizing “Tresemme” hairspray turned out to be a cost-effective choice, offering both a generous quantity and ease of application with its spray bottle feature.
Transitioning from the undercoat to the winter camouflage was indeed a nerve-wracking phase, almost feeling like I was undoing the work invested thus far. However, witnessing the final result, it’s evident that the risk was well worth the reward, showcasing a tank that stands as a testament to the dedication and craftsmanship poured into every stage of the process.
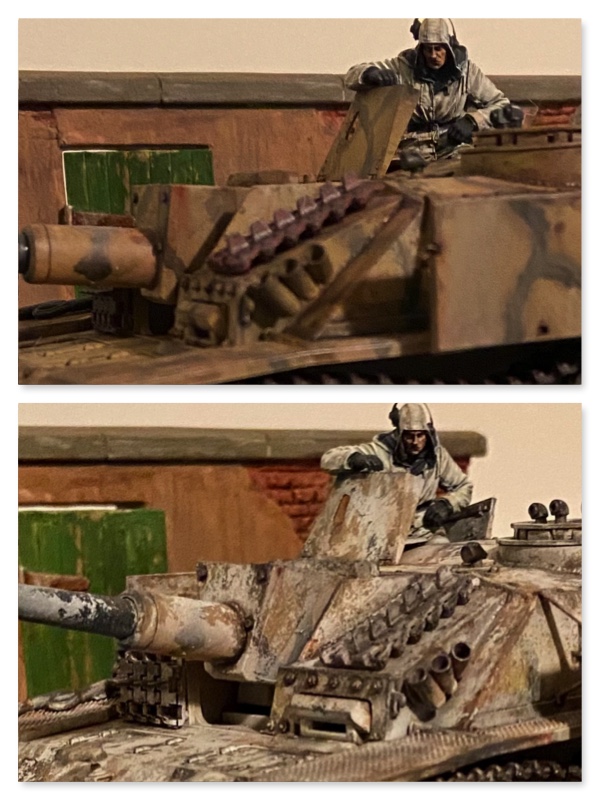
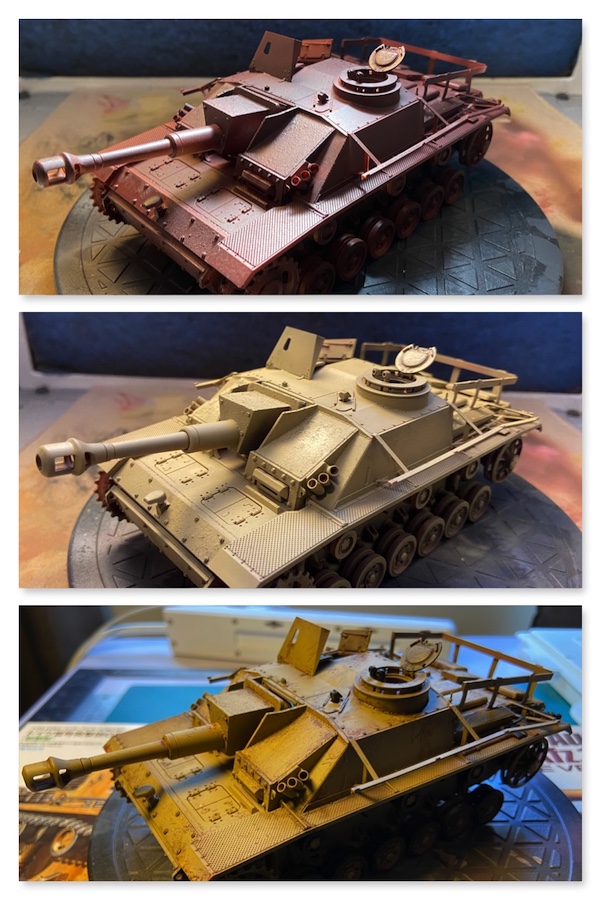
Figure. Illustrated the transition from the base coat to the winter white wash.
By incorporating the oil pin wash, accompanied by successive layers of oil and enamel to create realistic rust stains, has truly brought the model to life. After numerous stages of detailed painting, the finished winter whitewash stands out, showcasing a representation that resonates with realism and depth.

Figure. The completed StuG III tank adorned with a winter white wash, complemented by various weathering elements, showcasing its final appearance.
Last but not least, the tracks bear intricate layers of mud, dirt, rust, and metallic elements, intertwining to create a rich tapestry of textures. I believe the outcome successfully captures a striking semblance of additional realism.
More Details and Customization
Adding stowage (extra items and equipment that a tank might carry into battle) can be a fulfilling part of the model-building process. It allows us to add a personal touch to the StuG III models, making it unique. In addition, stowage can make a model look more realistic, as tanks in the field would often be seen with various pieces of equipment, supplies, and personal belongings attached to the outside of the tank.
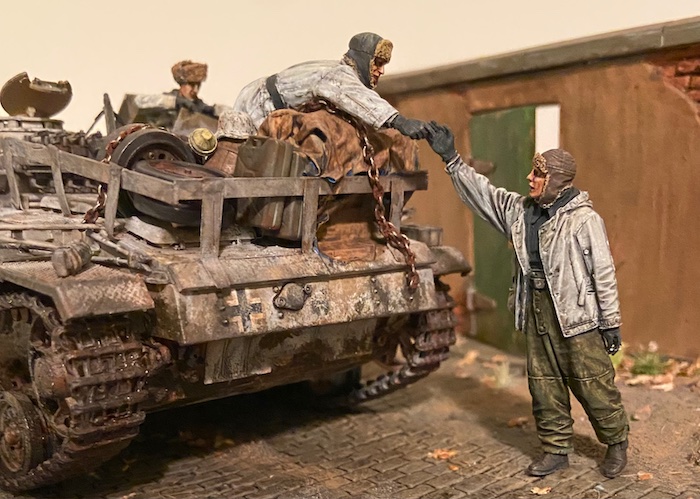
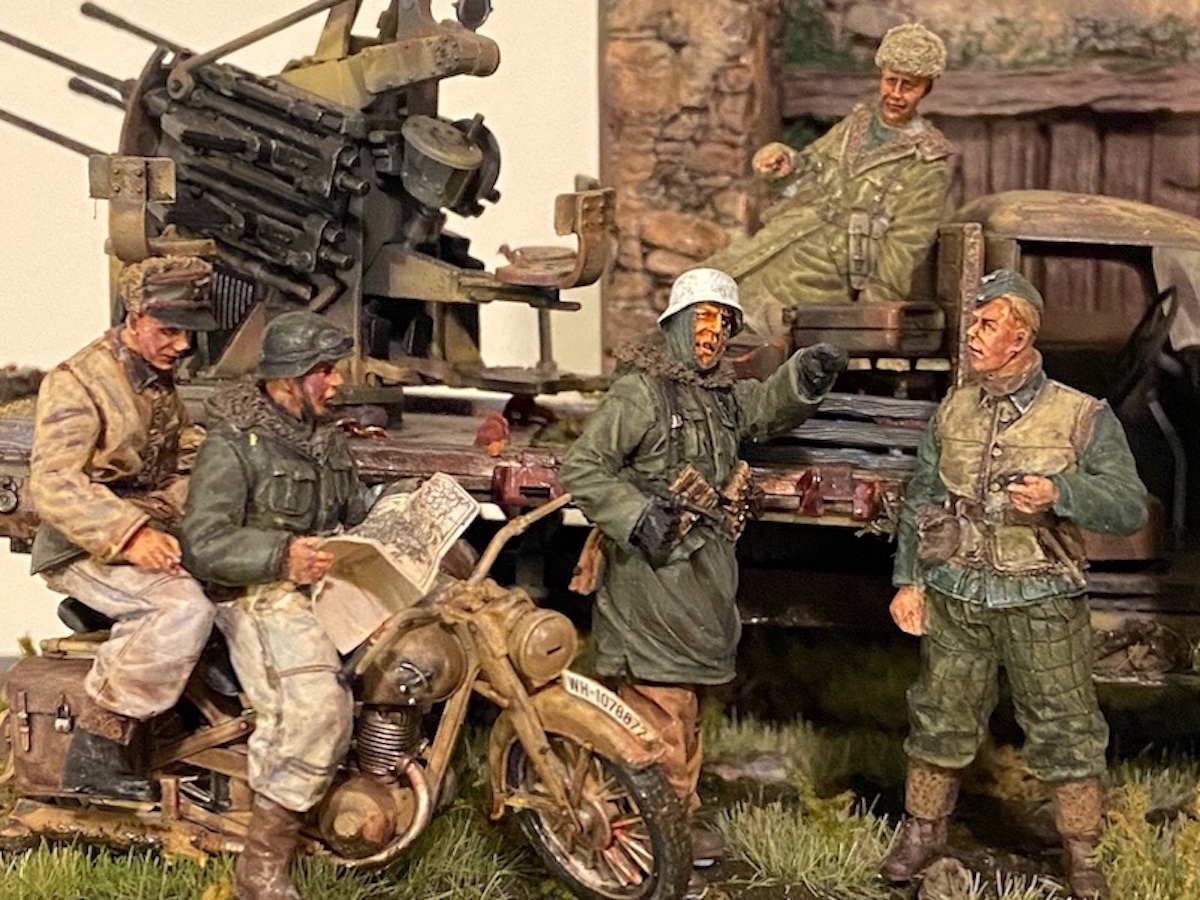
Figure. Beyond merely featuring stowage, this scene is enriched with a human element, depicting a heartfelt farewell between comrades on the battlefield.
This endeavor serves as a canvas for artistic expression, enabling us to craft our model into a genuine piece. In these picture, alongside the personalized stowage on the tank’s rear, we are incorporating two figures engaged in a heartfelt farewell, encapsulating the strong bond of friendship amidst turbulent times.
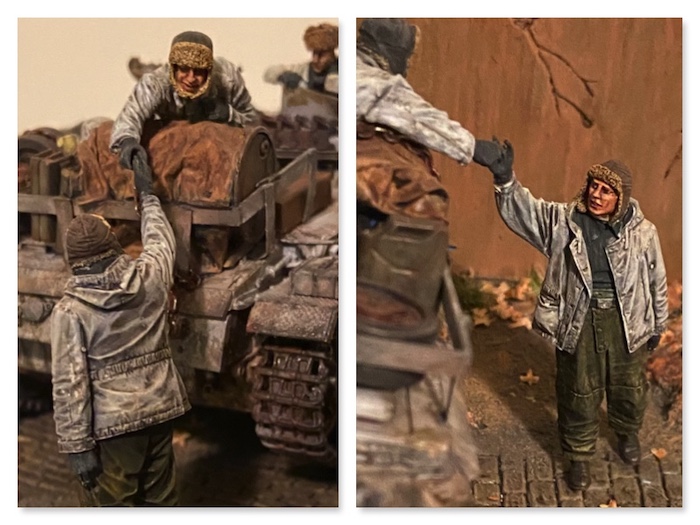
Figure. The process of painting these two figures, positioned at the rear of the tank, was a delightful experience. Their expressive faces and dynamic poses significantly enhance the overall ambiance of the model.
AI Generated Background
For my personal interests in latest technology, the Generative AI undertakes the task of autonomously generating a background that seamlessly aligns with the existing color tones and environmental elements present in the original image. This sophisticated algorithm is designed to analyze the intricate details of the foreground, thereby synthesizing a background that harmonizes both in terms of color palette and the overall aesthetic.
With the help of Stable Diffusion (open-source free software), I can prompt AI’s help to generate the appropriate photo background. First, I isolated the image background from foreground by producing an image mask. Then load the image along with the mask, using the Img2Img Inpaint method to only paint to the background according to my prompt to AI.
As the AI operates, it fabricates a variety of images, each offering a slightly different interpretation and approach to the background creation. This multiplicity not only ensures a richer selection but also allows for a nuanced adjustment of the background, catering to specific preferences or project requirements.
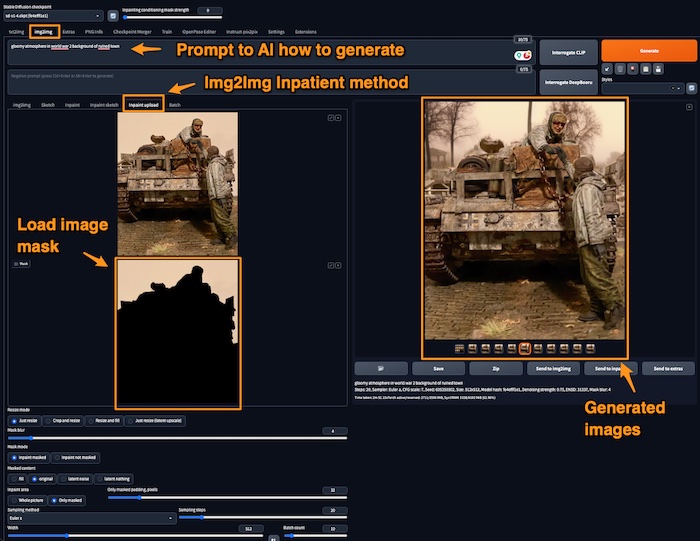
Figure. A preliminary glimpse into the process of utilizing Stable Diffusion to craft the background image, without describing the intricate details.
Once the generation phase reaches completion, individuals are presented with the opportunity to peruse through the diverse array of generated images. This step is crucial as it empowers users to critically evaluate each option, considering factors such as color balance, thematic consistency, perspective and visual appeal. One of the most challenging aspects is locating a background image that aligns seamlessly with the specific photographic perspective of the model, particularly when the viewpoint is from a higher or lower angle. Consequently, users can pinpoint and select the rendition that most resonates with their vision, ensuring the final output is not only aesthetically pleasing but also cohesively integrated with the initial image.
Here is the final selected result,
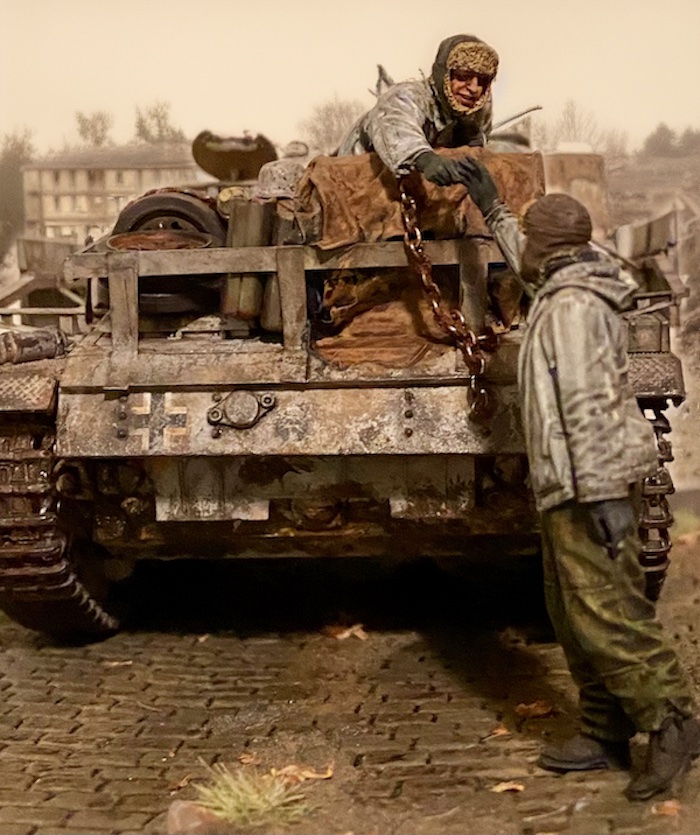
Figure. This image captures the harmonious blend of the AI-generated background with the poignant foreground scene of close friends bidding farewell on the battlefield, aiming to infuse the tank model presentation with a touch of human connection and emotion.
References
Your Guide to Mastering the Craft
To ensure a rich and rewarding building experience, I’ve curated a list of invaluable resources that serve as a beacon of knowledge and inspiration. These references are designed to guide you step-by-step, transforming a set of materials into a historically accurate representation of the StuG III. Here, you’ll find detailed insights into both the assembly and the artistic finishing touches that bring the model to life:
-
Scale Model Club 2, StuG III Ausf.G - Part 1 - 1/35 Tamiya - Tank Model - Model Building Journey, video, 28 Apr 2023. This first part guides you through the initial stages of assembling your StuG III model, laying a solid foundation for your project.
-
Scale Model Club 2, StuG III and Armored Howitzer - Part 2 - 1/35 Tamiya - Tank Model - The Art of Painting and Weathering, video, 12 May 2023. In the second installment, delve deeper into the nuances of painting and weathering, techniques that add a layer of realism and historical authenticity to your model.
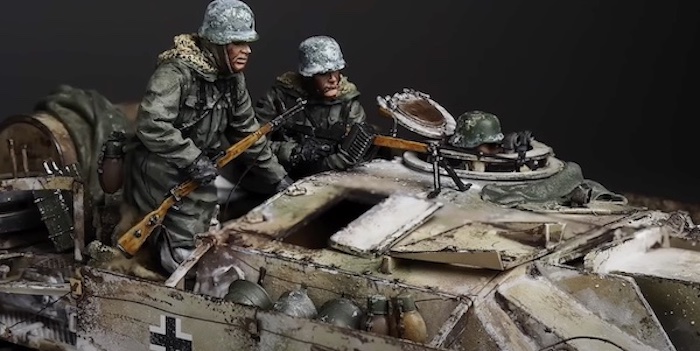
Figure: This image showcases the completed model, a creation inspired by the techniques and guidance gleaned from Scale Model Club 2’s building and painting tutorials. While I adhered to the expert advice provided in these videos, I also ventured to infuse my personal touch, diverging in several aspects to impart a distinctive character to my model. (image credit: Scale Model Club 2 Youtube Channel)
A Glimpse into the StuG III’s Storied Past
Resources for Deep Dive:
- FactBytes, Exploring the Sturmgeschütz: Germany’s WWII Powerhouse, video, 5 Feb 2023.
- The Australian Armour & Artillery Museum, The Majestic StuG III F: A Restoration Journey, video, 4 Nov 2022.
- Panzer Insight, The StuG III Ausf G: A Visual Chronicle, video, 22 Jan 2020.
The StuG III, conceived from Von Manstein’s “Sturmartillerie” concept, emerged in the 1930s to address the German infantry’s need for mobile artillery support during WWII. Daimler-Benz AG initiated its development in 1936, utilizing the Panzer III chassis to create a support vehicle equipped with a 75 mm howitzer. This marked the inception of the StuG III, which saw its first prototypes produced in 1937.
Entering production in January 1940, the StuG III underwent several upgrades, enhancing its functionality and maintaining a cost-effective production line until the end of WWII in April 1945. With over 11,300 units produced, it became the most manufactured armored fighting vehicle in the German military service.
The production timeline witnessed several significant versions, including the initial Ausf.A variant and the subsequent Ausf.C and Ausf.D versions, which introduced minor improvements. A notable advancement came with the Ausf.F variant in 1942, transitioning the StuG from an infantry support vehicle to a formidable tank destroyer equipped with high-velocity guns capable of countering new Soviet tanks.
The series culminated with the Ausf.G variant, which became the main production version from December 1942 to April 1945, characterized by a simplified and standardized design that incorporated several enhancements, including increased ammunition storage and a factory-fitted upper MG 34. This variant marked a significant milestone in the StuG III’s illustrious history, showcasing the vehicle’s evolution into a powerful and efficient war machine.