artwork by Style of blocks transfer to Klee's Gradation Red
Existential Crisis with Microservices using Docker
As software architects, we have no doubt that both Microservices architecture and Docker deployment help to bring flexibility and scalability in system design. However, the blurring existence of a system identity, due to distributed services and virtualized machines, has lead to the question of what makes the identity of this new form of design intention. This article points to one of the design intension is rapid development of data-oriented services. After understanding the basic of Docker deployment, this article offers a Starter Framework using Flask/PostgreSQL/Docker can be used to rapidly construct any data-oriented service with a database backend. From a larger background scheme, this article prepares the reader for a greater architectural composition of the future system.

Figure. Is a personal Identity (1) a body (2) a brain or (3) an invisible soul? Comparing to a software system (1) machine (2) software or (3) intention to raise the system’s existential question.
In this article, you can expect to learn:
- Start with Philosophical Musing on System Existence
- Follow by Understanding Docker
- Then, construct a Rapid Microservices using Docker
- Learn how to build the Microservices stack with Docker Orchestration
- Learn how to build Persistent Volumes with Docker - Data-only Container Pattern
- Learn how to create Postgres DB Image
- Learn how to create API starter-api Image
- Learn how to use the API image to import Sample (Medical Procedure Codes) into DB
- Finally, conclude with What’s Next
Philosophical Musing on System Existence
The expression “this system is my baby”, is a common analogy that a software system creator ascribe to his invention. The emotional attachment is the creator’s design and his creative spirit are manifested in the system. Imagine if the software is the brain of the system, the body is the physical machine to run the software. The soul of the system, where the creator’s desire and intention are encoded, is displayed by the style of functionalities. The first experience of running a Docker container, with it’s virtual and temporal existence, strangely invokes the philosophical amusment on “existence”.
Let’s run the Docker https://www.docker.com/ command,
$ docker run ubuntu echo “hello world”
The output displays on the terminal,
hello world
The machine responsible to say “hello world” has gone through,
- Docker pull down an image of the lastest
ubuntuos image from Docker registry - Docker start an instance of
ubuntuimage as a running container - the virtual machine - Docker execute the bash shell command
echo "hello world" - Docker display the terminal output “hello world” to the host machine
- Docker exit the virtual machine and terminated
The most tenderizing thought is the virtual machine just existed for a brief moment to execute the command,
and then it disappears back into the void. Both the machine body and the software brain are transient,
only the soul of the echo program remains to show the trace of saying “hello world” to us.
Hence, the existential question - Is your software system really existed in the distributed and virtual world?
or only the soul of the software system existed?
Let’s first seek to understand what Docker can offer, then we are prepared to answer the question of the new design form of rapid development.
Understanding Docker
In this section we shall define the basic Docker terminologies and learn how exactly a Docker image works.
-
Docker image - A Docker image is like a golden template. An image consists of OS (Ubuntu, centos etc.,) and applications installed on it. These images are called base images. A Docker base image is the building block of a Docker container from where a container can be created. An image can be built from scratch using Docker inbuilt tools. You can also use Docker images created by other users from Docker public registry (Docker hub) as a base image for your containers.
-
Docker registry - Docker registry is a repository for Docker images. It can be public or private. The public Docker registry maintained by Docker is called Docker hub. Users can upload and download images from the Docker registry. The public Docker registry has a vast collection of official and user created images. To create a container, you can either use the public images created by another user or you can use your own images by uploading it to the public or private registry.
-
Docker container - A container is more of a directory and an execution environment for applications. It is created on top of a Docker image and it is completely isolated. Each container has its own user space, networking and security settings associated with it. A container holds all the necessary files and configurations for running an application. A container can be created, run, started, moved and deleted
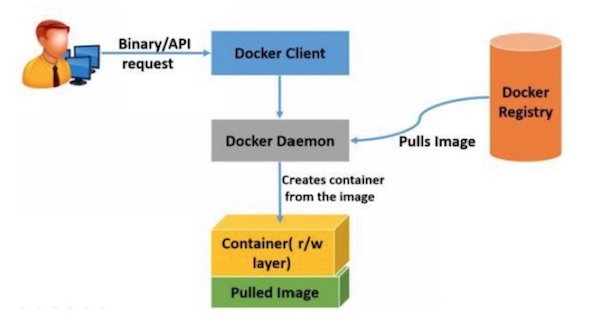
Figure. An illustration of all Docker terminologies and how they are worked together in Docker environment.
Each Docker image is an association of various layers. This layered approach provides a great way of abstraction for creating Docker images. These layers are combined in to a single unit using Uniform file system (AUFS). AUFS stores every layer as a normal directory, files with AUFS metadata. This ensures that all the files and directories are unique to the particular layer. AUFS creates a mount point by combining all the layers associated with the image. Any changes to the image will be written on the topmost layer.
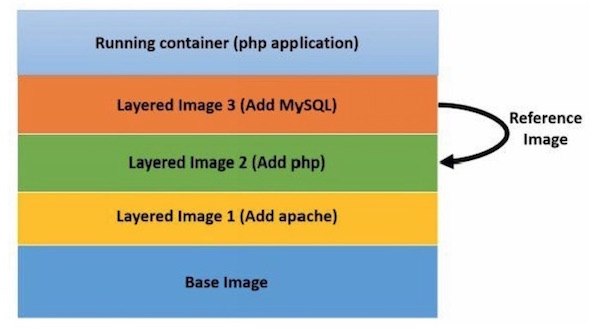
Figure. An illustration of all Docker image layers, the top layer is relying on the bottom layers building up.
This is the reason why the Docker containers are very light weight. For example, when you make an update to an existing application, Docker either creates a layer on the existing image or updates the existing layer. The newly created layers will refer its previous layer. Docker does not rebuild the whole image again for the application like virtual machines. When you push the new updated image to the registry it will not redistribute the whole image, instead it updates just the layer on top of the existing base Docker registry is used for storing Docker images. Images can be pushed and pulled from Docker registry for launching containers. There are two types of Docker registries.
- Public registry - (Docker hub https://hub.docker.com/) contains official Docker images and user created images.
- Private registry - A registry created by a user for storing private Docker images in your datacenter. You can also create a private registry in Docker hub.
All the images in the registry can be searched using Docker client. The images can be pulled down to the Docker host for creating containers and new images.
As we demonstrated earlier in the “hello world” example, a container is an execution environment for applications. It contains all the operating system files, files added by users and metadata. Basically a container is launched from an image, so the applications which are installed and configured on an image will run on the container created from it. As the images are in read only format, when a container is launched, a read/write layer will be added on top of the image for the container for the applications to run and make changes to it. The Docker client receives the command from the Docker binary or REST API to run a container.
On successful execution of the Docker run command, comparing to the earlier “hello world” example, here is a more precise description of what Docker will do actions at the backend.
- Docker checks if the specified Docker image in the command is present locally on the host. If it is present locally, Docker will use that image for creating a container. If not, it will download the image from the public or private registry (based on the Docker host configuration) on the host.
- The local or pulled image will be used for creating a new container. Once the image is set, Docker will create a read/write file system over the image.
- Then Docker creates the necessary network interfaces for the container to interact with the host machine.
- Docker checks for available IP address from the pool and allocates one to the container.
- Then it executes the command specified in the command e.g. /bin/bash shell
- Finally it logs all the input/output and errors for the user to find out the status of the container.
Please remember a container is not a classic virtual machine, but “just” a group of process sharing a common Linux kernel namespace.
Since Docker offers us a rapid container (virtual machine) with a completely isolated execution environment, we can build the data-oriented Microservices with a database backend rapidly with this deployment technology.
Rapid Microservices using Docker
The quick starter framework, please checkout from https://github.com/bennycheung/Flask-DB-Docker, illustrates how to use Docker to deploy a data-oriented Microservices API with a database backend.
The technologies used by the starter framework composed of,
- Dockerize PostgreSQL https://www.postgresql.org/ to run within a Docker container
- Dockerize API service written in Python/Flask http://flask.pocoo.org/ that can communicate with the PostgreSQL
- Orchestrate the Dockerized containers by docker-compose https://docs.docker.com/compose/ and established a link from the deployed service to the container running PostgreSQL
With this starter framework, we can easily built up a realistic Microservices architecture. I recommend to read the Martin Fowler and James Lewis’s white paper on Microservice architecture. Their white paper goes much more in-depth for the drivers behind the Microservice Architecture
Docker Orchestration
We need to bring Docker up and running on the host, see https://www.docker.com/get-started for your host installation.
Here is the deployment diagram, which is using Docker containers to deploy all starter framework services.
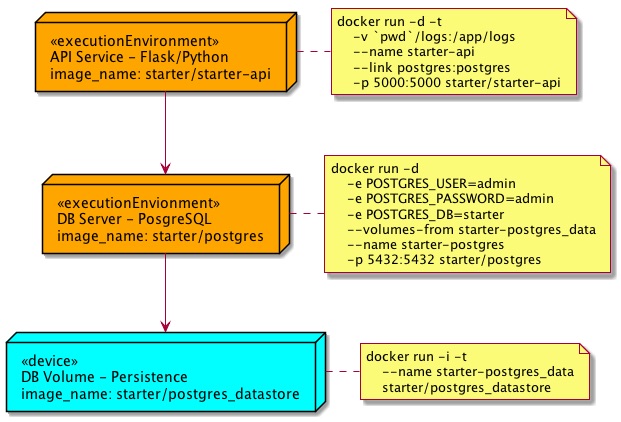
Figure. Dockerized deployment of a Microservices stack orchestrated with a database backend.
Following these steps to build all required docker images and bring up the application stack,
- Run
buildImages.shto build all required docker images - Run
startStack.shto bring up the application stack - If shutting down the application stack, run
stopStack.shwill suspend the application stack - If removing the application stack, run
teardownStack.shwill delete all the application containers - If removing all docker images, run
cleanupImages.shto leave no trace
To start a fresh application stack,
./buildImages.sh
./startStack.sh
To shutdown and clear out the application stack,
./stopStack.sh
./teardownStack.sh
./cleanupImages.sh
To achieve any in-between application state or retaining the built docker images, adjust the script running accordingly.
For curious readers desire to understand how the starter framework is built, the following sections provide detail instructions of how to build Docker images and how to create the starter Microservices and their dependencies.
Persistent Volumes with Docker - Data-only Container Pattern
The main purpose of data container is to retain the /var/lib/postgresql/data persistent volume.
Since you may have multiple data container running on the same host, the method to overcome
docker recognized the image uniqueness is to give it an unique README.md file in the image.
– Dockerfile –
FROM busybox
VOLUME /var/lib/postgresql/data

RUN mkdir /app
WORKDIR /app

ADD README.md /app/

CMD /bin/sh
To create the volume image:
cd busybox
docker build -t starter/postgres_datastore .
To start the volume image container:
docker run -i -t --name starter-postgres_data starter/postgres_datastore
Since the starter-postgres_data container likely won’t ever need to be updated, and if it does we can easily handle moving the data around as needed, we essentially work-around the issues of losing container data and we still have good portability.
We can now create as many starter/postgres_datastore instances as we can handle and use volumes from as many starter-postgres_data style containers as we want as well (provided unique naming or use of container ID’s). This can much more easily be scripted than mounting folders ourselves since we are letting docker do the heavy lifting.
One thing that’s really cool is that these data-only containers don’t even need to be running, it just needs to exist.
Create Postgres DB Image
This is the creation of Posgres 10.2 docker images. Similar to the data-container image,
we have copied an unique README.md into the image so that docker will recognize it’s uniqueness.
To prepare the image with vim-tiny, allows us to enter the container and perform some editing if needed.
– Dockerfile –
FROM postgres:10.2

RUN apt-get update && apt-get install -y vim-tiny

RUN mkdir /app
WORKDIR /app

ADD README.md /app/

EXPOSE 5432
To create the DB image:
cd db
docker build -t starter/postgres .
To start the DB image container:
docker run -d \
    -e POSTGRES_USER=admin \
    -e POSTGRES_PASSWORD=admin \
    -e POSTGRES_DB=starter \
    --volumes-from starter-postgres_data \
    --name starter-postgres \
    -p 5432:5432 starter/postgres
Try connect to starter-postgres container,
psql -h localhost -U admin starter
Create API starter-api Image
You can read the starter API Microservices in Starter API Documentation.
This is a Python/Flask RESTful API implementation, with connection to the Postgres backend
to illustrate full CRUD operation on persistent data. Instead of automatically starting the Python application (see the commented out ENTRYPOINT and CMD), we shall start by the commandline.
– Dockerfile –
FROM python:3.5

RUN mkdir /app
WORKDIR /app

ADD requirements.txt /app/
RUN pip install -r requirements.txt

ADD . /app

# If you want to start the Python application automatically, uncomment the following
# EXPOSE 5000
# ENTRYPOINT ["python", "manage.py", "runserver"]
# CMD ["-t", "0.0.0.0", "-p", "5000"]
To create the API image:
cd starter-api
docker build -t starter/starter-api .
To start the Starter API container:
docker run -d -t \
    -v `pwd`/logs:/app/logs \
    --name starter-api \
    -p 5000:5000 starter/starter-api \
    python manage.py runserver -t 0.0.0.0 -p 5000
Import Sample (Medical Procedure Codes) into DB
For importing the sample medical procedure codes, we would like to start an starter/starter-api instance. However, this instance needs to be in the same Docker network as the current running network.
When we started the stack, a network called flask-db-docker_default was created.
To confirm this, we can run docker network ls.
$ docker network ls

NETWORK ID          NAME                      DRIVER              SCOPE
e337657076ec        bridge                    bridge              local
88cc0cfe1cc7        composer_default          bridge              local
945ac8820956        flask-db-docker_default   bridge              local
7749efcaa3dc        host                      host                local
0c4c4f14a186        none                      null                local
We should see the starter-postgres and starter-api are part of the flask-db-docker_default network,
$ docker network inspect flask-db-docker_default

...
"Containers": {
    "b43291da217f705ea3d1676fb757b1dafc7c8fdf18f2df32d441e248a6ab8b31": {
        "Name": "starter-postgres",
        "EndpointID": "d01bdf7da8de378b51928a7e7e2a55fab6995865ea5d1c7793e9923c9409f287",
        "MacAddress": "02:42:ac:1d:00:03",
        "IPv4Address": "172.29.0.3/16",
        "IPv6Address": ""
    },
    "e05d5fba146fc4f1c018df41f1cae6bf4fe3d54395572cd73b2c3a3c9bbf859b": {
        "Name": "starter-api",
        "EndpointID": "19e27585ae2005d6310bc6ec8dfbfe8a405400cb4196bfd90206a1fbd9f5700c",
        "MacAddress": "02:42:ac:1d:00:02",
        "IPv4Address": "172.29.0.2/16",
        "IPv6Address": ""
    }
}
Then we shall start an instance of starter-api container to join the flask-db-docker_default network,
so that we can access to the same starter-postgres database connection.
We shall start a interactive shell -ti /bin/sh. The container will be automatically
destroyed after running by --rm remove container parameter.
docker run --rm -ti --network flask-db-docker_default starter/starter-api /bin/sh
After we enter the container, we can execute the initial starter database creation
by running the following commands in starter-api/startup folder.
python manage.py resetdb
We create a new user admin with the password admin (of course this is not secure).
After the database has been created, we can exercise the database by inserting all the medical procedure codes from the tex-api/startup folder.
docker run --rm -t \
    --network flask-db-docker_default \
    -v `pwd`/starter-api/startup:/app/startup \
    starter/postgres /bin/bash -c \
    "PGPASSWORD=admin psql -h starter-postgres -U admin starter < /app/startup/starter_pxcodes.sql"
We can get the medical procedural data from the starter-api that we have loaded.
http --auth admin:admin GET http://localhost:5000/api/v1.0/pxcodes/
You should see the paged JSON response of 100 medical procedure codes.
HTTP/1.0 200 OK
Content-Length: 15973
Content-Type: application/json
Date: Thu, 27 Sep 2018 22:18:00 GMT
ETag: "678ca404a51794f10b8747ea1eeb4959"
Server: Werkzeug/0.9.6 Python/3.5.6

{
    "items": [
        {
            "procedure": "EXTRACRANIAL PROCEDURES W/O CC/MCC",
            "pxcode": "039",
            "url": "http://localhost:5000/api/v1.0/pxcodes/039"
        },
        {
            "procedure": "DEGENERATIVE NERVOUS SYSTEM DISORDERS W/O MCC",
            "pxcode": "057",
            "url": "http://localhost:5000/api/v1.0/pxcodes/057"
        },
        ... skipped ...
    ],
    "meta": {
        "first": "http://localhost:5000/api/v1.0/pxcodes/?per_page=100&page=1",
        "last": "http://localhost:5000/api/v1.0/pxcodes/?per_page=100&page=1",
        "next": null,
        "page": 1,
        "pages": 1,
        "per_page": 100,
        "prev": null,
        "total": 100
    }
}
What’s Next
Even the machine’s body and software’s brain can only exist in a distributed and virtual form, the system identity is recognized as a new design form of rapid Microservices architectural style. We have exercised this new design style with the data-oriented API supported by a database backend, which can be constructed and deployed rapidly. With the presented starter framework https://github.com/bennycheung/Flask-DB-Docker, we are ready to construct a larger software system with the Microservices style composition.