artwork by Style of Kandinsky transfer to a blockchain image
FHIR Server Up and Running
Blockchain Healthcare
Part 1 of 3Blockchain is a hot topic for making patient’s Electronic Health Record both accessible and safe, talking about the dream of patients finally own their complete medical history, drugs list, lab test results, doctor notes etc. But there is a fundamental problem - Where is the data coming from? Even the medical providers are digitizing the patient’s data deligently, the data remains inaccessible beyond their database boundary.
There are many attempts to bridge this big data chasm. The interest reader should take the Coursera’s Health Informatics on FHIR https://www.coursera.org/learn/fhir to understand the history, the problem and how FHIR could keep the Blockchain dream alive in sharing the medical records. This article takes the Blockchain believers, as Kierkegaard famously termed “A leap of faith”, to setup a functional FHIR server for research and development.
FHIR Me Up!
FHIR is a platform specification that defines a set of capabilities use across the healthcare process, in all jurisdictions, and in lots of different context. This document will guide you through the installation, setup and testing of the FHIR Server. With the FHIR Server, the provider’s healthcare data can be made easily accessible with the standardized RESTful API and JSON formatted resources.
In addition, to limit the scope of this setup, the topics of security are not discussed.
Quick Links
The reference technology stack links:
- Official FHIR Website: http://hl7.org/fhir
- Hapi FHIR - The Open Source FHIR API for Java: http://hapifhir.io/
- SMART on FHIR - The Open App Connection Standard to FHIR Server: http://docs.smarthealthit.org/
The suite of tools are used and their links:
- STU3 Sandbox Data: http://docs.smarthealthit.org/data/stu3-sandbox-data.html
- Sample Patient Generator for STU3: https://github.com/smart-on-fhir/sample-patients-stu3
- Add Tags to FHIR Bundle and Resources Uploader: https://github.com/smart-on-fhir/tag-uploader
- SMART on FHIR Patient Browser: https://github.com/smart-on-fhir/patient-browser
Steps Overview
The following steps will guide you through the server installation, data generation and UI testing. The instructions are proven to work on a Mac (OS X El Capitan).
Compile Hapi FHIR Packages
Go download Hapi FHIR Server http://hapifhir.io/download.html. At the time of this writing, the latest DSTU3 (Draft Standard for Trial Use 3) is stable. We shall build our server and data upon this latest released standard.
HAPI is built primary using Apache Maven. Even if you are using an IDE, you should start by performing a command line build before trying to get everything working in an IDE.
Execute the build with the following command:
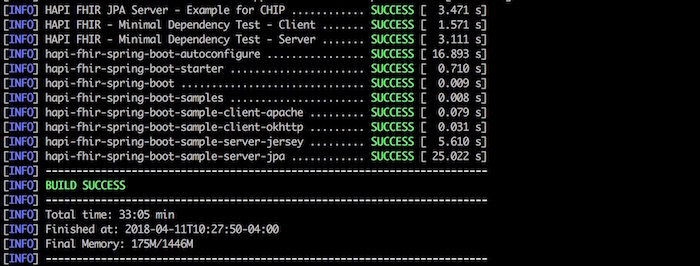
mvn install
Note that this complete build takes a long time because of all of the unit tests being executed. At the end you should expect to see a screen resembling:
Setup Hapi FHIR JPA Server
After the Hapi FHIR Server has been compiled, we can setup the JPA Server example located in hapi-fhir-jpasserver-example.
We shall edit the root URL context to a shorter name hapi-fhir (i.e. make the URL shorter).
vi pom.xml
In the section of Jetty server plug-in config, we shall change the contextPath XML value to /hapi-fhir.
<!-- The following is not required for the application to build, but allows you to test it by issuing "mvn jetty:run" from the command line. -->
<pluginManagement>
    <plugins>
        <plugin>
            <groupId>org.eclipse.jetty</groupId>
            <artifactId>jetty-maven-plugin</artifactId>
            <configuration>
                <webApp>
                    <contextPath>/hapi-fhir</contextPath>
                    <allowDuplicateFragmentNames>true</allowDuplicateFragmentNames>
                </webApp>
            </configuration>
        </plugin>
    </plugins>
</pluginManagement>
Start Hapi FHIR JPA Server
After editing the pom.xml, we are ready to start the Hapi FHIR Server by the embedded Jetty webserver,
mvn jetty:run
The Hapi FHIR Server example UI can be found at:
http://localhost:8080/hapi-fhir
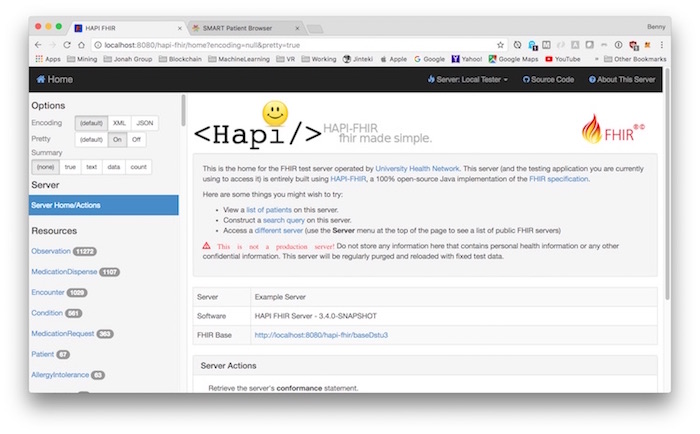
The Hapi FHIR’s RESTful API can be access through this root URL:
http://localhost:8080/hapi-fhir/baseDstu3
We can use the Hapi FHIR Server UI for testing, for example, to retrieve a specific patient ID smart-1032702 as illustrated,
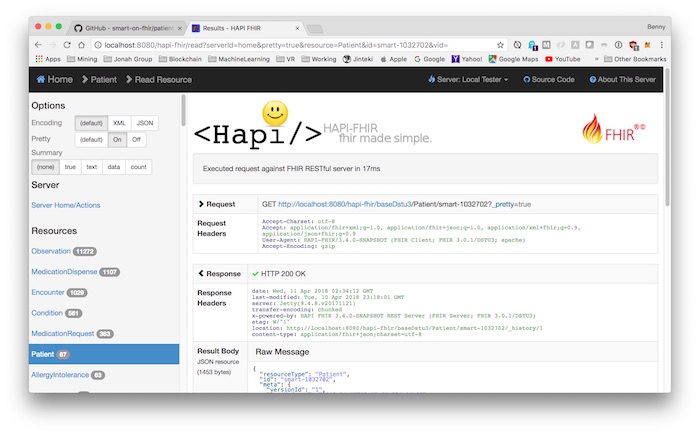
But wait, we need to populate with some sample data first. The following section will generate some fake (but realistic) data set.
Generate Sample Data Set
Running a server without health records is useless. In order to fiil the server with some realistically fake data, we shall use the Sample Patient Generator for STU3 https://github.com/smart-on-fhir/sample-patients-stu3
The primary purpose of this tool is to generate FHIR STU3 transaction bundles as JSON files. Once generated these bundles can be inserted into any compatible FHIR server using it’s API.
This generator requires Python 2.7 to run.
From the ‘bin’ directory, run to get a general help message,
cd sample-patients-stud3/
python generate.py --help
To generate the test data files in the ../out directory:
python generate.py --write-fhir ../out --id-prefix "smart"
All sample data ID will be prefixed with smart for the set.
Upload Sample Data Set to Server
We shall use the Tag Uploader https://github.com/smart-on-fhir/tag-uploader
cd tag-updloader/
npm install
From the previous step, we have the sample data located in out directory. We can move the directory under tag-uploader. Since the Javascript file index.js is the main entry point, we can rename it to tag-uploader.js for later executions.
To add a tag to every JSON bundle found (deep) within the specified directory.
node tag-uploader -d {SOURCE_DIR} -t "Some tag" -w
To upload JSON bundle found (deep) within the specified directory:
node tag-uploader -d {SOURCE_DIR} -t "Some tag" -S {SOME_FHIR_SERVER}
In our case, the {SOURCE_DIR} is out directory and our {SOME_FHIR_SERVER} is http://localhost:8080/hapi-fhir/baseDstu3
node tag-uploader -d out -t "smart" -w
node tag-uploader -d out -t "smart" -S http://localhost:8080/hapi-fhir/baseDstu3
It will take a few minutes to upload all the sample data. The tag smart can be used to delinearate different data set.
Use Patient-Browser to Visualize the Sample Data
We shall use the SMART on FHIR’s Patient Browser https://github.com/smart-on-fhir/patient-browser
cd patient-browser/
The configuration is located in build directory. The default configuration file stu3-open-sandbox.json5 will be used. We can edit the url to point to our Hapi FHIR Server.
...
server: {
    // "DSTU-2" or "STU-3"
    type: "STU-3",

    // Api URL
    url: "http://localhost:8080/hapi-fhir/baseDstu3",
...
The reason that patient-browser will use stu3-open-sandbox as the default config because under src/App/index.js has the DEFAULT_CONFIG constant defined.
const DEFAULT_CONFIG = "stu3-open-sandbox";
After the configuration changed, we can start the server by
npm install
After all the compiling and webpacking, the project is running at
http://localhost:9001
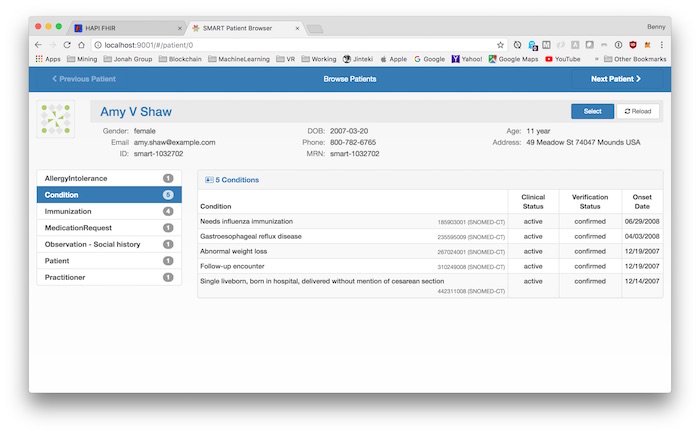
You can see the list of loaded sample patients.

By clicking on a patient, we can navigate the patient’s detail info.
That’s all, Hapi FHIRing!