artwork by Thomas Lehmann - Race for the Galaxy Cards
Game Architecture for Card Game Action (Part 2)
Game Architecture
Part 2 of 9Continue from the previous Game Architecture for Card Game Model (Part 1), we defined a game architecture as a reference to study the “Race for the Galaxy” card game. This article focus on the components of (3) Game Engine and (4) Game Interface.
[2024/10/04] We can listen to this article as a Podcast Discussion, which is generated by Google’s Experimental NotebookLM. The AI hosts are both funny and insightful.
images/game-architecture-card-ai-2/Podcast_Card_Game_AI_Part_2.mp3
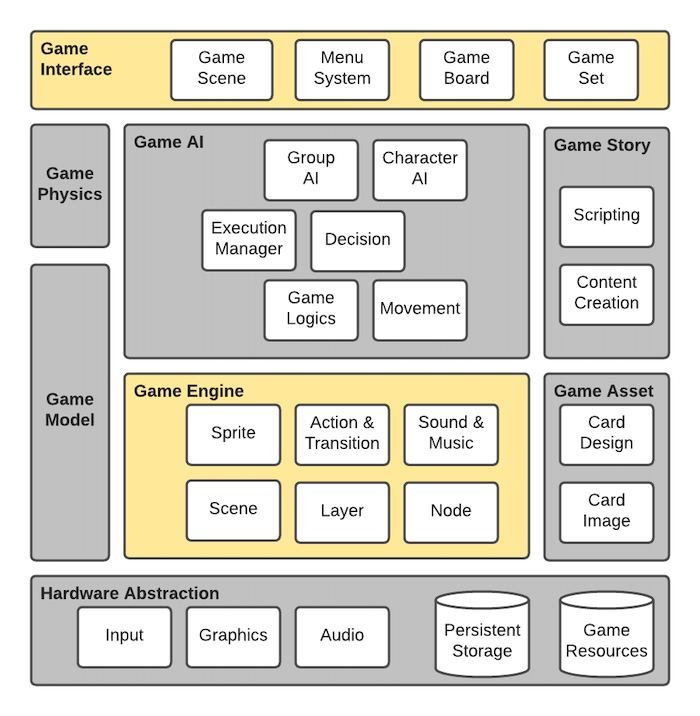
Figure. Game Architecture Overview - The components are grouped according to their functional roles in the system. The functional roles are (1) Game Story and Game Asset, (2) Game Model, (3) Game Engine, (4) Game Interface, (5) Game AI, (6) Game Physics (only for physics based game), and (7) Hardware Abstraction. When studying any game source code, this architecture will help to classify their functional roles
(3) Game Engine - the rules and rendering of a game. The game states and operations are projected on a display. All legal operations are checked and animated on-screen.
(4) Game Interface - the management system of a game. The game preference and setup are an integral part of running a game. The interface allows the player(s) to select optional elements of the game. All legal operations are presented and interacted with the player(s) according to the game rules.
In part 2, we shall continue to describe the game architecture using Race for the Galaxy (RFTG) for our study. As usual, a balance between theory and practice, we set up the Python development to illustrate the object-oriented game engine.
RFTG Python Development
Interest reader can find the full development set up instruction, Python source code and Jupyter notebook experiments described in this article from [Cheung21].
Jupyter Notebook Experiments (Part 2)
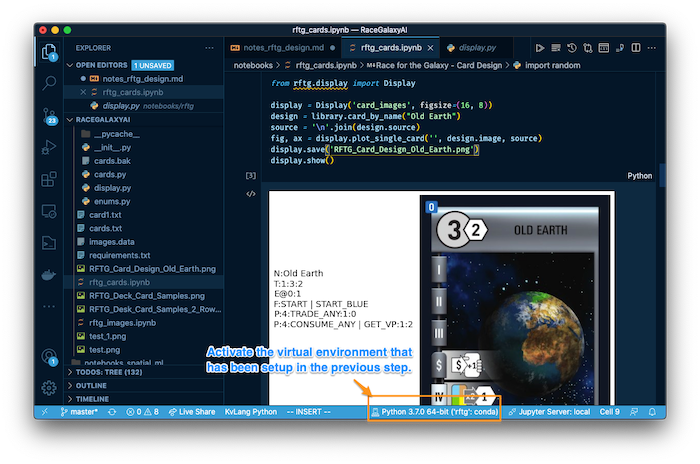
The development experiments on (Part 2) are recorded in the Jupyter Notebook rftg_game.ipynb to quickly run the code samples.
Inside Visual Studio code, install the Microsoft’s “Jupyter” extension. When activate the rftg_game.ipynb inside VScode, change the Python kernel to use rftg that has been setup from the code README.md instructions.
RFTG Game Engine
The Game Engine defines a set of rules that players must follow. It also maintains the game states, by using the game information system that tracks the players and the game progress. Extracting from the game data model, the following UML diagram highlights the classes that represent the game engine components.
Game is a session that follows a definite set of rules, a set of players that interact with the game model. At the highest level, a game is a composition of a Deck of cards, a set of Player and the associated GameResource. The resources include the card design library as Library and the card display as CardDisplay.
- Game -
Gameclass keeps the record of global states of a game. - Deck -
Deckclass represents the cards in a game. - Player -
Playerclass keeps the record of an actor action states within a game. - GameResource -
GameResourceclass keeps the global resources required by a game, such as theLibraryandCardDisplay.
The players are actors either as Human or Computer (AI). Each player must make decisions concerning about game process and rules. The Decision is the abstract class that can be implemented as interactive UIDecision that a human is called for any game actions, or implemented as automated AIDecision that a computer is called to act.
Create a Game
To create a game session, the initialization steps are shown as following:
- create
Libraryand load the card design and images - create
CardDisplayto provide convenient card images display - create
Deckof cards that reference to theLibrary - create a set of
Playerwho can be human or computer AI - create
GameResourceis composed ofLibraryandDisplay, potentially extend with more game resources, such as network communication and data storage. - Finally,
Gameis composed ofGameResource,Deckand a list ofPlayer.
Later, we shall discuss how the Player delegate the game control to Decision.
from rftg.cards import Library, Deck, Card
from rftg.display import Display, CardDisplay
from rftg.game import GameResource, Game, Player

# create the game resources
library = Library()
library.read_cards('cards.txt')
library.read_card_images('card_images')
library.load_actions('card_images')
print('Designs: {}'.format(len(library.designs)))

display = Display('card_images', figsize=(16,8))
card_display = CardDisplay(library, display)

# build the game deck
deck = Deck(library)
deck.build_deck(0)
print('Cards: {}'.format(len(deck.cards)))

# create the players
player1 = Player(name="Blue", ai=False)
player2 = Player(name="Red", ai=False)
players = [player1, player2]

# create a new game with players
rresource = GameResource(library=library, display=display)
game = Game(resource=resource, session_id='testing', deck=deck, players=players)
The Game can also take start_seed parameter to seed the random number generator. By default, it randomly generates a start_seed if it is not specified. Otherwise, it will take the given start_seed such that a game random sequence can be replayed.
For example, with start_seed=280966
game = Game(resource=resource, session_id='testing', deck=deck, players=players,
            start_seed=280966)
Deck Operations
After the game model has been constructed, we shall start with the game’s deck operations, such as picking the start worlds and draw random cards from the deck.
Pick Start Worlds
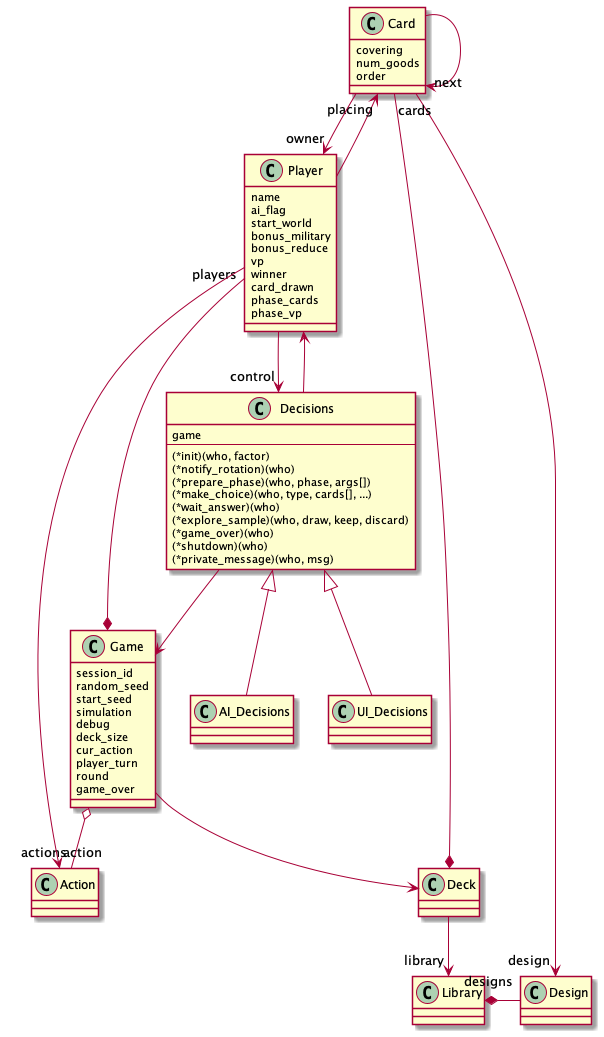
The RFTG’s base game start world Card has the flag of CardFlag.START. The get_cards_with_flag can search the cards to find the start world cards. Once those cards are identified from the deck, we use pick_cards to extract those cards, i.e. removed from the deck. The card.location will be changed from Location.DECK to Location.HAND.
start_cards = game.deck.get_cards_with_flags(CardFlag.START)
game.deck.pick_cards(start_cards)
print(start_cards)
print(game.deck.remain_cards())

game.resource.display.plot_cards(start_cards, len(start_cards))
game.resource.display.show()
[<Card 6/Old Earth/Location.HAND/-1>, <Card 7/Epsilon Eridani/Location.HAND/-1>,
<Card 8/Alpha Centauri/Location.HAND/-1>, <Card 9/New Sparta/Location.HAND/-1>,
<Card 10/Earth's Lost Colony/Location.HAND/-1>]
90
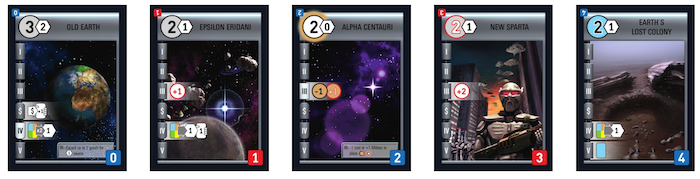
Draw 6 Random Cards
The remaining cards will be shuffled by shuffle_cards. Subsequently, we use draw_cards to draw 6 cards from the deck. The card.location will be changed from Location.DECK to Location.HAND. The drawn cards are assigned to a player, for example, player_index=0.
game.deck.shuffle_cards()
cards = game.deck.draw_cards(6)
game.deck.set_cards_player(cards, player_index=0)
print(cards)
print(game.deck.remain_cards())

game.resource.display.plot_cards(cards, len(cards))
game.resource.display.show()
[<Card 76/Merchant Guild/Location.HAND/0>, <Card 18/Rebel Miners/Location.HAND/0>,
<Card 24/Contact Specialist/Location.HAND/0>, <Card 33/Rebel Outpost/Location.HAND/0>,
<Card 12/Public Works/Location.HAND/0>, <Card 44/Investment Credits/Location.HAND/0>]
84
Decisions
We must present the game states to an actor, either human or AI, to make a decision. The Decision is an abstract super class that defines all the decision operations that is implemented as UIDecision for human actor and is implemented by AIDecision for a computer AI actor.
from rftg.decision import *
from rftg.enums import *

decision = UIDecision(game)
The decision object must initialize with the Game model. We shall start with some examples of the decision operations. Since we are using the UIDecision implementation, the game will show the cards for a human input.
Decide on the Start World
The game must present the list of start world cards to an actor, e.g. player 0, to choose a start world. This is just for illustration here. More realistically, the start world will be randomly assigned to the player.
decision.make_choice(0, Choice.START, cards=start_cards)
The UIDecision make_choice will route the Choice.START to interactively ask for a start world card. The actor will choose a world, by choosing a number from the list cards, the game will record the player’s chosen start world.
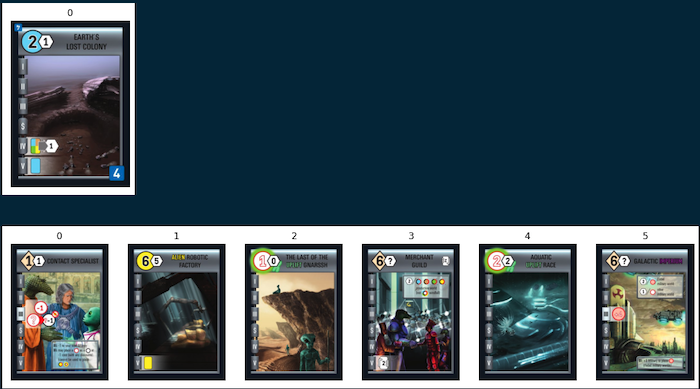
For example, player 0 has chosen “4”, which is translated to “Earth’s Lost Colony”. We call the game display to plot the player’s Location.ACTIVE in the player’s tableau. In addition, we also plot the player’s Location.HAND cards on hand.
game.plot_player_cards(0, Location.ACTIVE)
game.plot_player_cards(0, Location.HAND)
Decide on the Action
The next important actor’s decision is choosing an action. The game must display the list of actions, e.g. for player 0, to choose an action.
decision.make_choice(0, Choice.ACTION)
The UIDecision make_choice will route the Choice.ACTION, to interactively ask for an action. The actor must choose an action and the game will record the player’s chosen action.
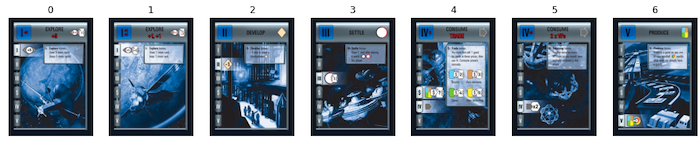
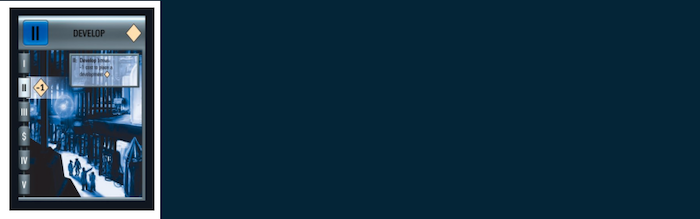
For example, player 0 has chosen action “2”, which is translated to Action.DEVELOP. Then we plot the player’s current action.
game.plot_player_actions(0)
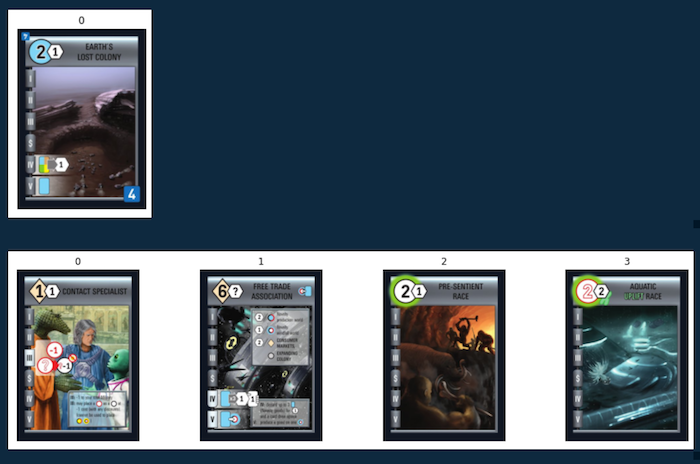
Discard Cards
Since cards are used as the main currency in the game, player must decide to discard a number of cards as payment for various causes.
cards = game.get_player_cards(0, location=Location.HAND)
decision.make_choice(0, Choice.DISCARD, cards=cards, discard=2)
For example, the player has chosen to discard cards “1,4”, where the “,” separate the multiple cards selection. The player’s cards Location.ACTIVE and Location.HAND are shown here after the discard action.
Start Game
Finally, there are sufficient game functions to show how to construct a complete example of constructing a game model and starting of a game of 2 players.
from rftg.enums import *
from rftg.cards import Library
from rftg.display import CardDisplay
from rftg.game import GameResource, Game, Player

library = Library()
card_display = CardDisplay(library)
resource = GameResource(library=library, display=card_display)

player1 = Player(name="Blue", ai=False)
player2 = Player(name="Red", ai=False)
players = [player1, player2]
game = Game(resource=resource, session_id='testing', expanded=0, players=players)
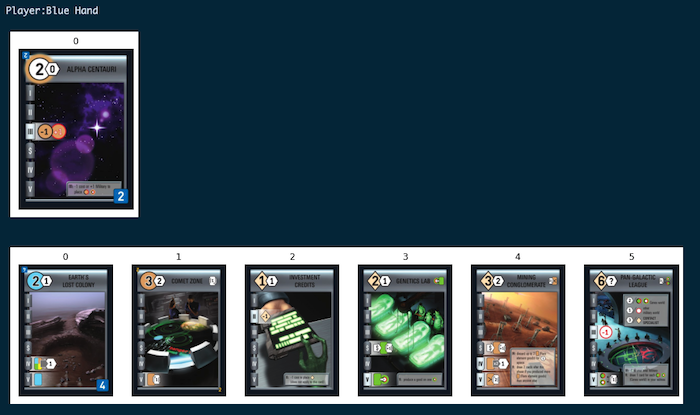
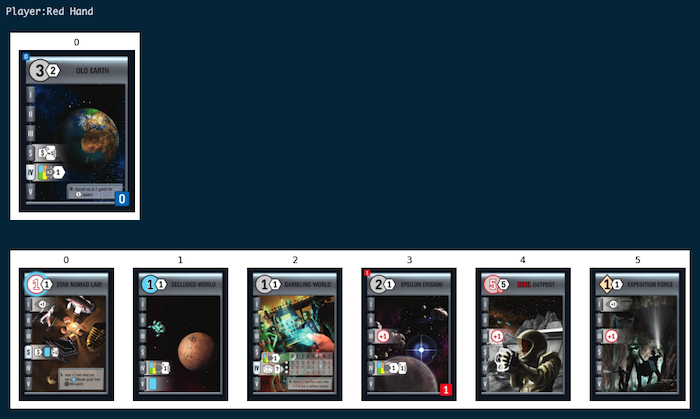
The game is started with a shuffled deck of cards. For each player, a start world is randomly assigned and 6 random cards are drawn from the deck.
game.deck.shuffle_cards()
start_worlds = game.deck.get_random_start_world_cards()
for player_index in range(len(game.players)):
  player = players[player_index]
  print('Player:{} Hand'.format(player.name))

  # assign player start world
  player.start = start_worlds[player_index].index
  game.deck.set_cards_player([ start_worlds[player_index] ], player_index)
  game.deck.set_cards_location([ start_worlds[player_index] ], Location.ACTIVE)

  # draw player hand
  game.deck.draw_cards(number=6, player_index=player_index)
  game.plot_player_cards(player_index=player_index, location=Location.ACTIVE)
  game.plot_player_cards(player_index=player_index, location=Location.HAND)
The plot of the player’s “Blue” Location.ACTIVE and Location.HAND cards.
The plot of the player’s “Red” Location.ACTIVE and Location.HAND cards.
Game Interface
So far, we are using matplotlib to display the game graphics and provide user interaction. The Jupyter notebook approach is purely for experimentation purposes, far from a satisfactory game interface. In this section, we shall start to convert the game interface using a better game framework.
cocos2d is a framework for building 2D games, demos, and other graphical/interactive applications. It works on Windows, OS X and Linux and it is meant to be used by applications written in the Python language.
cocos2d is built on top of pyglet. pyglet is a cross-platform windowing and multimedia library for Python, intended for developing games and other visually rich applications. It supports windowing, user interface event handling, game controllers and joysticks, OpenGL graphics, loading images and videos, and playing sounds and music. pyglet works on Windows, OS X and Linux.
Install Cocos2d
Download and install cocos2d is very simple, which works on any platform.
python setup.py install
There is a bug layer size is a quarter of the window size on Mac
Patch on the Mac
Apply the following patch to fix the problem the rentina display problem on Mac, then it will work!
diff --git a/cocos/director.py b/cocos/director.py
index 516fb8b..34aad7e 100644
--- a/cocos/director.py
+++ b/cocos/director.py
@@ -595,6 +595,12 @@ def scaled_resize_window(self, width, height):
         """
         # physical view size
         pw, ph = width, height
+        # Are we on HiDPI display?
+        viewportw, viewporth = self.window.get_viewport_size()
+        if viewportw > pw:
+            # yes
+            pw = viewportw
+            ph = viewporth
         # virtual (desired) view size
         vw, vh = self.get_window_size()
         # desired aspect ratio
@@ -642,6 +648,12 @@ def unscaled_resize_window(self, width, height):
         """
         self._usable_width = width
         self._usable_height = height
+        # Are we on HiDPI display?
+        viewportw, viewporth = self.window.get_viewport_size()
+        if viewportw > width:
+            # yes
+            self._usable_width = viewportw
+            self._usable_height = viewporth

         if self._resize_no_events:
             # setting viewport geometry, not handling an event
Read and Display the Cards
Read Card Images as pyglet Images
In the Library, we shall read the card image as pyglet image format so that it is ready to be used as a texture.
  def read_card_image(self, card_path, card_index):
    card_name = self.card_image_name(card_index)
    card_filename = '{}/{}.png'.format(card_path, card_name)
    # card_image = mpimg.imread(card_filename)
    card_image = pyglet.resource.image(card_filename)
    return card_image
Notes, if we want to import as PIL image, we can use the following code to convert it into pyglet image.
temp_image = PIL.Image.open("card_images/card006.png")
raw_image = temp_image.tobytes()  # tostring is deprecated, must use tobytes()
image = pyglet.image.ImageData(temp_image.width, temp_image.height,
                              'RGB', raw_image, pitch=-temp_image.width * 3)
Load Card Library and Define Game
We need to load the cards library and prepare the game deck.
from rftg.enums import *
from rftg.cards import Library, Deck, Card
from rftg.game import GameResource, Game, Player

library = Library()
library.setup()
print('Designs: {}'.format(len(library.designs)))

resource = GameResource(library=library)
player1 = Player(name="Blue", ai=False)
player2 = Player(name="Red", ai=False)
players = [player1, player2]
game = Game(resource=resource, session_id='testing', expanded=0, players=players)
Display Card Sprite and Animation
To use cocos2d, the following classes are minimum requirements to construct
Spriteto represent a card image that can be animated on player areasLayerto containSpriteSceneto describe a set ofLayerDirectorto draw the window and run theScene
from pyglet.gl import *
from pyglet.window import key

from cocos.actions import *
from cocos.director import director
from cocos.layer import Layer
from cocos.scene import Scene
from cocos.sprite import Sprite
We shall define CardsContainer, which is subclass of cocos Layer, to collect a set of CardLayer.
The cocos Layer can be recursively contain other Layer classes. The CardsContain responsible to layout and interact with the cards.
class CardsContainer(Layer):
  is_event_handler = True   #: enable pyglet's events

  def __init__(self, library:Library, pos, pickable=True):
    super(CardsContainer, self).__init__()

    self.library = library
    self.pos = pos
    self.pickable = pickable

  def add_cards(self, cards):
    dx = 800 / (len(cards) + 1)

    index = 1
    for card in cards:
      pos = (
        int(self.pos[0] + (dx * index)),
        self.pos[1]
        )
      index += 1
      cardNode = CardLayer(library, card, pos)
      self.add(cardNode)

  def on_mouse_press(self, x, y, buttons, modifiers):
    """This function is called when any mouse button is pressed

    (x, y) are the physical coordinates of the mouse
    'buttons' is a bitwise or of pyglet.window.mouse constants LEFT, MIDDLE, RIGHT
    'modifiers' is a bitwise or of pyglet.window.key modifier constants
       (values like 'SHIFT', 'OPTION', 'ALT')
    """
    if self.pickable:
      cardNodes = self.get_children()
      for cardNode in cardNodes:
        cardNode.is_picked(x, y)
The CardLayer is also a subclass of cocos Layer. It is responsible to hold the card image and its display state. For example, if the card has been selected or not.
class CardLayer(Layer):

  is_event_handler = False #: enable pyglet's events

  def __init__(self, library:Library, card:Card, pos):
    super(CardLayer, self).__init__()

    self.card_index = card.index
    self.image = library.card_by_id(card.index).image
    self.image.anchor_x = self.image.width // 2
    self.image.anchor_y = self.image.height // 2
    self.pos = pos
    self.sprite = Sprite(self.image, scale=0.25)
    self.add(self.sprite)
    self.selected = False
    self.bbox = self.get_bbox()

  def get_bbox(self):
    lx = self.pos[0] - (self.sprite.width / 2.0)
    hx = self.pos[0] + (self.sprite.width / 2.0)
    ly = self.pos[1] - (self.sprite.height / 2.0)
    hy = self.pos[1] + (self.sprite.height / 2.0)
    return (lx, ly, hx, hy)

  def is_picked(self, x, y):
    (lx, ly, hx, hy) = self.bbox
    if (lx <= x) and (x <= hx) and (ly <= y) and (y <= hy):
      self.do_selected(selected=True)
    else:
      self.do_selected(selected=False)

  def do_selected(self, selected=False):
    if self.selected:
      if not selected:
        self.sprite.do(MoveBy((0, -PICK_OFFSET), ANIMATE_DURATION))
    else:
      if selected:
        self.sprite.do(MoveBy((0, PICK_OFFSET), ANIMATE_DURATION))
    self.selected = selected
    self.bbox = self.get_bbox()

  def on_enter(self):
    super(CardLayer, self).on_enter()

    self.sprite.position = WINDOW_WIDTH/2, WINDOW_HEIGHT-100
    self.sprite.do(Delay(START_DELAY) + MoveTo((self.pos), ANIMATE_DURATION))
The cocos2d Director is responsible to create and run the animations. All cards Sprite is defined and insert into a Scene. The Director will take the Scene and run the nodes within it.
director.init(width=WINDOW_WIDTH, height=WINDOW_HEIGHT, resizable=True, caption='Race for the Galaxy - Cocos')
playerActive = CardsContainer(library, (0, 300), pickable=False)
playerActive.add_cards(game.get_player_cards(player_index, location=Location.ACTIVE))
playerHand = CardsContainer(library, (0, 100), pickable=True)
playerHand.add_cards(game.get_player_cards(player_index, location=Location.HAND))
scene = Scene(
  playerActive,
  playerHand
)
director.run(scene)
The game interface looks much better using cocos2d framework.
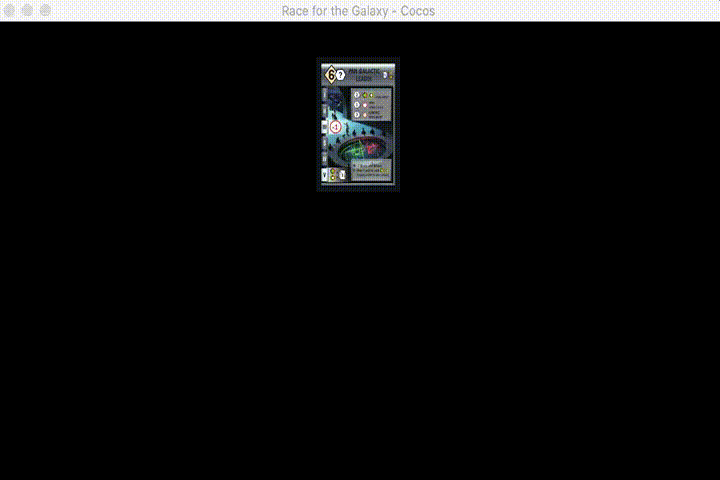 Figure. Showing the card game is designed and rewritten in Python. The game UI and animation are done using Cocos2d - Python edition. (credits: Rio Grande Games holds the copyrights for the images)
Concluding Remarks
We have explored (3) Game Engine and (4) Game Interface development. The game states are presented to an actor, either human or AI, to make a decision. This part shows the UIDecision for a human actor, to illustrate the usage of the abstract Decision class. The AI agent will drive the AIDecision implementation in the next article (Part 3). Towards the end, we converted the Game Interface to use cocos2d - Python edition. The card game experiment starts to look a lot more interesting.
- Game Architecture for Card Game Model (Part 1)
- » Game Architecture for Card Game Action (Part 2)
- Game Architecture for Card Game AI (part 3)
References
Race for the Galaxy
- [Jones09] Keldon Jones, Talk a bit about how the AI works, Sep 2009
- Latest Source Code 0.9.5, with all expansions https://github.com/bnordli/rftg
- [Tesauro95] Gerald Tesauro, Temporal Difference Learning and TD-Gammon, Communications of the ACM, March 1995 / Vol. 38, No. 3
- [TemplateGates17] Race for the Galaxy AI, Temple Gates, Dec 2017
- Temple Gates is the game developer for the App version that using Keldon Jone’s AI engine
- [Cheung21] Benny Cheung, Game Architecture for Card Game Action (Part 2) - Jupyter Notebook, Jun 2021
Interface Development
- [Cocos2d] cocos2d 0.6.5 Documentation
- Basic Concepts http://python.cocos2d.org/doc/programming_guide/basic_concepts.html
- Source code <https://github.com/los-cocos/cocos
- [pyglet] pyglet Documentation
- cocos2d uses The pyglet Event Framework to handle events, https://pyglet.readthedocs.io/en/latest/programming_guide/events.html
- pyglet.window events https://pyglet.readthedocs.io/en/latest/modules/window.html