artwork by Style of Kandinsky transfer to an AI head image
SingularityNET AI Service Integration
With the advent of AI and Blockchain technology and its exponential impact on business, a recently released open-source project SingularityNET https://singularitynet.io/ is truly revolutionary by combining both technologies into a decentralized market of coordinated AI services being backed by Blockchain’s smart contracts. Within the SingularityNET platform, the benefits of AI become a global commons infrastructure for the benefit of all; anyone can access AI tech or become a stakeholder in its development. Anyone can add an AI/machine learning service to SingularityNET for use by the network, and receive network payment tokens in exchange.
Today, the only technical information is available through their white paper (Dec 19, 2017) at https://public.singularitynet.io/whitepaper.pdf that gives a glimpse into their technical details. After struggling for a few days, I discovered an approach to consume their technical information by hacking with the SingularityNET source code. This article summarizes how to implement an AI service provider integration with SingularityNET’s service wrapper API. The example AI service is using MNIST image classification implemented in Tensorflow.
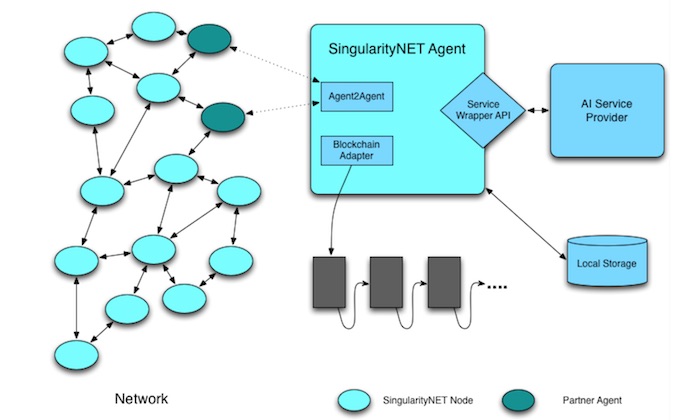
Figure. SingularityNET high-level system architecture, which illustrates how the platform supports AI agent to agent interactions and uses Blockchain smart contract to record the transactions.
This article will go through the steps to experiment with SingularityNET’s AI agent integration: creating a virtual environment, checking out the source code, running the MNIST Tensorflow agent example, explaining service adapter development, and showing service integration by configuration.
Obviously, there are many more SingularityNET topics, which must be explored by other articles.
SingularityNET is moving forward with another alpha release. This article is out-dated as of 2018-05-03; however the information can still be useful to understand the functional and implementational views of cooperating AI agents. For the latest SingularityNET development, reader can refer to Wiki at <https://github.com/singnet/wiki/wiki>.
Create a virtual environment
Virtual environments make it easy to separate different projects and avoid problems with different dependencies and version requirements across components. In the terminal client enter the following where envname is the name you want to call your environment, and replace x.x with the Python version you wish to use.
conda create -n envname python=x.x anaconda
From this point forward, we shall use the singnet as our environment name.
conda create -n singnet python=3.6 anaconda
To activate or switch into your virtual environment, simply type singnet is the name you gave to your environment at creation.
source activate singnet
SingularityNET Source Code
The breeding edge SingularityNET code can be found at https://github.com/singnet/singnet
Checking out the code into your local file system,
git clone https://github.com/singnet/singnet.git
After checking out, the article assumes the code is located in singnet directory.
Install SingularityNET Agent Requirements
cd singnet/agent
pip install -r requirements.txt
There is a long list of installations.
(singnet) [bcheung@Benny-Cheung:agent] pip install -r requirements.txt
Collecting aiohttp (from -r requirements.txt (line 1))
  Downloading aiohttp-3.0.1-cp36-cp36m-macosx_10_11_x86_64.whl (371kB)
    100% |████████████████████████████████| 378kB 1.0MB/s
...
Successfully installed Jinja2-2.10 MarkupSafe-1.0 PyYAML-3.12 Pygments-2.2.0 aiohttp-3.0.1 aiohttp-cors-0.6.0 aiohttp-jinja2-0.16.0 alabaster-0.7.10 argh-0.26.2 async-timeout-2.0.0 attrs-17.4.0 babel-2.5.3 bleach-1.5.0 bson-0.5.2 cchardet-2.1.1 chardet-3.0.4 commonmark-0.5.4 coverage-4.5.1 coveralls-1.2.0 cytoolz-0.9.0 docopt-0.6.2 docutils-0.14 eth-abi-0.5.0 eth-keys-0.1.0b4 eth-tester-0.1.0b11 eth-utils-0.8.0 feedparser-5.2.1 fire-0.1.2 funcsigs-1.0.2 future-0.16.0 html5lib-0.9999999 hvac-0.4.0 idna-2.6 idna-ssl-1.0.0 imagesize-1.0.0 isodate-0.6.0 jsonrpcclient-2.5.2 jsonrpcserver-3.5.3 jsonschema-2.6.0 livereload-2.5.1 lru-dict-1.1.6 markdown-2.6.11 mock-2.0.0 multidict-4.1.0 numpy-1.14.0 packaging-16.8 pathtools-0.1.2 pbr-3.1.1 pluggy-0.6.0 port-for-0.3.1 protobuf-3.5.1 py-1.5.2 pyaml-17.12.1 pyparsing-2.2.0 pysha3-1.0.2 pytest-3.4.0 pytest-cov-2.5.1 pytz-2018.3 rdflib-4.2.2 recommonmark-0.4.0 requests-2.18.4 rlp-0.6.0 semantic-version-2.6.0 six-1.11.0 snowballstemmer-1.2.1 sphinx-1.7.0 sphinx-autobuild-0.7.1 sphinx-rtd-theme-0.2.4 sphinxcontrib-websupport-1.0.1 tensorflow-1.3.0 tensorflow-tensorboard-0.1.8 toolz-0.9.0 tornado-4.5.3 urllib3-1.22 uvloop-0.9.1 watchdog-0.8.3 web3-3.16.5 werkzeug-0.14.1 yarl-1.1.1
Life seems good that every requirements are installed without hipcup, which is a rare event in a hacking experience.
Docker Prerequisites
According to the SingularityNET official website, SingularityNET runs on Mac OS X, or any Linux which has Python 3 installed and Docker or Docker for Mac installed. Their core devs regularly develop on Mac OS X Sierra, Linux Mint Mate 18.2, and Linux Ubuntu 16.04 LTS among others.
Docker and Docker Compose are used heavily, so you must have a recent version of Docker installed to take advantage of most of the automation and to isolate yourself from the dependency hell which often results from installing software with complex dependencies directly onto your host development OS.
The current development demo runs from a dev docker container which can be launched from your favorite bash terminal using the helper tool shell script: singnet/tools.sh.
MNIST Agent Running Example
Brings up the Dev server to demonstrate many agents interaction.
tools.sh dev
The execution will show the following:
(singnet) [bcheung@Benny-Cheung:singnet] ./tools.sh dev
...
... it will take a few minutes to pull docker images for the first run
...
======== Running on http://0.0.0.0:8000 ========
(Press CTRL+C to quit)
You can view the SingularityNET docker containers, are running as illustrated from Docker’s Kitematic UI.
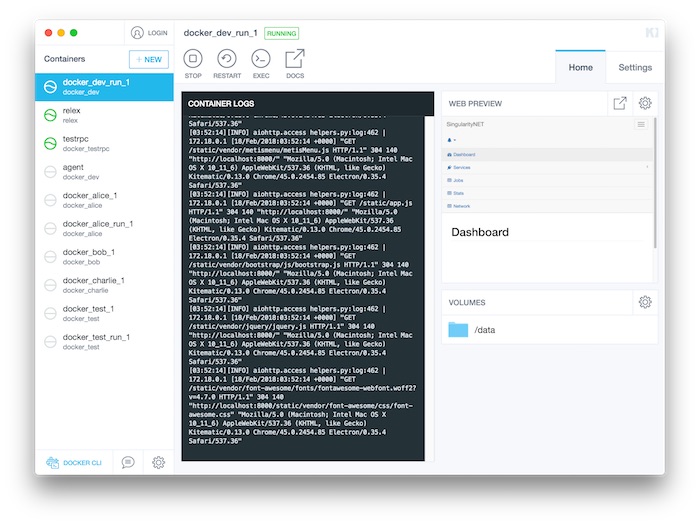
Figure. Showing the dev configuration start up multiple docker’s running containers. Their starting up is coordinated by docker compose
You can open browser at http://localhost:8000 for interactions.
Chrome Developer Inspection
To gain deeper insights, we can inspect the network traffic using Chrome Developer Tools.
You need to reload the page with the network tab open and filter by type ‘All’. This will show you a connection being made with a network calls. You can then click on the connection to show the traffic being sent back and forth to the server.
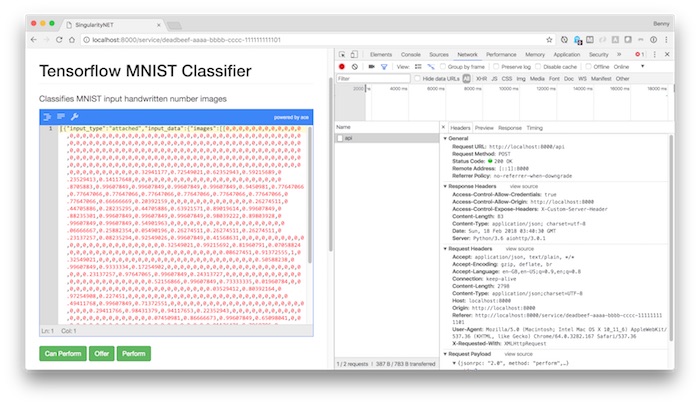
Figure. The Chrome developer tool showing the request data.
After clicking on the [Preform] button on the UI, the MNIST request is sent with the image data. The MNIST image data is a 784 (28x28) vector of pixels. The prediction response can be viewed on the UI and from the Chrome network inspection tool.
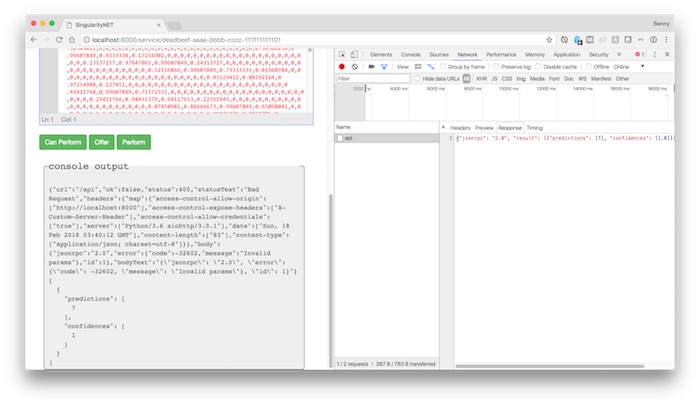
Figure. The Chrome developer tool showing the response result.
The prediction result is a 7 with the perfect confidence of 1 that it believed that a number seven has been seen.
Service Adapter Development
ServiceAdapterABC
There are three fairly common methods on the service adapter abstract base class, where you might want __init__ to initialize member variables, post_load_initialize to ensure all of the dependence services have been loaded and finally perform to execute the AI business logics to provide result from a request.

Let’s take a look at the service adapter member variables. This is important to remember listing all the dependent services here. If the requirements are met, then the variable requirements_met will set to be True. The unavailable flag defines whether the particular service is currently up or not. This available flag is used by the rest of the system to manage things automatically.
From the source code, singnet/agent/sn_agent/service_adapter.py
class ServiceAdapterABC(ABC):
    """
    This is the service adapter base, all other service adapters are based on it.
    """

    type_name = "Base"

    def __init__(self, app, service: Service, required_services: List[Service] = None) -> None:
        self.app = app
        self.service = service
        self.required_services = required_services
        self.required_service_adapters = []
        self.requirements_met = False
        self.available = False
The post_load_initialize is recursively calls all of the required service post node to initialize. If a service that relies on three or four other services, they’ll get loaded together and initialized together.
    def post_load_initialize(self, service_manager: ServiceManager):
        """
        This will hunt out all the agents required to fulfill the required ontology ids

        We should periodically call this if it is false - an agent might come alive that can support this
        :return:
        """
        if not self.required_services is None:
            for required_service in self.required_services:
                service_adapter = service_manager.get_service_adapter_for_id(required_service.node_id)
                self.required_service_adapters.append(service_adapter)
        self.requirements_met = self.has_all_requirements()

        logger.info('Service Adapter: %s initialized. Requirements met: %s', self.type_name, self.requirements_met)
        # print('Service Adapter: %s initialized. Requirements met: %s' % (self.type_name, self.requirements_met))

    def has_all_requirements(self):
        """
        Check to see if our all required services are available
        :return:
        """
        for required_service_adapter in self.required_service_adapters:
            if not required_service_adapter.has_all_requirements():
                return False
        return True
There are start and stop functions where you can take a service online and offline.
    def start(self):
        """
        If init sets up all the connections, start is here to ensure that the worker is actually alive and can process
        :return:
        """
        self.available = True

    def stop(self):
        """
        This will take the worker offline but does not need to be re-initialized
        :return:
        """
        self.available = False
The can_perform function is used to save cost on the network because you can directly ask the agent if it can perform something before you a request that is going to involve a blockchain contract and potentially some gas costs charged.
    def can_perform(self) -> bool:
        """
        This is a boolean flag indicating if this worker can do whatever work it says it can.

        An answer of no can be because it is offline, or perhaps it is too busy.
        :return:
        """
        return self.requirements_met and self.available and self.all_required_agents_can_perform()

    def all_required_agents_can_perform(self):

        if self.required_services is None:
            return True

        for required_service_adapter in self.required_service_adapters:
            if not required_service_adapter.can_perform():
                return False
        return True
The perform function is where the bulk of the work gets done. Let’s go to take a look into MNIST classifier for the details.
    @abstractmethod
    def perform(self, job: JobDescriptor):
        """
        This is where the work gets done, the worker will block here until the work itself is done
        :param args:
        :param kwargs:
        :return:
        """
        pass
TensorFlowMNIST
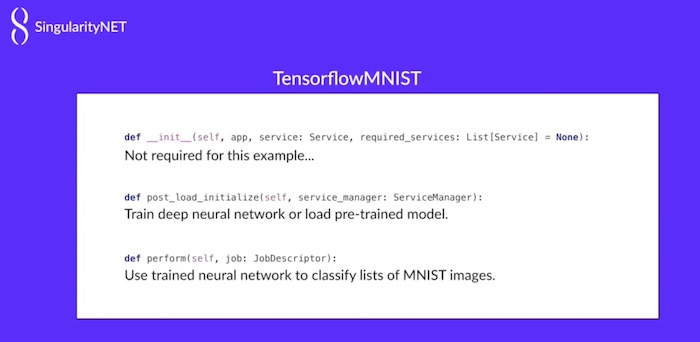
MNIST service adapter doesn’t really do anything except for checking the classifier ID in the initialization. In the post_load_initilize, we do the bulk of the training and loading of the model for the classifier.
From the source code, singnet/agent/adapters/tensorflow/mnist/__init__.py
class TensorflowMNIST(ServiceAdapterABC):
    type_name = "TensorflowMNIST"

    def __init__(self, app, service: Service, required_services: List[Service] = None):
        super().__init__(app, service, required_services)
        if not service.node_id == MNIST_CLASSIFIER_ID:
            raise RuntimeError("TensorflowMNIST cannot perform service %s", service.node_id)
The details of post_load_initilize will not be described. We need to put references to the input images and the classifier graph itself. There are few checking to see if the path exists and loading the model.
def post_load_initialize(self, service_manager: ServiceManager):

    # Train the model or load a pretrained model from the cache.

    # There are member variables for the placeholders:
    #     self.input_images - images to be classified
    #     self.keep_prob - controls the dropout during training
    #
    # As well as member variables we need to have during perform:
    #     self.classifier_graph - the tensorflow graph for the image classifier
    #     self.model_path - the location of the cached model

    # Import data
    data_directory = os.path.join(AGENT_DIRECTORY, "input_data")
    mnist_data = input_data.read_data_sets(data_directory, one_hot=True)

    # Create the model - first initialize to default
    tf.reset_default_graph()

    # Define a placeholder for the images
    self.input_images = tf.placeholder(tf.float32, [None, 784])

    # Define loss and optimizer
    input_labels = tf.placeholder(tf.float32, [None, 10])

    # Build the graph for the deep neural network classifier
    self.classifier_graph, self.keep_prob = build_classifier_graph(self.input_images)

    with tf.name_scope('loss'):
        cross_entropy = tf.nn.softmax_cross_entropy_with_logits(labels=input_labels, logits=self.classifier_graph)
    cross_entropy = tf.reduce_mean(cross_entropy)

    with tf.name_scope('adam_optimizer'):
        train_step = tf.train.AdamOptimizer(1e-4).minimize(cross_entropy)

    with tf.name_scope('accuracy'):
        correct_prediction = tf.equal(tf.argmax(self.classifier_graph, 1), tf.argmax(input_labels, 1))
        correct_prediction = tf.cast(correct_prediction, tf.float32)
    accuracy = tf.reduce_mean(correct_prediction)

    # Initialize the variables (i.e. assign their default value)
    initializer = tf.global_variables_initializer()

    # 'Saver' op to save and restore all the variables

    self.model_path = os.path.join(AGENT_DIRECTORY, "model_data", "model.ckpt")
    saver = tf.train.Saver()

    # Create our long-running Tensorflow session
    self.session = tf.Session()

    logger.debug("Checking for pre-trained model in {0}".format(self.model_path))
    if os.path.exists(self.model_path + ".index"):
        logger.debug("Restoring from pre-trained model")

        # Initialize variables
        self.session.run(initializer)

        # Restore model weights from previously saved model
        saver.restore(self.session, self.model_path)

        if CHECK_ACCURACY:
            accuracy = accuracy.eval(feed_dict={
                self.input_images: mnist_data.test.images,
                input_labels: mnist_data.test.labels,
                self.keep_prob: 1.0})
            logger.debug("test accuracy {0}".format(accuracy))

    else:
        logger.debug("No checkpoint - training model from scratch")
        self.session.run(initializer)

        # Train the model
        for i in range(20000):
            batch = mnist_data.train.next_batch(50)
            if i % 100 == 0:
                train_accuracy = accuracy.eval(feed_dict={
                    self.input_images: batch[0], input_labels: batch[1], self.keep_prob: 1.0})
                logger.debug('step {0}, training accuracy {1}'.format(i, train_accuracy))
            train_step.run(feed_dict={
                self.input_images: batch[0],
                input_labels: batch[1],
                self.keep_prob: 0.5})

        # Save model weights to disk
        save_path = saver.save(self.session, self.model_path)
        logger.debug("Model saved in file: {0}".format(save_path))

        if CHECK_ACCURACY:
            accuracy = accuracy.eval(feed_dict={
                self.input_images: mnist_data.test.images,
                input_labels: mnist_data.test.labels,
                self.keep_prob: 1.0})
            logger.debug('Test accuracy {0}'.format(accuracy))
The bulk of the work is being done in perform. We start a session to restore the model. Then we go one by one through each of the job items in the job. We take the inputs and pull them out of the data that was supplied by the request. We do some sanity checking on the types and then we run the actual classifier. Finally, we pull the confidence out so that the prediction can associate with the confidence value, sending out in the results.
def perform(self, job: JobDescriptor):

        # Process the items in the job. A single job may include a request to classify
        # many different images. Each item, in turn, may be an array of images.
        results = []
        for job_item in job:

            # Make sure the input type is one we can handle...
            input_type = job_item['input_type']
            if input_type != 'attached':
                logger.error("BAD input dict %s", str(job_item))
                raise RuntimeError("TensorflowMNIST - job item 'input_type' must be 'attached'.")

            # Get the images to classify, while making sure our job item dict is of the appropriate format.
            input_data = job_item['input_data']
            if input_data is None:
                raise RuntimeError("TensorflowMNIST - job item 'input_data' must be defined.")
            images_to_classify = input_data.get('images')
            if images_to_classify is None:
                raise RuntimeError("TensorflowMNIST - job item 'input_data' missing 'images'")

            # Get the predication and confidence for each image in this job item
            prediction = tf.argmax(self.classifier_graph, 1)
            confidence = tf.nn.softmax(self.classifier_graph)
            predictions = prediction.eval(session=self.session,
                                          feed_dict={self.input_images: images_to_classify, self.keep_prob: 1.0})
            confidences = confidence.eval(session=self.session,
                                          feed_dict={self.input_images: images_to_classify, self.keep_prob: 1.0})
            prediction_confidences = []
            for index in range(0, len(images_to_classify)):
                prediction_confidence = confidences[index][predictions[index]]
                prediction_confidences.append(float(prediction_confidence))

            logger.debug("Predictions: {0}".format(predictions))
            logger.debug("Confidences: {0}".format(prediction_confidences))

            # Add the job results to our combined results array for all job items.
            single_job_result = {
                'predictions': predictions.tolist(),
                'confidences': prediction_confidences,
            }
            results.append(single_job_result)

        return results
Service Configuration
In the singnet/agent/dev_config.yml file, we have to define the TensorflowMNIST service with a good unique identifier deadbeef-aaaa-bbbb-cccc-111111111101 and the module that is loaded adatper.tensorflow.mnist.TensorflowMNIST class.
services:

- service: deadbeef-aaaa-bbbb-cccc-000000000101
  module: examples.simple_adapter.SimpleAdapter

- service: deadbeef-aaaa-bbbb-cccc-111111111101
  module: adapters.tensorflow.mnist.TensorflowMNIST

...
Ideally, this agent integration example warms up your curiosity on SingularityNET platform, to prepare for the ultimate SingularityNET’s AI + Blockchain development.