artwork by Stable Diffusion AI
Dreambooth Training for Personal Embedding
This article will focus on training an embedding that is deeper and is able to go farther than the original Stable Diffusion software that we described in the previous post - Stable Diffusion Training for Personal Embedding, which already has a solid embedding to use to generate art. We want to train it to be even more customized, in a way that goes through larger and more complex contexts.
[2024/10/05] We can listen to this article as a Podcast Discussion, which is generated by Google’s Experimental NotebookLM. The AI hosts are both funny and insightful.
images/dreambooth-training-for-personal-embedding/Podcast_Dreambooth_Training_Personal.mp3
Training this more generalized checkpoint model will be via the use of the Dreambooth’s hypernetwork training technique. This will combine the personal image and embedding inside of it, which leads to new artwork that will be much higher quality and accurate than previous art that is just created from a basic Stable Diffusion embedding model. This is the next step and will improve the fidelity and accuracy of this art and the AI’s understanding of the given prompts.
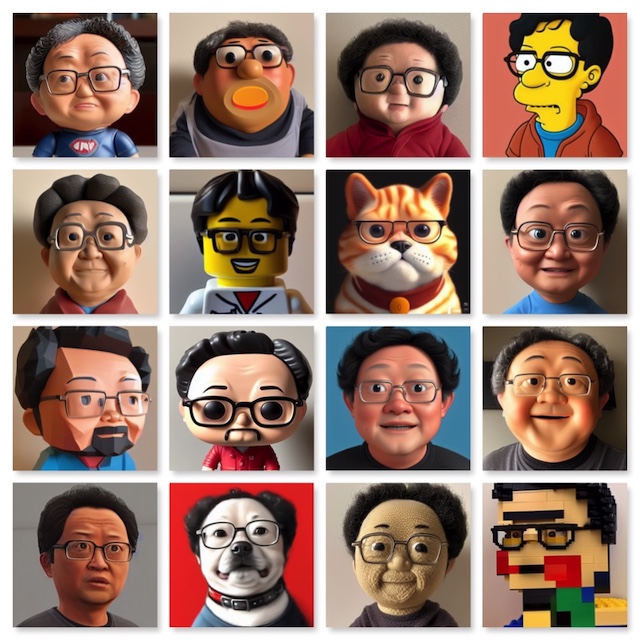
Figure. All of the creative imaginations of personal embedding into the toy and materials! From top-left, action figure, potato head, plush doll, simpson, play-doh, lego minifigure, garfield cat, disney, low-poly, funko-pop, pixar, plastic, video game, dog, yarn doll, lego blocks.
After learning how to use Dreambooth training a personal embedding, we shall also explore the topics on AI creativity and learn how to improve the generated images by img2img’s inpainting.
Using Dreambooth
Dreambooth and Stable Diffusion are capable of producing great works of art. The key differences are that Dreambooth is more targeted toward users who want to create images that look like a specific person, whereas Stable Diffusion is a more general image generation.
- With Stable Diffusion, the artist creates a prompt and then runs that prompt through the AI system to see what images are generated. This system can produce more realistic images but it might take longer to generate something that the user liked.
- With Dreambooth, the artist trains an AI system to create a particular artist’s or art style. The images produced are more predictable and quicker to generate.
Dreambooth is able to generate more precise results but can only generate specific individuals. Stable Diffusion can generate a variety of images, but the results may be less precise. For general use, Stable Diffusion is a better choice - although for precise individual use, Dreambooth is a superior choice.
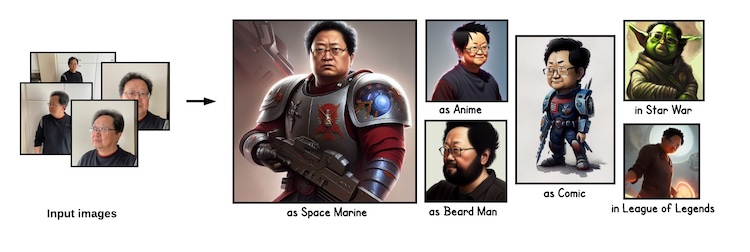
Figure. By input a set of personal images, Dreambooth training will produce a Stable Diffusion hypernetwork model that can be used in various context. See the original paper by Nataniel Ruiz, et. al., DreamBooth: Fine Tuning Text-to-Image Diffusion Models for Subject-Driven Generation
Following “Aitrepreneur” video on YouTube, detailing how to use Dreambooth training a custom Stable Diffusion model on RunPod.io or Google’s Colab environment, has explained the process step by step, and even includes the necessary code references in his video description. We see the trained custom model performing so well that motivate us to try out the technique ourselves!
How to Find the Training Hardware?
One of our biggest obstacles in training with the Dreambooth algorithm is the hardware requirement. This algorithm requires a GPU with a minimum of 24GB of VRAM. While the NVidia RTX 3090 is a great option, if you can get your hands on one, the price for a new one is a whopping $1,500 CAD. We are looking for a cheaper alternative, such as a cloud service that can offer that level of VRAM for cheaper.
After searching for suitable servers with the needed hardware, we resolved to use RunPod.io. It offers the option to rent a secure cloud-based machine which includes an RTX A5000 with 24GB of VRAM. This rental costs only $0.49 USD an hour, much more affordable than buying the NVidia RTX 3090!

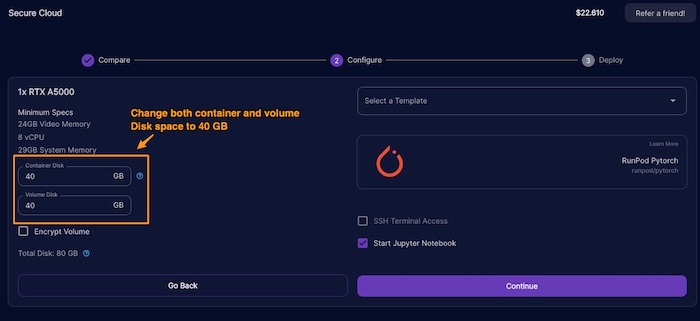
**Important Note!!! When starting the Pod, make sure there is more disk spaces are allocated. In our case, change from 20 to 40 GB for both container disk and volume disk spaces; otherwise, we may risk running out of disk space.
Which Dreambooth-Stable-Diffusion?
There are hundreds of forks on the Google’s original Dreambooth-Stable-Diffusion. However, “Aitrepreneur” video points out that the Joe Penna branch of Dreambooth-Stable-Diffusion contains special jupyter notebooks designed to help training your personal embedding. It has the notebook designed to run on Google Colab or RunPod.io. This allows us to train an hypernetwork model that will work with Stable Diffusion. The goal is to create a checkpoint model that can be used as a personal profile images based on text prompts.
Training Process
Now for the meat of the training details, training a hypernetwork is the process to generate a personalized embedding for the Stable Diffusion software; that creates an embedding that can be used to generate images in your own style. This will take time for Stable Diffusion to train, and once complete you will get a custom embedding. You can train with as many unique objects and styles as you want.
Training with Dreambooth only requires a limited amount of training data. For example: 20 images is enough to create an embedding, and the data doesn’t have to be high-quality. It will still work fine with poorly lit or incomplete images. The training time is typically around an hour on an RTX3090 with 24G GPU RAM.
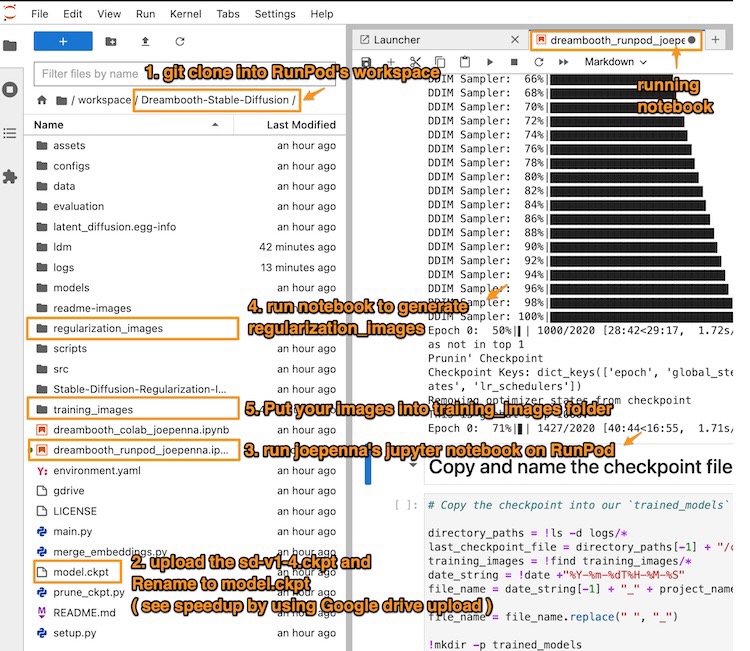
Figure. Shows the reference to the steps in order to successfully running the training notebook on RunPod.io. For each training step description, we can come back to this picture for reference.
Jupyter notebook is a web-based, code-executing program which can be used to write and run code interactively. This program makes it possible to run Python scripts and other programming languages in a browser window. There are many useful modules available that can be used to perform various tasks, such as creating graphical plots or visualizations.
1. git clone into RunPod’s workspace
Inside a new Jupyter notebook, execute this git command to clone the code repository into the pod’s workspace.
To reiterate, Joe Penna branch of Dreambooth-Stable-Diffusion contains Jupyter notebooks designed to help train your personal embedding. It can be run on RunPod.io.
!git clone https://github.com/JoePenna/Dreambooth-Stable-Diffusion/
2. upload the sd-v1-4.ckpt to the pod’s workspace
To speedup the Stable Diffusion’s model upload speed (too slow to directly use RunPod upload). We recommend to use the Google Drive. In the notebook, do this install
%pip install gdown
Then use gdown to download the Google Drive’s link to the file. To find the link to your hugging-face checkpoint file, you need to find the shared Google Drive’s link ID.
!gdown https://drive.google.com/uc?id=<link_to_file_location_id>
3. Run notebook on pod
After cloning, we shall shutdown the download notebook, and switch to use checkout Dreambooth-Stable_Diffusion in the pod’s workspace,
- use the
Dreambooth_runpod_joepenna.ipynbnotebook.
**Important Note!!! as of [2023/01/09], the JeoPenna’s RunPod.io Jupyter notebook is missing some Python module to run successfully. Please add the following into the
BUILD DEVcell that doingpip installwith the following missing modules:
!pip install taming-transformers-rom1504
!pip install clip
4. Run notebook cell to generate regularization images
Instead of generating a set of regularization images, we can skip over to the notebook cell to run “Download pre-generated regularization images”.
Regularization images are a type of data that helps neural networks detect patterns and improve their accuracy. Regularization images can be created by taking a set of data points (such as pixel or vector images) and randomly modifying them to add noise. These images are then used during training to prevent overfitting, which is where a neural network starts to see patterns that aren’t there in the data. Overfitting can cause a neural network to become excessively accurate on a specific training set, without being able to use its knowledge to make accurate predictions on new data.
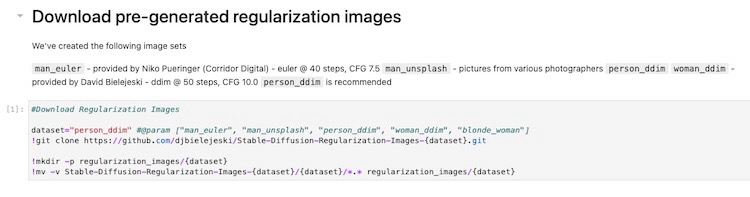
Figure. showing the notebook cell that download the regularization images for the given class.
After running the notebook cell, it will fetch 1500 of these regularization images and put them into the ./regularization_images folder for the later training step.
5. Put your images into training images folder
Important Note!!! The training expected PNG images, make sure the training images are in PNG format!
To train your embedding, you will need a set of images. The images should be in PNG format, and the dimensions should be 512 x 512 pixels. You should also include a text description for the images so that the model can learn from them. The images should be clear and well-lit, and there should be enough variety in the images to give the model enough information to work with.
The notebooks cell requires us to put the each file as a URL location. But actually after the cell download the images from the URL locations. These images are store into ./training_images folder. In another word, we can directly put the set of training images into the ./training_images folder, without going through the hoops uploading to a cloud service.
We don’t need to run the following notebook cell. It is using a list of urls, which are manually entered, to download the images from the web.
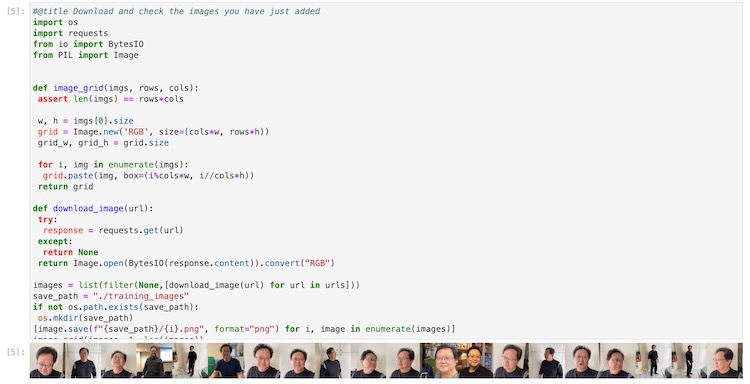
Figure. the displayed notebook cell that is going through the urls list and download the images into the “./training_images” folder. Once we understsand this cell, we can directly put the training images into the “./training_image” folder instead. This is nice to see the images that are going to be used in training as the cell execution output.
6. Training the model
Important Note!!! This is needed by Dreambooth, make sure to rename the
sd-v1-4.ckptfile tomodel.ckpt
After all the setup configuration, uploading the regularization and training images are in place. We are almost ready to start the training after the following edits to the notebook’s training cell,
- define a project name, e.g.
bennycheung, which will be used in the checkpoint model’s filename. - define a unique token, e.g.
bennycheung, and a class wordperson. This is important to remember that the combination of “token class”, e.g. “bennycheung person”, will be used to trigger the custom embedding in the hypernetwork. - define the number of
max_training_steps, we should have 100 steps per training image, in this case, we are using 30 training images - that’s mean we need 3000 steps.
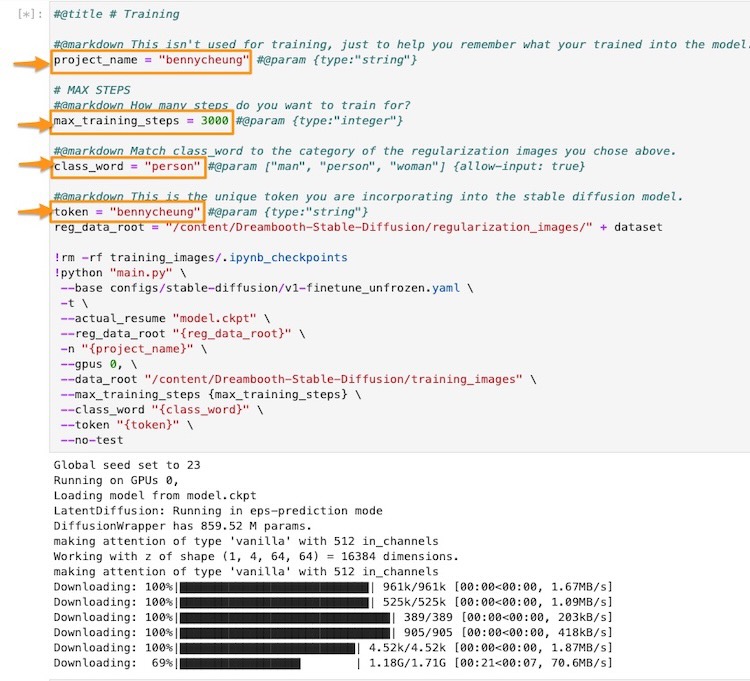
Figure. Illustrated the notebook’s training cell. We need to make the modifications to the highlighted parameters, that is described in this section.
Then, take ~80 mins to train 3000 steps.
When the training completed, run the cell to copy the final checkpoint model into ./trained_models folder. Then, you can download the final checkpoint model to be used. The file is named with all the details of the training,
2022-11-10T00-46-29_bennycheung_30_training_images_3000_max_training_steps_bennycheung_token_person_class_word.ckpt
We recommend to rename it to a shorter name, for example, bennycheung-v1-3000.ckpt.
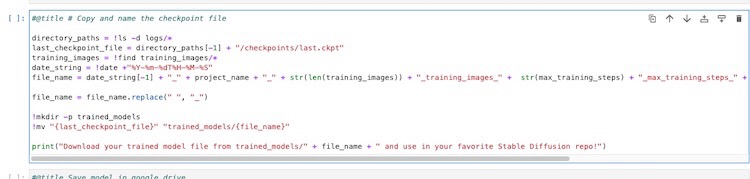
Figure. Illustrated the notebook’s cell that save the last checkpoint model into the “trained_models” folder.
Model Usage
The way to use your embedding is by the pattern pairs of <token> <class>, for example - the illustrated trained model is bennycheung person and not just bennycheung.
bennycheung person as a Warhammer 40K Space Marine, movie still,
  cinematic lighting, dramatic, octane render, long lens,
  shallow depth of field, 8k, hyper detailed
bennycheung personwith this combination, it will trigger the embedding to influence the image results.
Here are a few example results, a very accurate, high fidelity embedding into the generated images according to the text prompt.
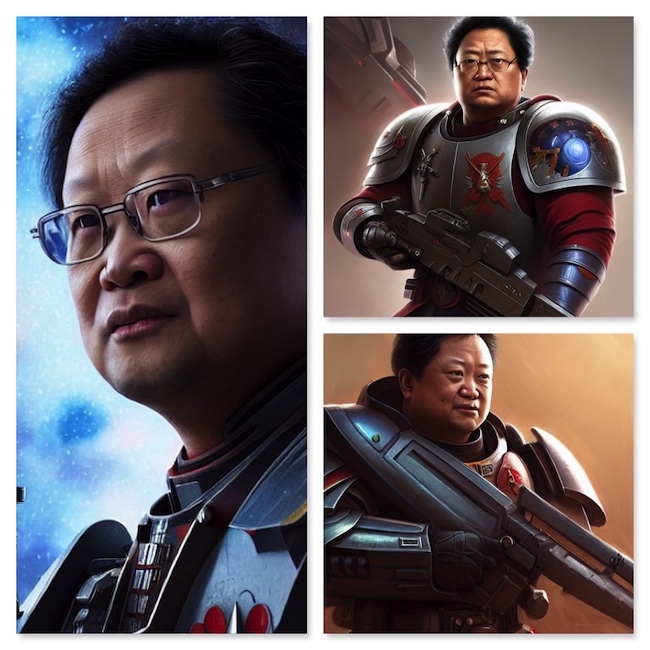
Figure. Dream of visualizing oneself as Warhammer 40k’s Astartes finally comes true!
Many people may think that the most important part of AI art is the AI itself. But, the quality of the artwork generated can also depends greatly on the text prompt given to the AI, as this text prompt will influence the AI’s choices heavily when creating new art. OpenArts is one of the leading experts in this field, and they have released an amazing PDF book on Stable Diffusion Prompt Book explaining how to improve text prompt accuracy. This will improve your text prompt accuracy when creating AI art, which leads to better and more accurate art!
On AI Creativity
In regards to the debate if an AI is actually being creative or not, an individual may argue that it is simply combining existing ideas and art to create something new. This is an understandable claim. However, the same could be said in regards to human creativity. There is a difference between copying and creating something new, as human artists themselves learn from other art styles to create something unique. Does this mean human creativity isn’t real?
Arguably, AI is not simply recreating existing works but exploring new possibilities and art styles. In the specific case of the Stable Diffusion, it creates new art and styles that are different than that which would be made by a human, in a unique and interesting way. The technology is able to make new connections between existing knowledge to find more variations and effective ways of combining, which then allows for more unique art styles. It can also look for unusual approaches and strategies in order to create more interesting and surprising art, in ways in which humans are limited by.
With a more positive outlook, the advancements in AI are progressing very quickly. The neural networks which are becoming bigger and more efficient, with larger neural links, are able to make connections between different ideas and memories. This level of simulation is what neural networks are trying to recreate. As this capability is further simulated, it allows an AI to be creative as it can make more complex connections between different ideas, memories, and art styles, as well as create new ideas from existing ones.
Gallery of Custom Model Artworks
The following gallery showcases the creative variations produced by the Stable Diffusion. The level of depth and creativity is apparent, and you can appreciate how the neural links have been created to create new art styles. This AI artist is indeed very talented to be able to generate so many variations from the provided prompt!
bennycheung person, anime, warhammer 40k, space marine, meditative look,
  trending on artstation, watercolor pen by brad mesina, greg rutkowski
- using various Sampler and CFG scale, Seed: 769704955
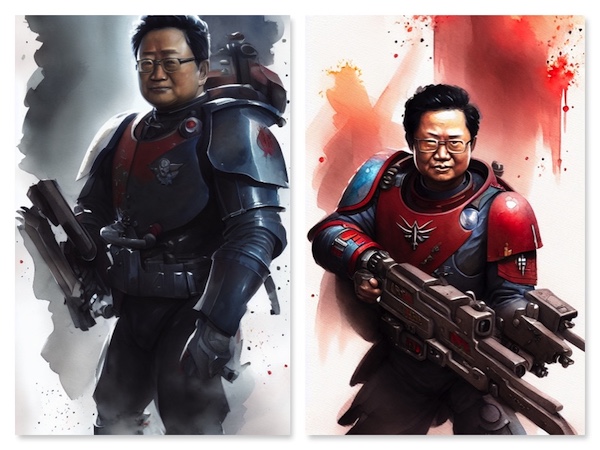
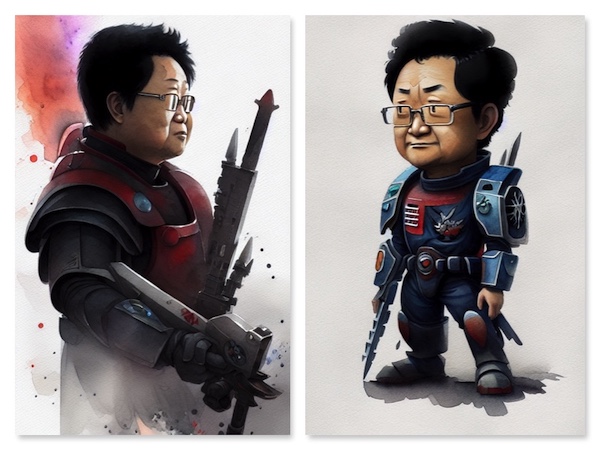
Figure. These AI creative works illustrate the numerous varieties and styles created through the custom trained model. Stable Diffusion is able to produce a variety of images from a singular prompt, each work being unique in style and detail.
This AI has truly tapped into creativity. Even though the artwork shown has been created with the use of AI, it is still a product of creativity. There are many things that the AI has been programmed with, but it is the neural net which can combine them and create an original product or concept. It has the ability to use both new and existing memories to create art that is truly beautiful.
On Image Generation Fixes
Fixing the Eyes
Stable Diffusion is bad at generating the eyes accurately. Fortunately, we can use the built-in img2img Inpainting feature to correct the weird eyes in the generated image.
For example, my eyeballs are out of proportion and looks wried. We shall show how to fix it.
We can send the image into img2img (Image to Image) tab’s Inpaint subtab feature.
- We should maintain a similar prompt from the origin image
- The image size should match exactly the same as the original image
- use the pen tool (which can be resize) to paint out (black out) the part of the image that we want to regenerate the image. In this case, we want to paint out the eyes that we want to
Inpaintto replace those pixels. - We usually generate a few more images, depends on luck (pure random chance), the algorithm will produce the perfect eyes that we like. Then, we can keep that image. For the other pixels, which are not paint out, they shall remain the same - no pixels are regenerated.
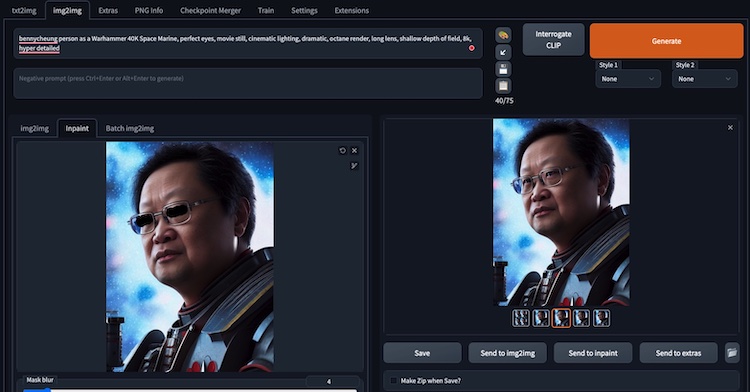
The eyes are improved to a satisfactory level. That’s what we choose.
The images showing the before the after the Inpaint eyes fixing operation.

Figure. showing the eyes are “inpainted” to generate better balanced and realistic eyes of myself, I know.
Fixing the Hands
Another weakness of Stable Diffusion image generation, depending on luck, the hands will be messed up too. We can apply the similar Inpaint technique to regenerate hands, with the prompt “correct hands” to emphasize to the algorithm paying attention to the “correct hands” generation.
Concluding Remarks
We are currently witnessing a major breakthrough in art and technology, an AI is now able to understand and mimic human art, as well as create their own artistic styles! This is the best of both worlds, as human creativity can be fused with machine accuracy to produce truly beautiful works of art. This is all done with the use of using the Dreambooth technique to train a hypernetwork to make the best artistic styles with the personal embedding.
For this article, the total training cost on RunPod.io is - $0.608, which a great deal for all the fun!!
References
- Aitrepreneur, Dreambooth: Train Stable Diffusion With Your Images Using Google’s AI!, Youtube video, Oct 2022
- Great tutorial, step-by-step walkthrough of the training process using RunPod.io with Dreambooth-Stable-Diffusion repo Jupyter notebook.
Formal Publications
- Robin Rombach, et. al., High-Resolution Image Synthesis with Latent Diffusion Models, arXiv:2112.10752v2 cs.CV, 13 Apr 2022
- Nataniel Ruiz, et. al., DreamBooth: Fine Tuning Text-to-Image Diffusion Models for Subject-Driven Generation, arXiv:2208.12242v1 cs.CV, 25 Aug 2022, Google Research
- Online DreamBooth Blog Post
Other Related Blog Post
- Suraj Patil, Training Stable Diffusion with Dreambooth, Weights & Biases, Oct 2022.
- An analysis of their experiments to train Stable Diffusion with Dreambooth, great details and technical explanation of the training parameters.
- OpenArts, Stable Diffusion Prompt Book, Oct 2022
- Download PDF
- OpenArts newly released Stable Diffusion prompt book where they put together tips and tricks of prompting.
Supporting Tools
- Play with Lexica to see many example prompts that generating beautiful Stable Diffusion artworks.
- Use Birme to resize images collection
- The training process expects the images you provide are of dimension 512x512. If your images are of a different size, you can use this site to adjust and resize the images so they match the proper requirements for the neural network to read.